
Weaving Magic: The Basics of Pie Lattice
When it comes to baking a pie, there’s something truly magical about creating a perfectly woven lattice top. Not only does it add a beautiful touch to your pie, but it also allows the filling to peek through, giving it an extra special look. If you’ve always wanted to learn how to master the art of pie lattice, you’ve come to the right place. In this step-by-step guide, we’ll take you through the basics of creating a perfectly woven pie lattice.
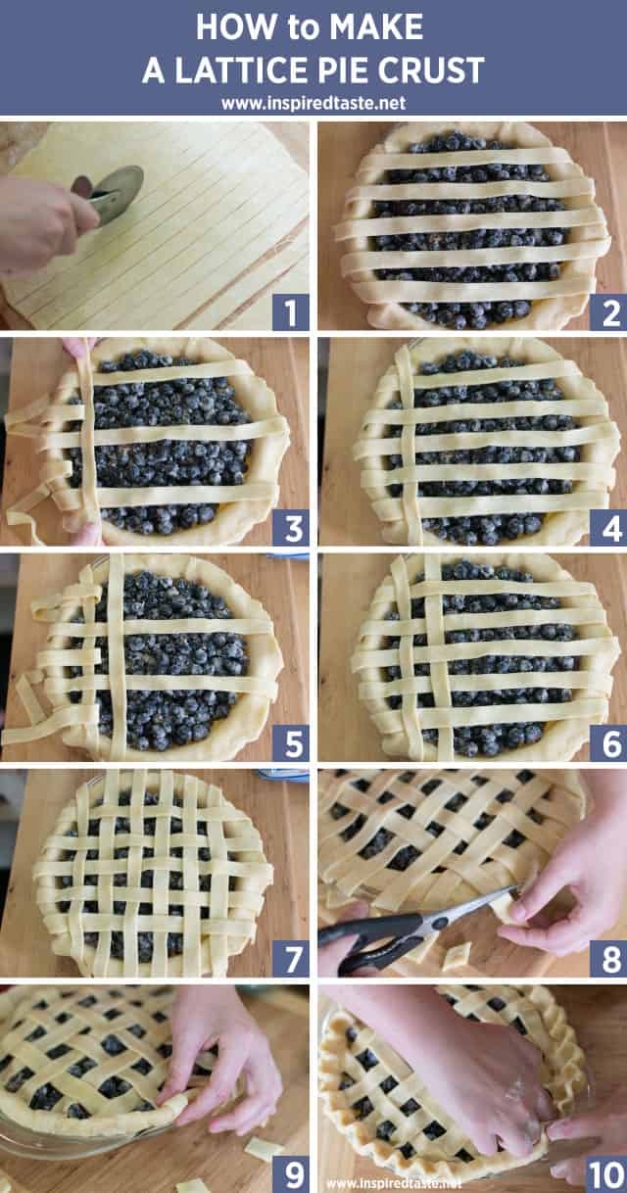

Image Source: houseofnasheats.com
The first step in weaving magic with your pie lattice is to prepare your pie dough. Whether you’re using a store-bought pie crust or making your own from scratch, make sure the dough is chilled before you begin. This will make it easier to work with and will help ensure that your lattice stays intact during baking.
Next, roll out your pie dough into a large circle, about 1/8 inch thick. Use a sharp knife or pastry cutter to cut the dough into strips, about 1/2 inch wide. You can make the strips as long or short as you like, depending on the size of your pie.
Image Source: inspiredtaste.net
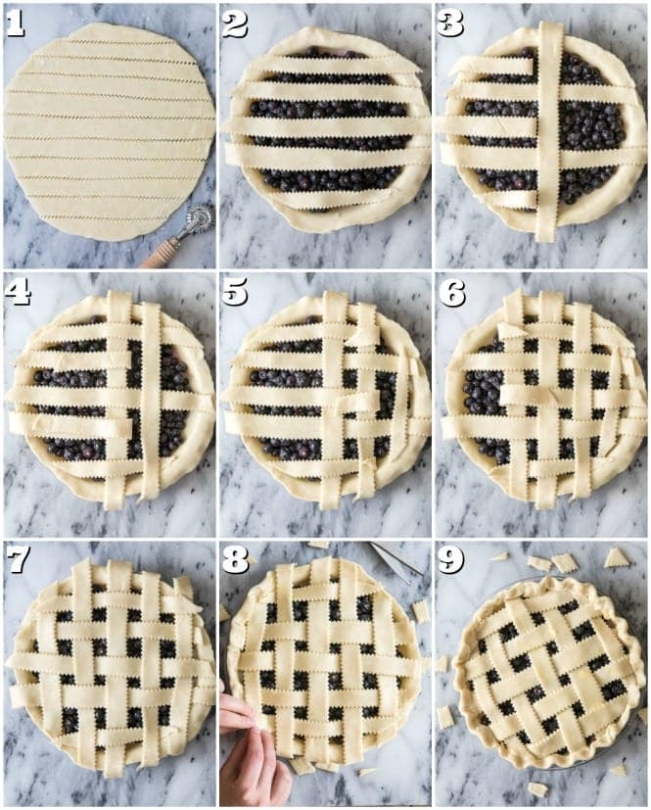
Once you have your dough strips ready, it’s time to start weaving your lattice. Begin by laying half of the strips across the top of your pie filling, spacing them evenly apart. You can lay them parallel to each other or create a crisscross pattern for a more intricate design.
After laying the first set of strips, it’s time to weave the second set in between. Lift every other strip from the first set and fold them back halfway. Lay a strip of dough perpendicular to the folded strips, then unfold the strips over the new strip. Repeat this process, alternating which strips you fold back each time, until you’ve woven a lattice pattern over the entire pie.
Image Source: sugarspunrun.com
As you weave your lattice, gently press the ends of the strips into the edge of the pie crust to seal them in place. Trim any excess dough with a sharp knife and crimp the edges of the pie to create a decorative border.
Once your lattice is woven and your pie is beautifully decorated, it’s time to bake it to perfection. Follow the Recipes-ideas/’>Recipe instructions for baking temperature and time, and be sure to keep an eye on your pie as it bakes. The lattice should turn a golden brown color and the filling should be bubbling when it’s done.
When your pie is finished baking, remove it from the oven and let it cool before serving. Whether you’re enjoying it on its own or with a scoop of ice cream, savor every bite of your perfectly woven pie lattice creation.
So there you have it – the basics of creating a magical pie lattice. With a little practice and a lot of patience, you can master the art of weaving a beautiful lattice top for your pies. Get creative with different lattice patterns and designs, and most importantly, have fun with it. Happy baking!
Pie-fection: Tips for Woven Pie Success
Ah, the delightful art of pie making! There’s something truly magical about creating a perfectly woven lattice top for your pie. It not only looks beautiful but adds a deliciously crunchy texture to your favorite dessert. If you’re looking to master the art of pie lattice, here are some tips to help you achieve pie-fection every time.
First and foremost, it’s essential to start with a well-chilled pie dough. Cold dough is much easier to work with and will help prevent it from becoming too soft and sticky. Make sure to refrigerate your dough for at least 30 minutes before rolling it out for your lattice top.
When rolling out your dough, be sure to flour your work surface and rolling pin generously. This will prevent the dough from sticking and tearing as you roll it out. Roll the dough into a circle that is slightly larger than the diameter of your pie dish to ensure that it will cover the entire top of the pie.
Once your dough is rolled out, it’s time to create the lattice top. Using a sharp knife or pastry wheel, cut the dough into strips of equal size. You can make them as wide or narrow as you like, depending on the look you’re going for. For a classic lattice top, aim for strips that are around half an inch wide.
Now comes the fun part – weaving the lattice! Start by laying half of the strips across the top of the pie, evenly spaced apart. Then, fold back every other strip halfway and lay a new strip perpendicular to them. Unfold the folded strips over the new one and fold back the remaining strips. Continue this process until you have woven a beautiful lattice top for your pie.
To ensure that your lattice stays in place during baking, it’s a good idea to brush the edges of the pie crust with water before laying down the lattice strips. This will help the strips adhere to the crust and prevent them from shifting as the pie bakes.
Another tip for achieving pie-fection is to brush the top of the lattice with an egg wash before baking. This will give your pie a beautiful golden brown color and a shiny finish. You can also sprinkle the top with a bit of sugar for an extra touch of sweetness and crunch.
As your pie bakes, keep an eye on it to ensure that the crust is cooking evenly. If you notice that the edges of the lattice are browning too quickly, you can cover them with strips of aluminum foil to prevent them from burning. This will allow the rest of the pie to continue baking to perfection.
Once your pie is out of the oven and has had a chance to cool, it’s time to slice into it and savor your masterpiece. Whether you’re enjoying a classic apple pie or a decadent cherry pie, the lattice top is sure to impress your friends and family.
So there you have it – a few tips for achieving pie-fection with your woven pie. With a little practice and patience, you’ll be weaving beautiful lattice tops for all of your favorite pies in no time. Happy baking!
Get Creative: Designing Your Pie’s Lattice Top
When it comes to baking the perfect pie, the lattice top is often the star of the show. Not only does it add a beautiful touch to your dessert, but it also allows for the delicious filling to peek through, enticing your taste buds before you even take a bite. While creating a lattice top may seem daunting at first, with a little practice and creativity, you can master the art of pie lattice and impress your friends and family with your baking skills.
One of the best parts about designing your pie’s lattice top is that the possibilities are endless. You can create intricate patterns, experiment with different widths of strips, or even add decorative touches like braids or twists. The key is to let your imagination run wild and have fun with the process.
To get started, begin by rolling out your pie dough and cutting it into strips. You can use a sharp knife, a pastry wheel, or even a pizza cutter to create uniform strips of dough. Remember to keep your strips chilled in the refrigerator while you work to prevent them from becoming too soft and difficult to handle.
Once you have your strips ready, it’s time to start weaving your lattice. Begin by laying half of the strips vertically across the top of your pie filling, leaving space between each strip. Then, fold back every other strip and lay a horizontal strip across the center of the pie. Unfold the folded strips over the horizontal strip and fold back the alternate strips. Continue this weaving pattern until you have covered the entire pie.
As you weave your lattice, don’t be afraid to get creative with the design. You can experiment with different patterns, like a simple over-under weave or a more intricate basket weave. You can also play around with the width of your strips, alternating between thick and thin strips for added visual interest.
If you’re feeling adventurous, you can even add decorative elements to your lattice top. Try braiding strips of dough together before weaving them onto your pie, or create twisted ropes of dough to add a unique touch. You can also use cookie cutters to cut out shapes from the dough and place them on top of your lattice for a fun and whimsical look.
Another way to add flair to your lattice top is to mix and match different types of dough. You can use a traditional pie dough for the base of your lattice and a flavored dough, like cinnamon or chocolate, for the strips. This will not only add a pop of color to your pie but also infuse it with extra flavor.
Once you have finished weaving your lattice top, it’s time to bake your pie to perfection. Remember to brush the top of your pie with an egg wash for a golden, shiny finish. You can also sprinkle some sugar on top for a sweet crunch.
As your pie bakes in the oven, the lattice top will crisp up and turn a beautiful golden brown, creating a stunning visual contrast to the bubbling filling underneath. When your pie is done baking, be sure to let it cool slightly before slicing into it. This will help the filling set and prevent it from oozing out when you cut into the pie.
When you finally serve your perfectly woven pie to your guests, be prepared for the oohs and aahs that are sure to follow. Your creative lattice design will not only be a feast for the eyes but also a delicious treat for the taste buds. So go ahead, get creative, and design your pie’s lattice top with flair and imagination. Mastering the art of pie lattice has never been more fun!
Weave Your Way to Pie Perfection!
Are you ready to take your pie-making skills to the next level? If so, it’s time to master the art of pie lattice! Creating a beautifully woven pie crust not only adds a decorative touch to your dessert but also allows for better airflow while baking, resulting in a perfectly golden and flaky crust.
To weave your way to pie perfection, start by preparing your favorite pie filling. Whether it’s a classic apple pie, a decadent cherry pie, or a savory chicken pot pie, the lattice crust will elevate your creation to new heights.
Once your filling is ready, it’s time to prepare your pie crust. Whether you prefer a Homemade crust or a store-bought option, make sure it is chilled and ready to roll out. Roll out your bottom crust and place it in your pie dish, then fill it with your delicious pie filling.
Now comes the fun part – creating the lattice top for your pie! Start by rolling out the second half of your pie crust and cutting it into strips. You can use a knife, a pizza cutter, or even a pastry wheel to create uniform strips for weaving.
To create a classic lattice top, lay half of the strips across the pie filling in one direction, leaving space between each strip. Then, fold back every other strip and lay a new strip perpendicular to the first set. Continue weaving the strips over and under until you have covered the entire pie.
Once your lattice top is complete, trim any excess crust hanging over the edge of the pie dish and crimp the edges to seal in the filling. For an extra touch of elegance, you can brush the top of the pie with an egg wash before baking to achieve a beautiful golden finish.
As your pie bakes, the lattice crust will allow steam to escape, preventing a soggy bottom crust and ensuring that your pie bakes evenly. The end result will be a pie that is not only visually stunning but also incredibly delicious.
So, why not take your pie-making skills to the next level and weave your way to pie perfection? With a beautifully woven lattice crust, your pies will be the talk of the town and the highlight of any dessert spread. Embrace the art of pie lattice and watch as your creations become works of art that are as delightful to look at as they are to eat.
Lattice Love: A Pie-Making Masterclass
Welcome to the ultimate guide on mastering the art of pie lattice! If you’re a pie enthusiast or just looking to up your baking game, creating a perfectly woven lattice on top of your pie can take your dessert to the next level. In this masterclass, we will walk you through the step-by-step process of creating a beautifully woven lattice that will impress your friends and family.
The first step to achieving pie perfection is to start with a well-chilled pie crust. Whether you’re using a store-bought crust or making your own from scratch, make sure it’s nice and cold before you begin the weaving process. This will help the dough hold its shape and prevent it from becoming too soft and sticky.
Once your pie crust is ready to go, roll it out on a floured surface until it’s about 1/8 inch thick. Using a sharp knife or pastry cutter, cut the dough into strips that are about 1/2 inch wide. These strips will form the lattice on top of your pie, so make sure they are even in size for a uniform look.
Now, it’s time to start weaving your lattice. Begin by laying half of the strips horizontally across the top of your pie filling, leaving about 1/2 inch of space between each strip. Next, fold back every other strip halfway and lay a strip of dough vertically across the unfolded strips. Unfold the horizontal strips over the vertical strip, then fold back the strips that were not folded back the first time. Lay another strip of dough vertically next to the first strip, then repeat the process until the lattice is complete.
As you weave your lattice, remember to gently press the ends of each strip into the edge of the crust to seal them in place. This will help prevent the strips from shifting or moving during baking. Once your lattice is complete, trim any excess dough from the edges of the pie and crimp the edges with a fork or your fingers for a decorative finish.
Before baking your pie, brush the lattice with an egg wash to give it a shiny, golden finish. This will also help the lattice hold its shape and prevent it from shrinking too much during baking. Now, your pie is ready to go into the oven and bake until the crust is golden brown and the filling is bubbly and delicious.
Congratulations, you’ve just mastered the art of pie lattice! With a little practice and patience, you can create beautifully woven pies that will be the star of any dessert table. So go ahead, get lattice-y and impress your friends and family with your pie-making skills. Happy baking!
Step-by-Step Guide to Woven Wonder
Ah, the art of pie lattice. It’s a skill that can take your pies from ordinary to extraordinary in a heartbeat. There’s something so beautiful and satisfying about a perfectly woven lattice crust atop a delicious pie filling. If you’ve always wanted to master the art of pie lattice, you’re in the right place.
Creating a stunning lattice crust may seem daunting at first, but fear not! With a little practice and patience, you’ll be weaving like a pro in no time. So grab your rolling pin, dust off your apron, and let’s dive into the wonderful world of woven pies.
First things first, you’ll need to start with a well-chilled pie dough. Whether you’re using store-bought or Homemade dough, it’s crucial that it’s cold to prevent it from becoming too soft and sticky. Once your dough is ready to go, roll it out on a floured surface into a circle that’s slightly larger than your pie dish.
Next, carefully transfer the dough to your pie dish, pressing it gently into the corners and trimming any excess overhang. Now comes the fun part – creating the lattice top.
To begin weaving your lattice, cut the remaining dough into strips using a sharp knife or pastry wheel. You can make the strips as thick or thin as you like, depending on your personal preference.
Lay half of the strips across the top of the pie filling in one direction, leaving a small space between each strip. Now, fold back every other strip halfway and lay a new strip perpendicular to the folded strips. Unfold the folded strips over the new strip, then fold back the other strips. Continue this process, weaving the strips over and under each other, until the entire pie is covered in a beautiful lattice pattern.
As you weave, be sure to gently press the edges of the strips into the bottom crust to seal them together. This will help prevent any gaps from forming during baking.
Once your lattice is complete, trim any excess dough from the edges of the pie dish and crimp the edges to create a decorative finish. You can also brush the top of the lattice with an egg wash for a shiny, golden finish.
Now it’s time to bake your masterpiece! Follow the Recipes-ideas/’>Recipe instructions for baking time and temperature, and keep a close eye on your pie as it bakes. The aroma of a freshly baked pie will fill your kitchen, and you’ll be eagerly anticipating the moment when you can finally dig in.
When your pie is done baking, remove it from the oven and let it cool slightly before slicing. The moment of truth has arrived – it’s time to enjoy your beautifully woven pie.
So there you have it, a step-by-step guide to creating a perfectly woven lattice crust for your pies. With a little practice and a lot of love, you’ll be weaving wonders in no time. Happy baking!
Perfect Pies Await: Let’s Get Lattice-y!
As the saying goes, Life is short, eat dessert first. And what better way to indulge in a sweet treat than with a perfectly woven pie lattice? Whether you’re an experienced baker or a novice in the kitchen, mastering the art of pie lattice can elevate your baking game to new heights. So, let’s roll up our sleeves, dust off our rolling pins, and get ready to create beautifully woven pies that will impress both friends and family.
The key to a successful pie lattice lies in patience and precision. It may seem daunting at first, but with a bit of practice and the right technique, you’ll be weaving like a pro in no time. So, grab your favorite pie Recipes-ideas/’>Recipe, preheat your oven, and let’s dive into the world of lattice-y goodness.
To start, make sure you have all the necessary tools and ingredients on hand. You’ll need a well-chilled pie dough, a rolling pin, a pastry cutter or sharp knife, and a ruler. For the filling, choose your favorite fruits or savory ingredients, and don’t forget a touch of sugar and spice to enhance the flavor.
Once you have everything you need, it’s time to roll out your pie dough. Divide the dough in half and roll each half into a circle slightly larger than your pie dish. Gently transfer one circle of dough to the bottom of the dish, leaving any excess hanging over the edges. This will serve as the base for your lattice top.
Next, it’s time to create the lattice. Using a sharp knife or pastry cutter, slice the second circle of dough into even strips, about half an inch wide. You can make them thicker or thinner depending on your preference, but be sure to keep them consistent for a uniform lattice.
Now comes the fun part – weaving the lattice. Start by laying half of the strips vertically across the pie, spacing them evenly apart. Fold back every other strip halfway and lay a horizontal strip across the center of the pie. Unfold the strips over the horizontal one and fold back the remaining vertical strips. Repeat this process, weaving the strips over and under, until you’ve covered the entire pie.
As you weave, be gentle with the dough and take your time to ensure a tight and tidy lattice. If any strips break or tear, don’t worry – simply press them back together and continue weaving. Remember, imperfections add character to Homemade pies, so embrace the quirks and quirks of your lattice.
Once you’ve completed the lattice, trim any excess dough hanging over the edges of the pie dish. Use a fork or your fingers to crimp the edges, sealing the lattice to the base crust. This will help prevent the filling from bubbling over during baking and create a beautifully finished look.
Before baking, give your lattice a final touch by brushing it with an egg wash or milk for a golden, shiny finish. Sprinkle a bit of sugar on top for added sweetness and crunch. Then, pop your pie into the oven and let it bake until the crust is golden brown and the filling is bubbling.
When the timer dings and the aroma of freshly baked pie fills your kitchen, it’s time to pull out your masterpiece. Let the pie cool for a bit before slicing into it, allowing the filling to set and the flavors to meld together. Serve your lattice-y creation with a scoop of ice cream or a dollop of whipped cream for the ultimate indulgence.
In the end, mastering the art of pie lattice is all about practice, patience, and a sprinkle of creativity. So, don’t be afraid to experiment with different patterns, flavors, and fillings to make each pie uniquely yours. With each lattice you weave, you’ll hone your skills and create delicious desserts that will delight and impress everyone lucky enough to enjoy a slice. So, roll up your sleeves, get lattice-y, and let your baking skills shine!
how to lattice a pie


