
Flawless Fluting: Pie Crust Perfection
Fluting a pie crust is like adding the cherry on top of a delicious dessert masterpiece. It not only enhances the visual appeal of your pie but also helps seal in the filling, ensuring a perfectly baked treat. To achieve pie crust perfection, it’s essential to master the art of fluting like a pro. With the right techniques and tips, you can create picture-perfect pies that will impress your friends and family. Here are some expert tips to help you become a pie crust Picasso:
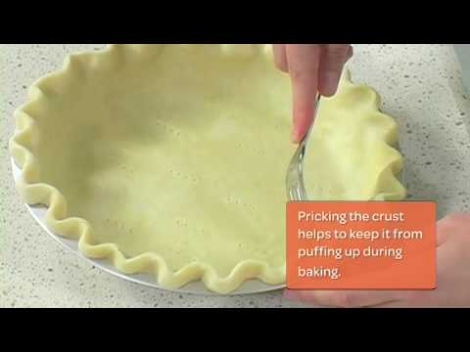
Image Source: ytimg.com
1. Keep it Cold: One of the most crucial tips for fluting a pie crust like a pro is to keep your dough cold. Cold dough is easier to work with and will result in a flakier crust. Before you start fluting, make sure your dough is well-chilled. You can even pop it in the freezer for a few minutes to firm it up.
2. Use the Right Tools: To achieve flawless fluting, you’ll need the right tools. Invest in a good quality fluted pastry wheel or a sharp knife to create clean and precise edges. You can also use a fork or your fingers to create decorative patterns on the crust.
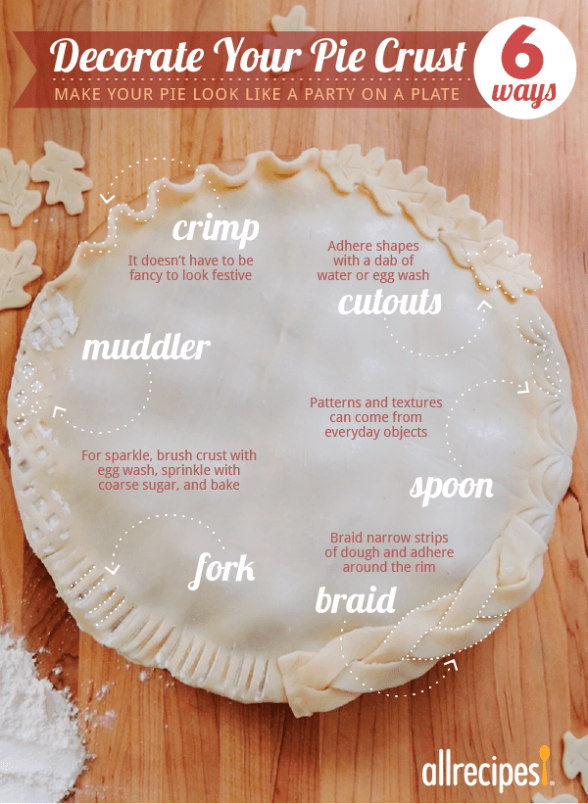
Image Source: allrecipes.com
3. Trim the Excess: Before you start fluting, make sure to trim any excess dough hanging over the edge of the pie dish. This will make it easier to create neat and even flutes. Use a sharp knife to trim the excess dough, being careful not to cut into the crust itself.
4. Crimp with Confidence: When it comes to fluting a pie crust, confidence is key. Don’t be hesitant or second-guess yourself. Use firm and deliberate motions to create beautiful fluted edges. Remember, practice makes perfect, so don’t be afraid to experiment and find a crimping style that works best for you.
5. Experiment with Different Styles: There are countless ways to flute a pie crust, so don’t be afraid to get creative. Try different patterns and designs to see what works best for your pie. You can create simple flutes, braided edges, or even intricate lattice designs. The sky’s the limit when it comes to fluting!
6. Brush with Egg Wash: For a professional-looking finish, brush your fluted pie crust with an egg wash before baking. This will give your pie a golden-brown color and a shiny finish. To make an egg wash, simply beat an egg with a splash of water and brush it over the crust before baking.
7. Chill Before Baking: Once you’ve fluted your pie crust, it’s important to chill it again before baking. This will help the crust hold its shape and prevent it from shrinking in the oven. Pop your pie in the fridge for at least 15-30 minutes before baking to ensure a perfectly fluted crust.
Fluting a pie crust may seem daunting at first, but with practice and the right techniques, you can master the art like a pro. Follow these expert tips for flawless fluting and watch as your pies become the talk of the town. Whether you’re a seasoned baker or a pie-making novice, mastering the art of fluting will take your desserts to the next level. So roll up your sleeves, grab your pie dish, and start fluting like a pro today!
Expert Tips for Fluting Like a Pro
Fluting a pie crust is not just about making it look pretty – it’s about creating a masterpiece that will impress not only your taste buds but also your eyes. With these expert tips, you’ll be able to master the art of fluting like a pro and take your pie crust game to the next level.
1. Start with a Chilled Dough
Before you even think about fluting your pie crust, make sure your dough is properly chilled. A cold dough is much easier to work with and will hold its shape better when you start fluting. So, pop your dough in the fridge for at least 30 minutes before rolling it out and fluting.
2. Use the Right Tools
To achieve perfectly fluted edges, you’ll need the right tools. A fluted pastry wheel or a sharp knife can create those classic ruffled edges that are sure to impress. You can also use a fork to create a simple yet elegant fluted pattern.
3. Keep Your Work Surface Floured
To prevent your dough from sticking to your work surface, make sure to keep it well-floured. This will make it much easier to roll out the dough and flute the edges without any frustrating sticking or tearing.
4. Don’t Stretch the Dough
When you’re fluting your pie crust, be gentle and avoid stretching the dough. Stretching the dough can cause it to shrink during baking, which will result in uneven and unattractive fluted edges. Instead, gently press the dough into your desired fluted shape.
5. Experiment with Different Fluting Techniques
There are so many ways to flute a pie crust, so don’t be afraid to experiment with different techniques. Try crimping, scalloping, or braiding the edges to create unique and beautiful designs that will make your pie stand out from the rest.
6. Chill Before Baking
Once you’ve fluted your pie crust, pop it back in the fridge for 15-20 minutes before baking. This will help the dough relax and hold its shape better during baking, resulting in perfectly fluted edges that won’t lose their definition in the oven.
7. Egg Wash for a Beautiful Finish
For a shiny and golden-brown finish on your fluted pie crust, brush it with an egg wash before baking. This will give your pie a professional-looking touch that will make it look like it came straight from a bakery.
8. Practice, Practice, Practice
Fluting a pie crust like a pro takes practice, so don’t get discouraged if your first few attempts aren’t perfect. With time and patience, you’ll be able to master the art of fluting and create picture-perfect pies that will wow your friends and family.
With these expert tips, you’ll be able to elevate your pie crust game and create fluted edges that look like they were made by a professional pastry chef. So, roll up your sleeves, grab your dough, and start fluting like a pro!
Become a Pie Crust Picasso with These Tips
Fluting a pie crust may seem like a daunting task, but with the right tips and techniques, you can become a true Picasso in the art of pie making. Fluting is not only about making your pie look beautiful, but it also serves a functional purpose by sealing in the delicious filling and preventing it from leaking out during baking. So, let’s dive into some expert tips to help you master the art of fluting like a pro.
First and foremost, it’s important to start with a well-chilled pie crust. This will make it easier to work with and prevent it from becoming too soft and sticky. You can chill your pie dough in the refrigerator for at least 30 minutes before rolling it out to ensure it’s the right consistency for fluting.
When rolling out your pie crust, make sure to roll it evenly and to the desired thickness. You can use a rolling pin to help you achieve a uniform thickness throughout the dough. This will ensure that your pie crust bakes evenly and produces a crisp, flaky texture.
To flute the edges of your pie crust, you can use your fingers or a fork. If using your fingers, simply pinch the edge of the dough between your thumb and index finger, creating a scalloped pattern around the perimeter of the pie. This classic fluting technique adds a decorative touch to your pie and helps to seal in the filling.
If you prefer a more intricate design, you can use a fork to flute the edges of your pie crust. Simply press the tines of the fork into the edge of the dough, creating a series of small indentations. This technique is quick and easy, but still adds a beautiful decorative element to your pie.
For a more advanced fluting technique, you can try using a fluted pastry wheel. This tool creates a scalloped edge on your pie crust with just a simple rolling motion. It’s a great way to achieve a professional-looking finish on your pies without a lot of effort.
Another tip for perfecting your fluting technique is to brush the edges of your pie crust with an egg wash before baking. This will give your pie crust a golden brown color and a shiny finish, making it look even more appetizing. You can also sprinkle some sugar or cinnamon on top for an extra touch of sweetness and flavor.
When it comes to choosing the right pie dish for fluting, a glass or ceramic dish is ideal. These materials conduct heat evenly and help to prevent your pie crust from becoming soggy. Make sure to place your pie dish on a baking sheet before placing it in the oven to catch any drips or spills that may occur during baking.
Finally, don’t be afraid to get creative with your fluting technique. Experiment with different patterns and designs to add a personal touch to your pies. Whether you prefer a classic scalloped edge or a more modern twist, the key is to have fun and enjoy the process of creating a beautiful pie crust masterpiece.
With these expert tips and techniques, you’ll be well on your way to becoming a pie crust Picasso. So, roll up your sleeves, dust off your rolling pin, and get ready to impress your friends and family with picture-perfect pies that are as delicious as they are beautiful. Happy fluting!
Master the Art of Fluting for Picture Perfect Pies
Pie making can be a therapeutic and rewarding experience, especially when you master the art of fluting a pie crust like a pro. Fluting is the decorative crimping or shaping of the edge of a pie crust, and when done correctly, it adds a touch of elegance and sophistication to your baked creations. Whether you’re a seasoned baker or a novice in the kitchen, these expert tips will help you elevate your pie game to the next level.
One of the keys to achieving picture-perfect fluting is to start with a well-chilled pie crust. This ensures that the dough is firm and easy to work with, allowing you to create clean, defined edges. Before rolling out your dough, make sure to let it rest in the refrigerator for at least 30 minutes to an hour. This step will also help relax the gluten in the dough, making it less likely to shrink during baking.
When it comes to shaping the edges of your pie crust, there are several techniques you can use to achieve different looks. One classic method is the fork method, where you simply press the tines of a fork around the edge of the crust to create a decorative pattern. This technique is quick and easy, perfect for beginner bakers looking to add a bit of flair to their pies.
For a more traditional and elegant look, consider using the pinch method. This involves using your thumb and index finger to create a series of small pinches or flutes around the edge of the crust. To achieve uniform flutes, make sure to space them evenly apart and apply consistent pressure as you pinch the dough.
If you’re feeling adventurous, you can also experiment with more intricate fluting techniques, such as the rope or scallop edge. The rope edge involves twisting the dough between your fingers to create a twisted rope-like pattern, while the scallop edge involves creating small, scalloped waves around the edge of the crust. These techniques require a bit more practice and patience but can result in stunning, professional-looking pies.
Another tip for mastering the art of fluting is to work quickly and confidently. The key to achieving crisp, clean edges is to avoid overhandling the dough, as this can cause it to become tough and difficult to shape. Use light, gentle motions when shaping the edges of your pie crust and avoid pressing too hard, as this can cause the dough to stick to the pan or lose its shape.
In addition to technique, the type of pie pan you use can also impact the appearance of your fluted crust. For the most defined edges, consider using a metal pie pan with straight, vertical sides. These pans provide a sturdy base for shaping the crust and help maintain the shape of your flutes during baking. Avoid using glass or ceramic pie pans, as these materials can cause the crust to brown too quickly or lose its shape.
Finally, don’t forget to give your fluted crust a little extra love before baking. Brushing the edges with an egg wash or milk can help achieve a golden, shiny finish, while sprinkling the edges with sugar or cinnamon can add a touch of sweetness and flavor. You can also experiment with decorative cutouts or lattice designs to further enhance the appearance of your pie crust.
With these expert tips and techniques, you’ll be well on your way to mastering the art of fluting and creating picture-perfect pies that are sure to impress your friends and family. So roll up your sleeves, dust off your rolling pin, and get ready to elevate your pie game like a pro!
how to flute a pie crust


