
Pie Chart Perfection: A Beginner’s Guide
Are you ready to take your PowerPoint presentations to the next level? Do you want to impress your audience with clear and visually appealing data visualization? Look no further than the humble pie chart. In this beginner’s guide, we will show you how to create a pie chart that is not only informative but also visually stunning.
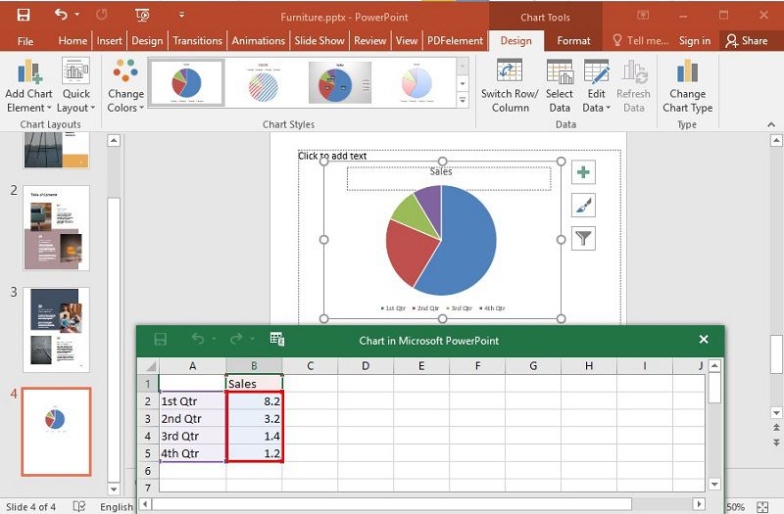
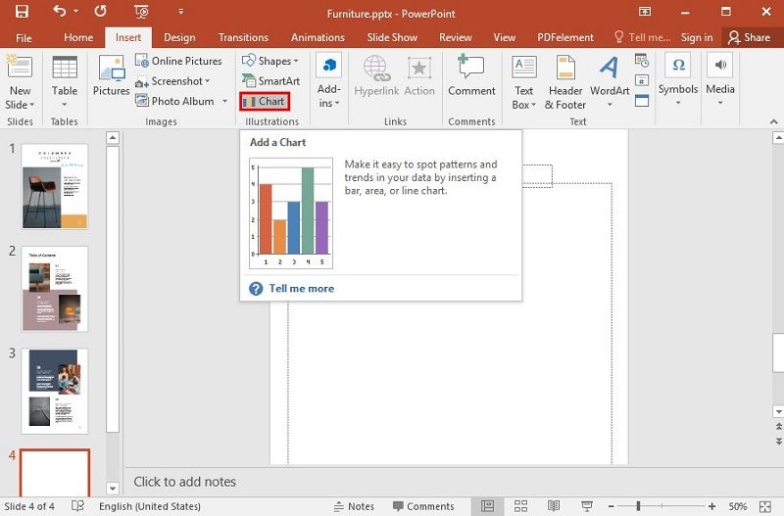
Image Source: office.net
Pie charts are a simple yet powerful tool for presenting data in a clear and easily digestible format. They are perfect for showcasing proportions or percentages in a visually appealing way. Whether you are presenting sales figures, survey results, or budget breakdowns, a well-designed pie chart can help your audience understand the data at a glance.
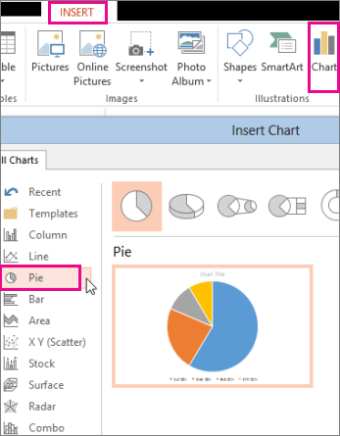
To create a pie chart in PowerPoint, start by selecting the data you want to represent. This could be as simple as a list of numbers or percentages in an Excel spreadsheet. Once you have your data ready, go to the Insert tab in PowerPoint and select the Pie Chart option. You can choose from different styles of pie charts, such as 2D or 3D, depending on your preference.
Image Source: wondershare.com
Once you have inserted the pie chart into your slide, it’s time to customize it to make it truly shine. You can change the colors of the segments, add labels and legends, and even explode or rotate individual segments to draw attention to specific data points. Experiment with different design options until you find the perfect combination that suits your presentation style.
But creating a pie chart is not just about design – it’s also about conveying information effectively. Make sure to include a clear title and labels for each segment of the chart so that your audience can easily understand what the data represents. You can also add a brief description or key takeaway to provide context and help your audience interpret the chart correctly.
Image Source: wondershare.com
In addition to traditional pie charts, PowerPoint also offers other types of circular charts like doughnut charts and radial bar charts. These variations can add visual interest to your presentation and help you stand out from the crowd. Experiment with different chart types to see which one best suits your data and presentation style.
Remember, the key to pie chart perfection is simplicity and clarity. Avoid cluttering your chart with unnecessary elements or too much data. Keep it clean and focused on the main message you want to convey. A well-designed pie chart should be easy to read and understand, even from a distance.
So next time you need to present data in your PowerPoint presentation, consider using a pie chart to add visual interest and clarity. With a little practice and creativity, you can master the art of creating a pie chart that will impress your audience and make your data shine. Good luck, and happy charting!
Slicing and Dicing Data with Ease
Are you ready to take your PowerPoint presentations to the next level? One of the most effective ways to engage your audience and convey complex information is by using pie charts. These simple yet powerful visual tools can help you communicate data in a clear and concise manner. But creating a pie chart that is both informative and visually appealing can be a daunting task. That’s where slicing and dicing data with ease comes in.
Pie charts are a great way to represent data in a way that is easy to understand at a glance. They allow you to compare different parts of a whole and see how they stack up against each other. But in order to create a pie chart that truly stands out, you need to know how to slice and dice your data effectively.
The first step in slicing and dicing data with ease is to gather all the information you need to include in your pie chart. This could be anything from sales figures to market share percentages to survey results. Make sure to organize your data in a clear and logical manner so that it is easy to work with when creating your pie chart.
Next, you’ll need to input your data into PowerPoint. This is where the slicing and dicing comes in. PowerPoint has a variety of tools that allow you to manipulate your data in order to create the perfect pie chart. You can easily adjust the size of each slice, add labels and percentages, and even change the colors to make your chart more visually appealing.
Once you have inputted your data and adjusted the settings to your liking, it’s time to customize your pie chart even further. You can add a title, legend, and data labels to make your chart more informative. You can also change the style and layout of your pie chart to match the theme of your presentation.
But slicing and dicing data with ease doesn’t stop there. In order to truly master the art of creating a pie chart in PowerPoint, you need to make sure that your chart is easy to read and understand. Avoid cluttering your chart with too much information or making it too complex. Keep it simple and to the point so that your audience can quickly grasp the key takeaways.
Another important aspect of slicing and dicing data with ease is choosing the right colors for your pie chart. Colors can help to make your chart more visually appealing and easier to understand. Make sure to choose colors that are easy on the eyes and that contrast well with each other. You can also use different shades of the same color to create a more visually interesting chart.
Finally, don’t forget to practice, practice, practice. The more you work with pie charts in PowerPoint, the better you will become at slicing and dicing data with ease. Experiment with different layouts, styles, and colors to see what works best for your data. And don’t be afraid to ask for feedback from colleagues or friends to help improve your pie chart design.
In conclusion, slicing and dicing data with ease is essential for mastering the art of creating a pie chart in PowerPoint. By gathering your data, inputting it into PowerPoint, customizing your chart, and choosing the right colors, you can create a pie chart that is not only informative but visually appealing as well. So next time you need to present data in a clear and concise manner, remember to slice and dice with ease.
Unlocking the Creative Power of PowerPoint
When it comes to creating visually appealing and informative presentations, PowerPoint has been a go-to tool for professionals and students alike. With its user-friendly interface and versatile features, PowerPoint allows users to unleash their creativity and effectively convey their message. One of the most popular and visually striking tools in PowerPoint is the pie chart, which can help break down complex data into easily digestible slices.
But mastering the art of creating a pie chart in PowerPoint goes beyond simply plugging in numbers and colors. It requires a creative touch and an understanding of design principles to ensure that your chart not only looks good but also effectively communicates your message. Here are some tips on how to unlock the creative power of PowerPoint and create stunning pie charts that will captivate your audience.
First and foremost, consider the purpose of your pie chart. Are you using it to showcase sales data, demographics, or survey results? Understanding the context in which your chart will be presented will help you determine the best design approach. For example, if you are presenting sales data, you may want to use bold, contrasting colors to highlight different sales figures. On the other hand, if you are showcasing demographic data, you may want to use a more subdued color palette to avoid overwhelming your audience.
Next, think about the layout of your pie chart. While the traditional circular pie chart is the most common, there are other creative ways to present your data. For example, you could use a donut chart, which displays data in a ring shape with a hole in the center. This can be a visually appealing alternative to the standard pie chart and can help draw attention to specific data points.
When it comes to choosing colors for your pie chart, think about the psychology of color. Different colors evoke different emotions and can influence how your audience perceives your data. For example, blue is often associated with trust and reliability, making it a good choice for financial data. Green is associated with growth and harmony, making it a good choice for environmental or health-related data. Experiment with different color combinations to find the ones that best convey the message you want to communicate.
In addition to colors, consider using different textures and patterns to add visual interest to your pie chart. PowerPoint offers a range of built-in textures and patterns that you can apply to your chart slices. You can also experiment with gradients and shadows to create a sense of depth and dimension. Just be sure to use these effects sparingly, as too many can make your chart look cluttered and confusing.
Another way to unlock the creative power of PowerPoint is to customize the labels and legends on your pie chart. Instead of using generic labels like Category 1 and Category 2, consider using descriptive labels that provide more context for your data. For example, instead of Sales Figures, you could use labels like Q1 Sales and Q2 Sales to make it clear which data points you are comparing. You can also customize the font style, size, and color of your labels to make them more visually appealing.
Finally, don’t be afraid to experiment with different chart styles and layouts to find the one that best suits your data and message. PowerPoint offers a range of chart templates and styles that you can use as a starting point, but don’t be afraid to customize them to make them your own. By thinking creatively and exploring the full range of design options available in PowerPoint, you can unlock the creative power of the software and create pie charts that are not only informative but also visually stunning.
Mastering the Art of Pie Chart Design
When it comes to creating eye-catching and informative presentations, pie charts are a staple tool for visualizing data. They provide a clear and concise way to represent complex information in a digestible format. In this article, we will explore the ins and outs of mastering the art of pie chart design in PowerPoint.
Pie charts are a versatile tool that can be used in a variety of settings, from business presentations to academic projects. They are particularly useful for showing how a whole is divided into parts, making them ideal for showcasing percentages and proportions.
One of the key aspects of pie chart design is choosing the right colors. Colors play a crucial role in making your pie chart visually appealing and easy to understand. When selecting colors, it’s important to choose a palette that is both aesthetically pleasing and easily distinguishable. Avoid using overly bright or clashing colors, as this can make your chart confusing and difficult to read.
In addition to colors, it’s also important to consider the layout of your pie chart. Make sure that the labels and legend are clear and easy to read. You can also experiment with different chart styles, such as 3D or exploded pie charts, to add visual interest to your presentation.
When it comes to labeling your pie chart, simplicity is key. Avoid cluttering your chart with unnecessary text or data points. Instead, focus on highlighting the most important information and using clear and concise labels to guide the viewer’s eye.
Another important aspect of pie chart design is choosing the right data. Make sure that your data is accurate and relevant to the topic at hand. Avoid overloading your chart with too many data points, as this can make it difficult for the viewer to interpret the information.
Once you have chosen your colors, layout, and data, it’s time to create your pie chart in PowerPoint. To do this, simply insert a pie chart from the Insert menu and input your data into the spreadsheet provided. You can then customize your chart by adjusting the colors, labels, and layout to suit your presentation style.
When creating a pie chart in PowerPoint, it’s important to keep in mind the overall theme and tone of your presentation. Make sure that your chart complements the rest of your slides and adds value to the information you are presenting. A well-designed pie chart can help reinforce your message and make your presentation more engaging and memorable.
In conclusion, mastering the art of pie chart design in PowerPoint is a key skill for creating impactful and visually appealing presentations. By choosing the right colors, layout, and data, you can create charts that are not only informative but also visually stunning. So next time you need to visualize data in your presentation, remember to slice and dice your data with ease using the power of pie charts.
how to create a pie chart in powerpoint


