
Get Ready to Slice and Dice Your Data!
Are you ready to unleash your data visualization skills and create a stunning pie chart in Tableau? If so, you’ve come to the right place! In this article, we’ll walk you through the easy steps to create a pie chart that will not only impress your colleagues but also help you gain valuable insights from your data.


Image Source: googleusercontent.com
The first step in creating a pie chart in Tableau is to gather your data. Whether you’re working with sales figures, marketing data, or any other type of information, make sure you have all the necessary data points ready to go. Once you have your data in hand, it’s time to start slicing and dicing!
Tableau makes it easy to create a pie chart with just a few clicks. Simply drag and drop the dimensions and measures you want to visualize onto the canvas, and Tableau will automatically generate a pie chart for you. You can customize the colors, labels, and other design elements to make your pie chart truly stand out.
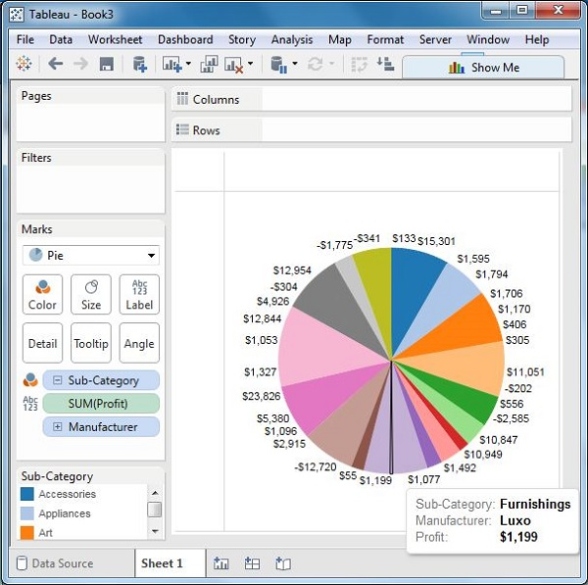
Image Source: tableau.com
One of the great things about Tableau is that it allows you to interact with your data in real-time. This means that as you make changes to your pie chart, you can instantly see how those changes impact your data. You can drill down into specific data points, filter out irrelevant information, and explore your data in a way that would be impossible with a traditional spreadsheet.
Creating a pie chart in Tableau is not only easy, but it’s also a lot of fun! You can experiment with different design elements, try out new color schemes, and see how your data looks from different angles. And the best part is, you don’t need to be a data visualization expert to create a beautiful and informative pie chart in Tableau.
Image Source: tutorialspoint.com
So go ahead, get ready to slice and dice your data in Tableau! With just a few clicks, you can create a pie chart that will impress your colleagues and help you gain valuable insights from your data. Tableau Tips: Crafting a Pie Chart in Minutes
Crafting a pie chart in Tableau is easier than you might think. With just a few simple steps, you can create a visually appealing and informative pie chart that will help you gain valuable insights from your data. Here are some Tableau tips to help you craft a pie chart in minutes:
1. Start by selecting the dimensions and measures you want to include in your pie chart. These could be sales figures, customer demographics, or any other data points you want to visualize.
2. Drag and drop your dimensions and measures onto the canvas in Tableau. Tableau will automatically generate a pie chart based on the data you’ve selected.
3. Customize your pie chart by changing the colors, labels, and other design elements. You can experiment with different color schemes to make your pie chart visually appealing and easy to read.
4. Add filters and drill down into specific data points to explore your data in more detail. Tableau allows you to interact with your data in real-time, so you can instantly see how changes to your pie chart impact your data.
5. Experiment with different chart types and design elements to see what works best for your data. Tableau offers a wide range of visualization options, so don’t be afraid to try out new ideas and see what looks best.
With these Tableau tips, you’ll be able to craft a pie chart in minutes that will impress your colleagues and help you gain valuable insights from your data. So what are you waiting for? Let’s bake up a delicious pie chart together!
Let’s Bake Up a Delicious Pie Chart Together
Are you ready to whip up a scrumptious data visualization treat? In this article, we’ll be exploring the delightful world of pie charts in Tableau. Just like baking a pie, creating a pie chart in Tableau requires a few key ingredients and a dash of creativity. So, grab your apron and let’s get started!
Pie charts are a popular way to represent data in a visually appealing and easily digestible format. They are perfect for showcasing proportions and percentages within a dataset, making them ideal for comparing different categories or showing the distribution of a single variable.
To begin our pie chart baking adventure, the first step is to gather all of our ingredients. This includes your dataset, Tableau software, and a sprinkle of imagination. Once you have everything you need, it’s time to roll up your sleeves and start creating your masterpiece.
In Tableau, creating a pie chart is as easy as pie! Simply drag and drop the desired dimension or measure onto the Pie chart type option in the Marks card. Tableau will automatically generate a pie chart based on your data, displaying the proportions of each category in a colorful and interactive format.
But why stop at a plain old pie chart when you can add some extra flavor and flair to your visualization? Tableau offers a variety of customization options to help you create a pie chart that is as unique as you are. From changing the colors and labels to adding annotations and tooltips, the possibilities are endless.
One of the key ingredients to a successful pie chart is choosing the right colors. Just like selecting the perfect combination of flavors for a pie, choosing the right colors can make your visualization more visually appealing and easier to interpret. Tableau offers a range of color palettes to choose from, or you can create your own custom color scheme to match your data and personal style.
Another important factor to consider when creating a pie chart is the labeling. Labels help to provide context and clarity to your visualization, making it easier for your audience to understand the data being presented. Tableau allows you to customize the labels on your pie chart, including font size, color, and placement, so you can ensure that your visualization is both informative and visually appealing.
Once you have customized your pie chart to your liking, it’s time to add the finishing touches. Tableau offers a range of formatting options to help you polish your visualization and make it truly shine. From adjusting the size and alignment of your chart to adding borders and shadows, Tableau allows you to fine-tune every aspect of your visualization to create a professional and polished final product.
And just like baking a pie, creating a pie chart in Tableau is a fun and creative process that allows you to showcase your data in a visually stunning way. So, the next time you’re looking to spice up your data visualization skills, why not try your hand at creating a delicious pie chart in Tableau? With a little bit of imagination and a sprinkle of creativity, you can unleash your data visualization skills and create a pie chart that is as unique and delightful as you are.
Tableau Tips: Crafting a Pie Chart in Minutes
Are you ready to take your data visualization skills to the next level? Do you want to impress your colleagues and boss with stunning visualizations that tell a compelling story? Look no further than Tableau, a powerful tool that allows you to create beautiful charts and graphs with ease.
One of the most popular types of charts in Tableau is the pie chart. This classic chart type is perfect for showing the proportions of different categories within a data set. Whether you’re visualizing sales data, survey responses, or any other type of data, a pie chart can help you quickly and effectively communicate your findings.
Creating a pie chart in Tableau is simpler than you might think. With just a few easy steps, you can have a beautiful and informative chart ready to share with your team. Here’s how to do it:
1. Connect to Your Data
The first step in creating a pie chart in Tableau is to connect to your data source. Tableau supports a wide range of data sources, so whether your data is stored in an Excel spreadsheet, a SQL database, or an online platform like Google Sheets, you can easily bring it into Tableau for analysis.
2. Drag and Drop
Once you’ve connected to your data, it’s time to start building your chart. In Tableau, creating a pie chart is as simple as dragging and dropping fields onto the canvas. To create a pie chart, drag a categorical field (such as product category or customer segment) onto the Columns shelf and a numerical field (such as sales revenue or survey responses) onto the Rows shelf.
3. Customize Your Chart
With your data fields in place, you can now customize your pie chart to make it more visually appealing and informative. Tableau offers a wide range of customization options, including colors, labels, and tooltips. You can also adjust the size and shape of your chart to fit your dashboard layout.
4. Add Context
To make your pie chart even more impactful, consider adding context to help your audience better understand the data. This could include adding a title, annotations, or additional charts and graphs to provide a more complete picture of the data.
5. Share Your Insights
Once you’re happy with your pie chart, it’s time to share your insights with your team. Tableau makes it easy to publish your visualizations to Tableau Server or Tableau Public, where your colleagues can access and interact with the data in real-time.
In just a few minutes, you’ve gone from raw data to a beautiful and informative pie chart that tells a compelling story. With Tableau, you can unleash your data visualization skills and create stunning visualizations that will impress and inspire. So why wait? Start crafting your own pie charts in Tableau today and take your data analysis to the next level!
Visualize Your Data in a Fun and Easy Way!
Are you ready to unleash your data visualization skills and create a stunning pie chart in Tableau? If so, you’re in the right place! In this article, we’ll walk you through the process of visualizing your data in a fun and easy way using Tableau.
Data visualization is a powerful tool that allows you to communicate information in a clear and concise manner. Whether you’re presenting data to your colleagues, clients, or stakeholders, a well-designed pie chart can make a significant impact. With Tableau’s user-friendly interface and powerful features, creating a pie chart has never been easier.
To get started, you’ll first need to gather your data. This could be anything from sales figures to survey responses to website traffic data. Once you have your data ready, open Tableau and connect to your data source. Tableau supports a wide range of data sources, so you can easily import your data from Excel, CSV files, databases, and more.
Next, drag and drop your data fields onto the canvas. Tableau’s drag-and-drop interface makes it easy to create visualizations quickly. For a pie chart, you’ll typically want to drag a categorical field (such as product categories or survey responses) onto the Columns shelf, and a numerical field (such as sales figures or percentages) onto the Rows shelf.
Once you’ve added your data fields to the canvas, Tableau will automatically generate a pie chart for you. You can customize your pie chart by adjusting the colors, labels, and other visual elements. Tableau offers a wide range of customization options, so you can create a pie chart that suits your needs and matches your brand’s aesthetic.
In addition to customizing the appearance of your pie chart, you can also add interactivity to make your visualization more engaging. Tableau allows you to add filters, parameters, and actions to your dashboard, allowing users to interact with the data and explore different insights.
One of the great things about Tableau is its ability to handle large datasets with ease. Whether you’re working with hundreds, thousands, or even millions of data points, Tableau’s powerful in-memory engine can process your data quickly and efficiently. This means you can create complex visualizations without worrying about performance issues.
Another key feature of Tableau is its ability to create dynamic dashboards that update in real-time. This can be incredibly useful for monitoring key metrics, tracking trends, and making data-driven decisions. With Tableau, you can create interactive dashboards that provide real-time insights into your data.
In conclusion, Tableau is a powerful tool for visualizing your data in a fun and easy way. By following the steps outlined in this article, you can create a stunning pie chart that effectively communicates your data to your audience. So why wait? Unleash your data visualization skills today and start creating beautiful pie charts in Tableau!
how to create a pie chart in tableau


