
Let’s Get Cooking: Making a Pie Graph in Word!
Are you ready to embark on a fun and creative journey of data visualization? In this step-by-step guide, we will show you How to Make a delicious pie graph in Microsoft Word. Just like baking a pie, creating a pie graph can be a fun and rewarding process. So put on your chef’s hat and let’s get cooking!
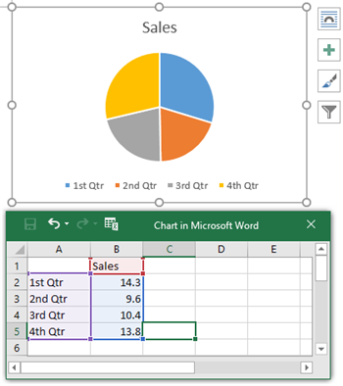
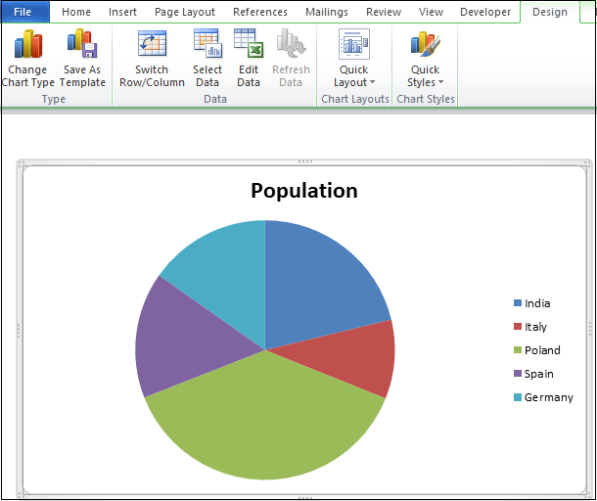
Image Source: office.net
The first step in making a pie graph is to gather all the necessary ingredients. In the world of data visualization, these ingredients are your data points. Whether you are analyzing sales figures, survey results, or any other type of data, make sure you have all the numbers you need to create your graph.
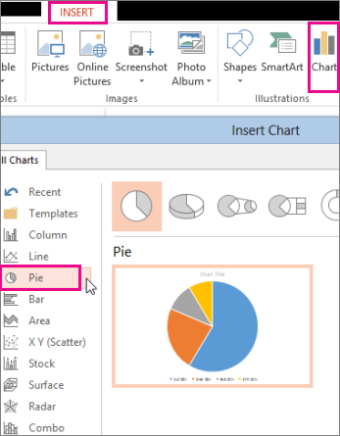
Once you have gathered your data, it’s time to fire up the oven, or in this case, Microsoft Word. Microsoft Word has a built-in feature that allows you to easily create pie graphs with just a few clicks. To access this feature, go to the Insert tab and select Chart. From there, choose the Pie option and click OK.
Image Source: edrawmax.com
Now that you have your pie graph template in front of you, it’s time to start adding your data. Simply click on the placeholder values in the graph and replace them with your own data points. You can also customize the colors and labels of your graph to make it more visually appealing.
As you continue to add your data points, you will start to see your pie graph taking shape. Just like adding ingredients to a pie, each data point plays a crucial role in the overall picture. Make sure to double-check your numbers and labels to ensure accuracy.
Image Source: javatpoint.com
Once you have added all your data points and customized your graph to your liking, it’s time to put your pie graph in the oven and let it bake. In this case, baking refers to formatting and finalizing your graph. You can adjust the size, position, and layout of your graph to make it look just right.
As your pie graph begins to take its final form, take a step back and admire your handiwork. Just like a perfectly baked pie, a well-made pie graph is a thing of beauty. It not only presents your data in a clear and concise manner but also adds a touch of creativity to your work.
In conclusion, making a pie graph in Microsoft Word is a fun and creative process that allows you to visualize your data in a visually appealing way. So the next time you need to present your data, why not whip up a delicious pie graph to add a dash of visual flair? Happy graph-making!
Ingredients for Success: Data Visualization Tools
When it comes to visualizing data, having the right tools at your disposal is key to creating a successful and impactful pie graph. In this article, we will explore the essential ingredients needed to effectively visualize your data in Microsoft Word.
One of the most important tools for data visualization is a reliable spreadsheet program. Microsoft Excel is a popular choice for organizing and analyzing data before creating a pie graph. With Excel, you can easily input your data, manipulate it as needed, and then transfer it to Microsoft Word for graph creation.
Another essential ingredient for success is a clear understanding of the data you are working with. Before creating your pie graph, take the time to analyze and interpret your data. Identify key trends, patterns, and insights that you want to highlight in your graph. This will not only help you create a visually appealing graph but also ensure that it effectively communicates the message you want to convey.
In addition to Excel, there are various data visualization tools and software programs available that can help you create stunning pie graphs. Programs like Tableau, Google Sheets, and Infogram offer advanced features and customization options that can take your data visualization to the next level. Experiment with different tools to find the one that best suits your needs and preferences.
When creating a pie graph in Microsoft Word, it is also important to consider the design and layout of your graph. Choose colors that are visually appealing and easy to distinguish, and ensure that your graph is properly sized and positioned within your document. Adding labels, titles, and a key can also help provide context and make your graph more informative.
To truly make your pie graph stand out, consider incorporating interactive elements. Some data visualization tools allow you to create interactive graphs that viewers can interact with, such as zooming in on specific data points or filtering out certain categories. These features can enhance the user experience and make your graph more engaging and informative.
In conclusion, creating a pie graph in Microsoft Word requires a combination of the right tools, a clear understanding of your data, and attention to design and layout. By following these steps and incorporating the ingredients for success, you can create a visually stunning and effective pie graph that effectively communicates your data insights. So, roll up your sleeves, gather your ingredients, and get ready to bake up a storm with your data visualization skills!
Baking Up a Storm: Creating Your Pie Graph
Are you ready to bake up a storm and create a delicious pie graph in Microsoft Word? Well, you’re in luck because I’m here to guide you through the process step by step. Creating a pie graph can be a fun and creative way to visualize data, and with a few simple techniques, you’ll be on your way to pie graph perfection in no time.
First things first, gather all the necessary ingredients for your pie graph. This includes your data points, labels, and percentages. Remember, the key to a successful pie graph is having clear and concise data that accurately represents the information you want to convey. Once you have all your ingredients ready, it’s time to start baking!
To begin creating your pie graph in Microsoft Word, open a new document and select the Insert tab at the top of the page. Click on the Chart option and choose the Pie chart from the list of available chart types. This will create a blank pie graph on your document where you can input your data.
Next, input your data points into the spreadsheet that appears on the right side of the screen. Make sure to include all the necessary information such as labels and percentages for each data point. You can also customize the colors and styles of your pie graph to make it visually appealing and easy to read.
Once you have entered all your data points, labels, and percentages, it’s time to fine-tune your pie graph. You can adjust the size of the slices by clicking and dragging on the edges of the graph. You can also add data labels to each slice to make it easier for your audience to understand the information being presented.
To add a title to your pie graph, simply click on the Chart Title option at the top of the chart and input the title you want to display. You can also customize the font, size, and color of the title to make it stand out on the page. Additionally, you can add a legend to your pie graph to explain what each slice represents.
Once you are satisfied with the look of your pie graph, it’s time to save and share your creation. You can save your pie graph as an image file or print it out to include in a presentation or report. You can also copy and paste the graph into other Microsoft Office programs such as PowerPoint or Excel for further analysis and manipulation.
Creating a pie graph in Microsoft Word is a simple and effective way to visualize data and communicate information in a clear and concise manner. By following these step-by-step instructions, you can bake up a storm and create a delicious pie graph that will impress your audience and make your data shine. So go ahead, get baking and start creating your perfect pie graph today!
Slice of Success: Tips for Perfecting Your Graph
Visualize Data: Step-by-Step Guide to Creating a Pie Graph in Microsoft Word
Slice of Success: Tips for Perfecting Your Graph
So you’ve followed the step-by-step guide to creating a pie graph in Microsoft Word and now you’re ready to perfect your graph. Congratulations! In this article, we will provide you with some tips and tricks to make sure your pie graph looks professional and visually appealing.
First and foremost, it’s important to choose the right colors for your pie graph. You want to make sure that the colors you choose are easy to distinguish and complement each other. Avoid using colors that are too similar or too bright, as this can make it difficult for viewers to interpret the data.
Next, consider the labels on your pie graph. Make sure that the labels are clear, concise, and easy to read. You may want to adjust the font size or style to make the labels stand out more. Additionally, consider adding a legend to your graph if you have multiple categories, as this can help viewers understand the data more easily.
Another tip for perfecting your pie graph is to pay attention to the size of the slices. You want to make sure that each slice is proportional to its corresponding data value. Avoid making one slice too large or too small, as this can distort the data and make it difficult to interpret.
When it comes to formatting your pie graph, less is often more. Avoid adding unnecessary elements or effects that can clutter the graph and distract viewers from the data. Keep the design clean and simple, focusing on presenting the data clearly and effectively.
Consider adding a title to your pie graph to provide context and help viewers understand what they are looking at. The title should be clear and descriptive, giving viewers a quick overview of the data being presented in the graph.
Finally, don’t forget to proofread and double-check your pie graph before finalizing it. Ensure that all data is accurate and correctly represented, and make any necessary adjustments to improve the overall look and readability of the graph.
By following these tips and tricks, you can create a professional and visually appealing pie graph in Microsoft Word that effectively communicates your data to viewers. Remember to experiment with different colors, labels, and formatting options to find the perfect combination that works for your specific data set.
how to create a pie graph in word


