
Flaky and Fabulous: The Secrets to Pie Crust Perfection!
When it comes to baking a pie, one of the most important elements is the crust. A perfectly crimped pie crust can take your dessert from good to great in an instant. But mastering the art of crimping can be a daunting task for many Home bakers. However, fear not! With a few simple tips and tricks, you can elevate your baking game and create a pie crust that is flaky, fabulous, and sure to impress.
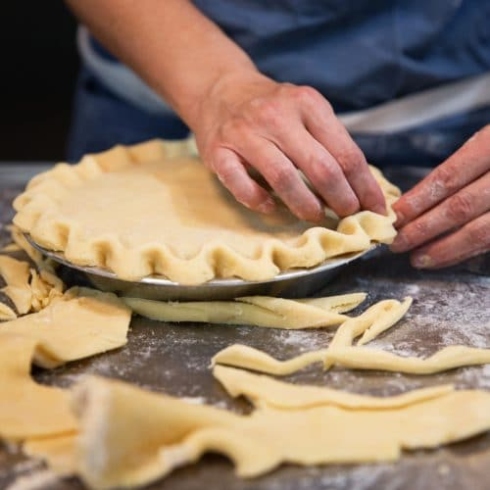
Image Source: apartmenttherapy.info
The first secret to pie crust perfection is using cold ingredients. This includes cold butter, cold water, and even chilling your dough before rolling it out. Keeping your ingredients cold ensures that the fat in the butter doesn’t melt too quickly, which is what creates those flaky layers in your crust. So, be sure to pop your butter in the freezer for a few minutes before cutting it into your flour mixture.
Another key to a perfect pie crust is making sure not to overwork the dough. Overworking the dough can result in a tough crust, rather than a light and flaky one. When mixing your ingredients, be sure to only mix until just combined. It’s okay if there are still some visible pieces of butter in the dough – this is what will help create those delicious layers.
Image Source: thegourmandiseschool.com
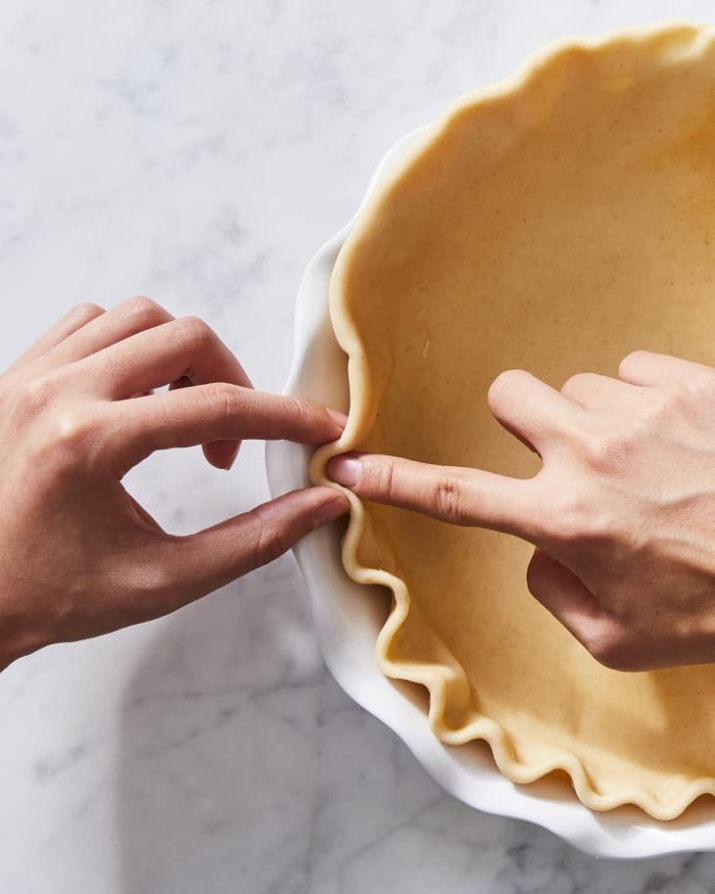
Once you have your dough mixed and rolled out, it’s time to crimp the edges. Crimping is what gives your pie that professional touch and can really elevate the presentation of your dessert. There are many different ways to crimp a pie crust, from using a fork to create a simple design, to braiding the edges for a more intricate look. Experiment with different techniques to find the one that works best for you and your pie.
To really take your crimping skills to the next level, try using an egg wash on the edges of your pie crust before crimping. This will help the dough stick together and create a beautiful golden brown finish on your crust. Simply whisk an egg with a little water and brush it onto the edges of your crust before crimping. You can even sprinkle a little sugar on top for an extra touch of sweetness.
Finally, don’t forget to chill your pie crust before baking. This will help prevent the crust from shrinking in the oven and will result in a flakier texture. Pop your pie in the fridge for at least 30 minutes before baking to ensure that your crust stays crisp and flaky.
So, there you have it – the secrets to pie crust perfection! With a little practice and a few simple tips, you can master the art of crimping and create a pie crust that is sure to impress. So, next time you’re baking a pie, remember these tips and techniques to take your dessert from good to great. Happy baking!
Crimping Like a Pro: Elevate Your Baking Game Today!
Are you ready to take your baking skills to the next level? If you want to impress your friends and family with perfectly crimped pie crusts, then you’ve come to the right place! Crimping may seem like a simple finishing touch, but mastering this art can truly elevate the overall look and taste of your pies.
So, how can you become a pro at crimping? Let’s dive into some tips and tricks that will help you perfect this essential baking technique.
First and foremost, it’s important to start with a well-chilled pie crust. Keeping your dough cold will make it easier to work with and will help prevent it from becoming tough. Make sure to follow your Recipes-ideas/’>Recipe‘s instructions for chilling time, and don’t rush this step!
Once your dough is chilled and ready to go, roll it out to the specified thickness. It’s crucial to roll the dough evenly to ensure that your pie crust bakes evenly as well. Use a rolling pin to gently roll out the dough, rotating it occasionally to maintain an even thickness.
Now comes the fun part – crimping! There are several different techniques you can use to create a beautifully crimped edge on your pie crust. One popular method is the fork method, where you press the tines of a fork all around the edge of the crust. This creates a simple yet elegant finish that adds a decorative touch to your pie.
Another classic crimping technique is the fluted edge. To achieve this look, use your fingers to pinch the edge of the crust into a series of small ridges. This method requires a bit of practice, but once you get the hang of it, you’ll be crimping like a pro in no time!
If you’re feeling extra fancy, you can try your hand at the rope edge technique. This involves twisting the edge of the crust to create a rope-like effect. It may take a bit of patience and precision, but the end result is well worth the effort. Your pies will look like they came straight from a professional bakery!
In addition to these classic crimping techniques, don’t be afraid to get creative and try out different styles. Experiment with different tools and methods to find the crimping style that works best for you. Whether you prefer a simple fork finish or an intricate fluted edge, the key is to have fun and let your creativity shine through.
Remember, practice makes perfect! Don’t get discouraged if your first few attempts at crimping don’t turn out exactly as you’d hoped. Baking is a skill that takes time to master, so keep practicing and refining your technique. Before you know it, you’ll be crimping like a pro and wowing everyone with your perfectly finished pies.
So, what are you waiting for? Grab your rolling pin, chill that dough, and get ready to elevate your baking game with perfectly crimped pie crusts. With a little patience and a lot of creativity, you’ll be well on your way to mastering the art of crimping like a pro!
Master the Art: Tips and Tricks for Flawless Crimping!
Ah, the art of crimping a pie crust – it may seem like a simple task, but mastering the perfect crimp can truly elevate your baking game to pro level status. Whether you’re a seasoned baker looking to up your game or a beginner eager to impress with your pie crust skills, these tips and tricks for flawless crimping will help you achieve pie perfection every time.
First and foremost, let’s talk technique. The key to a beautifully crimped pie crust is to work quickly and confidently. You want to avoid overhandling the dough, as this can lead to a tough crust. Instead, gently press the dough into the pie plate and use your fingers to create a decorative edge. Don’t be afraid to get creative – there are countless ways to crimp a crust, from simple fluting to intricate braiding.
Another important tip for flawless crimping is to keep your dough cold. Chilled dough is easier to work with and will result in a flakier crust. If your dough starts to warm up as you’re working with it, simply pop it back in the fridge for a few minutes to firm up.
In addition to technique, the type of fat you use in your pie crust can also have a big impact on the final result. Butter, lard, and shortening all have their own unique qualities, so experiment with different fats to find the perfect balance of flavor and texture. Many bakers swear by a combination of butter and shortening for the perfect flaky, flavorful crust.
When it comes to adding the filling to your pie crust, make sure not to overfill. A too-full pie can result in a soggy bottom crust or overflow during baking. Use a light hand when filling your pie and leave a little bit of space at the top to allow for expansion.
Once your pie is filled and crimped, it’s time to bake. Preheating your oven is crucial for a perfectly baked pie crust, as it helps to set the shape and structure of the crust before the filling heats up. Be sure to follow the Recipes-ideas/’>Recipe‘s instructions for baking time and temperature, and keep an eye on your pie as it bakes to ensure that the crust doesn’t overbrown.
Finally, the moment of truth – slicing into your perfectly crimped pie crust. Whether you’re serving up a classic apple pie or a decadent chocolate cream pie, the sight of a beautifully crimped crust is sure to impress your friends and family. So go ahead, master the art of crimping and wow your guests with your flawless pie crust skills.
In conclusion, mastering the art of perfectly crimping a pie crust is all about technique, temperature, and practice. With these tips and tricks in mind, you’ll be well on your way to crimping like a pro and creating showstopping pies that are as delicious as they are beautiful. So roll up your sleeves, dust off your rolling pin, and get ready to impress with your perfect pie crust!
Get Ready to Wow: Impress with Your Perfect Pie Crust!
Are you ready to take your pie baking skills to the next level and impress your friends and family with a perfectly crimped pie crust? Look no further, because we’ve got all the tips and tricks you need to master the art of crimping like a pro!
Crimping a pie crust may seem like a daunting task, but with a little practice and the right techniques, you’ll be able to create beautifully crimped edges that will wow everyone who lays eyes on your delicious pies. So let’s dive in and learn how to achieve pie crust perfection!
The first step to creating a perfectly crimped pie crust is to make sure you have the right tools. A fluted pastry wheel or a fork can both be used to create decorative edges on your pie crust. Whichever tool you choose, make sure it is sharp and clean for the best results.
Once you have your tools ready, it’s time to prepare your pie crust. Whether you’re using a store-bought crust or making your own from scratch, be sure to roll it out evenly and to the desired thickness. A uniform thickness will make it easier to crimp the edges and will result in a more professional-looking pie.
When it comes to crimping the edges of your pie crust, there are several techniques you can use to achieve different decorative effects. The most common method is to use your fingers to create a fluted edge by pinching the dough between your thumb and index finger. For a more intricate design, you can use a fork to create a scalloped edge by pressing the tines of the fork into the dough.
If you’re feeling extra creative, you can try your hand at braiding the edges of your pie crust. Simply cut strips of dough and weave them together before attaching them to the edge of the crust. This technique takes a little more time and patience, but the end result is sure to impress!
Another fun way to jazz up your pie crust is to use cookie cutters to create decorative shapes that can be placed on top of the crust. Whether you choose to make flowers, leaves, or even stars, adding a decorative touch to your pie crust is a surefire way to impress your guests.
In addition to using different techniques to crimp the edges of your pie crust, there are a few tips and tricks you can use to ensure that your crust turns out perfectly every time. One important tip is to chill your pie crust before baking it. This will help prevent the dough from shrinking and will result in a flakier crust.
Another tip is to brush the edges of your pie crust with an egg wash before baking. This will give your crust a golden brown color and a shiny finish that will make it look even more appetizing. You can also sprinkle the edges with sugar or cinnamon for an extra touch of sweetness.
So there you have it – with the right tools, techniques, and tips, you can master the art of crimping a pie crust like a pro and impress everyone with your baking skills. So roll up your sleeves, get out your rolling pin, and start creating beautifully crimped pie crusts that will have everyone coming back for seconds!
how to crimp a pie crust


