
Master the art of apple slicing!
When it comes to making the perfect apple pie, mastering the art of apple slicing is crucial. The way you cut your apples can not only affect the aesthetics of your pie, but also the texture and overall flavor. So, if you want to wow your guests with a delicious and beautifully crafted apple pie, it’s time to sharpen your slicing skills.
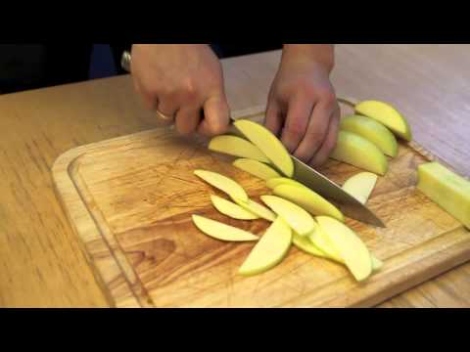
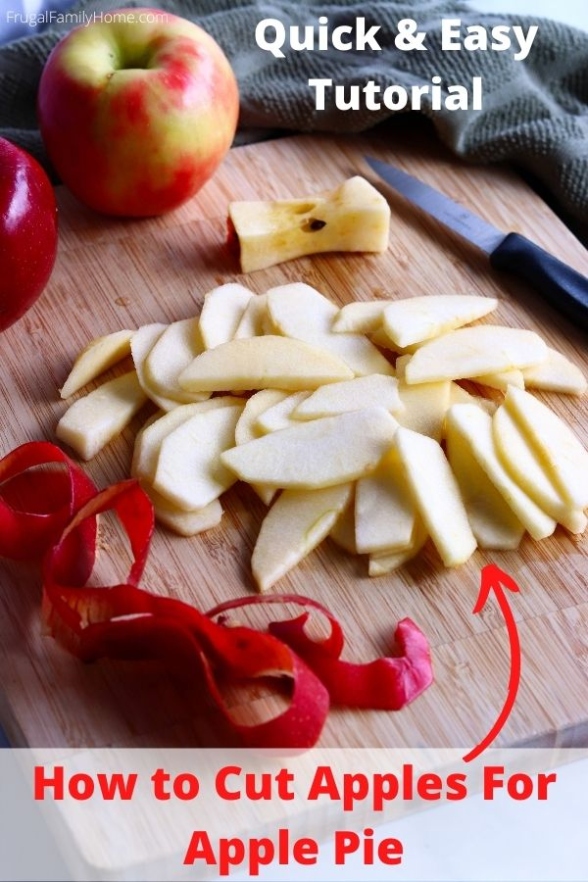
Image Source: ytimg.com
The first step to mastering apple slicing is choosing the right tools. A sharp knife is essential for cleanly cutting through the apples without causing them to bruise or become mushy. A paring knife or chef’s knife works best for this task, as they provide the precision and control needed to make uniform slices.
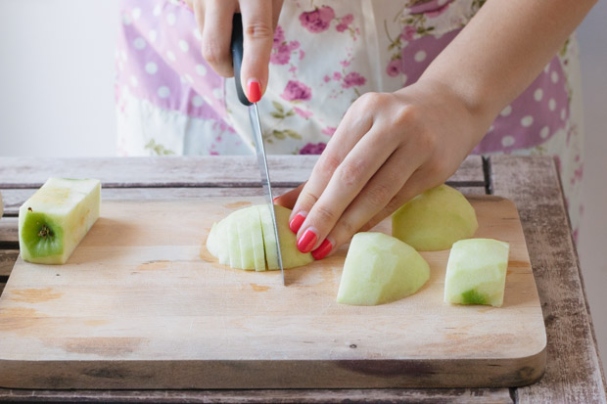
Next, it’s important to select the right type of apple for your pie. While there are many varieties to choose from, some are better suited for baking than others. Popular choices for apple pie include Granny Smith, Honeycrisp, and Pink Lady, as they hold their shape well and offer a nice balance of sweetness and tartness.
Image Source: prettysimplesweet.com
Once you have your apples and tools ready, it’s time to start slicing. Begin by washing and drying the apples thoroughly to remove any dirt or residue. Then, using your knife, carefully remove the core and seeds from the center of the apple. You can do this by cutting the apple in half vertically and then using a melon baller or knife to scoop out the core.
After coring the apples, it’s time to slice them. The thickness of your slices will depend on your personal preference and the Recipes-ideas/’>Recipe you are following. Some prefer thin slices for a more delicate texture, while others like thicker slices for a heartier pie. Whatever your preference, be sure to make the slices as uniform as possible to ensure even cooking.
Image Source: frugalfamilyhome.com
As you slice the apples, be mindful of your technique. Hold the apple steady with one hand while using the other hand to guide the knife through the flesh. Keep your fingers curled under to avoid any accidents, and work slowly and deliberately to ensure precision.
Once all your apples are sliced, you can move on to assembling your pie. Layer the slices in a circular pattern, overlapping slightly to create a mound of apples in the center. Sprinkle with sugar, cinnamon, and any other spices or flavorings called for in your recipe.
With your apples sliced and your pie assembled, it’s time to pop it in the oven and let the magic happen. As the apples cook, they will soften and release their juices, creating a sweet and fragrant filling that is sure to impress your guests.
So, next time you’re craving a delicious apple pie, remember to master the art of apple slicing. With the right tools, techniques, and ingredients, you can create a masterpiece that will have everyone coming back for seconds. Happy baking!
Get ready to bake the perfect pie
Ah, there’s nothing quite like the aroma of a freshly baked apple pie wafting through the kitchen. The combination of sweet apples, warm cinnamon, and buttery crust is enough to make anyone’s mouth water. But before you can enjoy that delicious pie, you need to prepare your apples properly.
When it comes to baking the perfect pie, the key is in the preparation. And that starts with slicing your apples just right. Whether you prefer a traditional lattice crust or a crumbly streusel topping, having perfectly sliced apples is essential for a successful pie.
But fear not, dear baker, for I am here to guide you through the process of slicing apples like a pro. With a few simple tips and tricks, you’ll be well on your way to pie perfection in no time. So grab your favorite peeler and let’s get slicing!
First things first, you’ll want to choose the right type of apple for your pie. While Granny Smith apples are a popular choice for their tart flavor and firm texture, you can also experiment with other varieties like Honeycrisp or Gala. Just be sure to select apples that are ripe yet firm, as mushy apples will result in a soggy pie.
Once you’ve selected your apples, it’s time to start slicing. Begin by peeling the apples and removing the cores. For a classic pie, you’ll want to slice the apples into thin, uniform slices. This can be easily achieved with a sharp knife and a steady hand. If you prefer chunkier apple pieces in your pie, feel free to cut the slices thicker.
As you’re slicing your apples, be sure to pay attention to the size of your slices. Uniformity is key here, as evenly sliced apples will ensure that your pie bakes evenly and looks aesthetically pleasing. Plus, smaller slices will cook faster than larger ones, so keep that in mind when preparing your pie.
Once you’ve sliced all your apples, it’s time to get creative with your pie filling. Add a sprinkle of cinnamon, a dash of nutmeg, or a squeeze of lemon juice to enhance the flavor of your apples. You can also experiment with adding ingredients like caramel, raisins, or walnuts for a unique twist on a classic apple pie.
Now that your apples are sliced and your filling is ready, it’s time to assemble your pie. Whether you’re going for a traditional double-crust pie or a rustic galette, be sure to arrange your apple slices in an even layer for a beautifully baked pie. And don’t forget to add a generous pat of butter on top for a golden, flaky crust.
As you pop your pie in the oven and wait for it to bake to golden perfection, take a moment to savor the anticipation of enjoying a slice of warm, Homemade apple pie. The sweet aroma filling your kitchen, the bubbling juices of the apples, and the golden crust beckoning you to take a bite – it’s a moment to be cherished.
And when your pie is finally ready, be sure to serve it warm with a scoop of vanilla ice cream or a dollop of whipped cream. The combination of flavors and textures will delight your taste buds and leave your guests impressed. So go ahead, slice, dice, and bake the perfect pie – you’ve earned it.
Slice and Dice: The Ultimate Guide to Perfectly Cutting Apples for Pie
Slice and Dice: The Ultimate Guide to Perfectly Cutting Apples for Pie
Slice, Dice, and Impress Your Guests
Welcome to the ultimate guide on how to perfectly cut apples for your delicious apple pie! If you want to impress your guests with a beautifully crafted pie, then mastering the art of slicing and dicing apples is essential. In this article, we will explore the techniques and tips to help you transform your apples into pie perfection.
When it comes to making a pie, the way you slice and dice your apples can make all the difference. Not only does it affect the appearance of your pie, but it also impacts the texture and flavor of the final product. By following these simple steps, you can elevate your apple pie to a whole new level.
First, it’s important to choose the right type of apple for your pie. While there are many varieties to choose from, some of the best apples for baking include Granny Smith, Honeycrisp, and Jonagold. These apples are firm and sweet, making them ideal for pies. Once you have your apples selected, it’s time to start slicing and dicing!
Start by washing and peeling your apples. Then, using a sharp knife, carefully slice off the top and bottom of the apple. Stand the apple upright and slice down the sides to remove the peel. Once peeled, cut the apple in half and remove the core using a melon baller or a knife. Now you’re ready to slice and dice!
For a classic apple pie, you can slice your apples into thin, even slices. This will ensure that your pie cooks evenly and has a nice texture. If you prefer a chunkier pie, you can dice your apples into small cubes. The choice is yours!
When slicing your apples, make sure to pay attention to the thickness of the slices. Thin slices will cook faster and create a softer texture, while thicker slices will hold their shape better and provide a more substantial bite. Experiment with different slicing techniques to find the perfect balance for your pie.
Once you have your apples sliced or diced, it’s time to assemble your pie. Whether you’re making a traditional lattice crust or a crumb topping, the way you arrange your apples can make a big difference in the final presentation. Layer your apple slices or cubes evenly in the pie crust, making sure to pack them tightly to avoid any gaps.
Before baking your pie, don’t forget to add your favorite spices and sweeteners. Cinnamon, nutmeg, and a touch of sugar can enhance the flavor of your apples and take your pie to the next level. Brush the crust with an egg wash for a golden finish, and then pop it in the oven to bake to perfection.
As your pie bakes, the aroma of cinnamon and apples will fill your kitchen, creating a warm and inviting atmosphere. When the pie is done, remove it from the oven and let it cool before serving. Your guests will be impressed not only by the delicious flavors but also by the beautiful presentation of your pie.
So there you have it – the ultimate guide to slicing and dicing apples for the perfect pie. With a little practice and creativity, you can create a pie that will impress your guests and have them coming back for more. Happy baking!
Transform your apples into pie perfection
Are you ready to take your apple pie game to the next level? If so, it’s time to transform your apples into pie perfection. The key to a delicious apple pie lies in the quality of the apples and how they are prepared. With the right techniques, you can ensure that your pie is bursting with flavor and perfectly cooked every time.
When it comes to making apple pie, the first step is to select the right apples. Not all apples are created equal when it comes to baking. Some varieties are too tart, while others are too sweet. The best apples for pie are those that are a balance of both sweet and tart, such as Granny Smith, Honeycrisp, or Gala apples. These varieties hold up well during baking and provide a nice contrast of flavors.
Once you have selected your apples, it’s time to prepare them for the pie. The most common way to prep apples for pie is to peel, core, and slice them. However, there are a few different techniques you can use to slice your apples, depending on the look and texture you want to achieve in your pie.
One popular technique for slicing apples is to cut them into thin, even slices. This method ensures that the apples cook evenly and create a uniform texture in the pie. To achieve this, use a sharp knife to slice the apples thinly, making sure to remove any seeds or tough parts of the core.
Another option for slicing apples is to dice them into small cubes. This method is great for creating a more rustic, chunky texture in your pie. To dice apples, simply peel and core them, then cut them into small, uniform cubes. This will give your pie a more Homemade, country-style look and feel.
If you want to get creative with your apple pie, you can also try slicing the apples into thin wedges. This technique creates a visually stunning pie that showcases the natural beauty of the apples. To slice apples into wedges, simply cut them into quarters, then slice each quarter into thin wedges. This technique is perfect for those who want to make a show-stopping pie that looks as good as it tastes.
No matter which slicing technique you choose, it’s important to make sure that your apples are evenly sliced and sized. This will ensure that they cook evenly in the pie and create a cohesive texture throughout. Take your time when slicing the apples, and make sure to pay attention to detail to achieve the perfect slices for your pie.
In addition to slicing your apples, it’s also important to season them properly before adding them to the pie. A simple mixture of sugar, cinnamon, and a touch of lemon juice can enhance the natural sweetness of the apples and give your pie a balanced flavor profile. Toss the sliced apples in the seasoning mixture until they are evenly coated, then layer them into the pie crust for baking.
Once your apples are sliced, seasoned, and layered into the pie crust, it’s time to bake your pie to perfection. Make sure to follow the Recipes-ideas/’>Recipe instructions carefully, and keep an eye on the pie as it bakes to ensure that the apples are cooked through and the crust is golden brown. With a little practice and attention to detail, you can transform your apples into pie perfection every time.
how to cut apples for pie


