
Let’s Get Rolling: Laying the Foundation
Ah, the start of a delicious pie begins with the perfect foundation – the crust. Whether you’re making a sweet fruit pie or a savory quiche, mastering the art of a lattice pie crust is essential. So let’s dive in and learn how to lay the foundation for a perfect pie!


Image Source: houseofnasheats.com
First things first, you’ll need to gather your ingredients. Flour, butter, salt, and ice water are the basic components of a classic pie crust. The key to a flaky crust is to keep your ingredients cold and work quickly to prevent the butter from melting. Once you have your ingredients ready, it’s time to start rolling.
Using a rolling pin, roll out your dough on a lightly floured surface. Start from the center and roll outwards, rotating the dough every so often to ensure an even thickness. Aim for a circle that is slightly larger than your pie dish to allow for overhang. Once your dough is rolled out to the desired size, carefully transfer it to the pie dish, gently pressing it into the bottom and sides.
Image Source: inspiredtaste.net
Now comes the fun part – creating the lattice top! Roll out a second piece of dough in the same manner as the bottom crust. Using a sharp knife or pastry cutter, slice the dough into even strips. You can make them as thick or as thin as you like, depending on your preference.
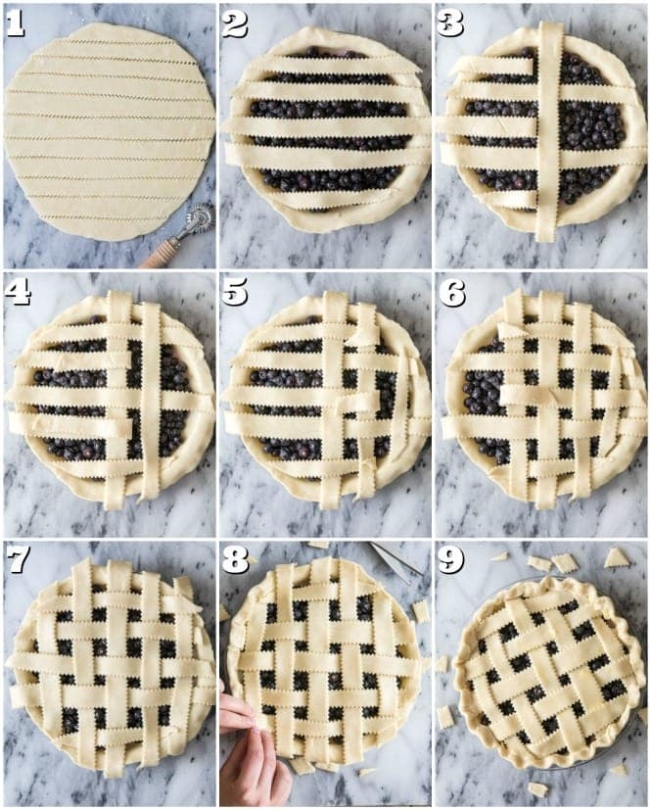
Once you have your strips ready, it’s time to weave your lattice. Start by laying half of the strips across the pie in one direction, leaving a little space between each strip. Then, fold back every other strip halfway and lay a new strip perpendicular to them. Unfold the folded strips over the new one and repeat with the remaining strips until you have a beautiful lattice pattern.
Image Source: sugarspunrun.com
As you weave your lattice, remember to work quickly to prevent the dough from getting too warm. If it starts to get too soft, you can pop it back in the fridge for a few minutes to firm up. Once your lattice is complete, trim any excess dough hanging over the edges and crimp the edges to seal everything together.
With the foundation of your pie laid, it’s time to move on to the finishing touches. Brush the top of your lattice crust with an egg wash or a sprinkle of sugar for a golden, shiny finish. You can also get creative with decorative cutouts or braided edges to make your pie truly stand out.
Now that you’ve mastered the art of laying the foundation for a perfect lattice pie crust, it’s time to bake to perfection. Pop your pie in the oven and let it bake until the crust is golden brown and the filling is bubbling. Once it’s done, let it cool slightly before slicing into it and savoring the flaky goodness of your masterpiece.
So there you have it – a step-by-step guide to mastering the art of laying the foundation for a perfect lattice pie crust. Get rolling, weave your magic, add the finishing touches, and bake to perfection for a pie that is sure to impress. Happy baking!
Weave Your Magic: Crafting the Lattice
When it comes to baking the perfect pie, mastering the art of crafting a lattice pie crust is essential. Not only does a beautifully woven lattice crust look impressive, but it also allows the filling to bubble and caramelize evenly, resulting in a deliciously flaky and golden-brown crust. In this step-by-step guide, we’ll show you how to weave your magic and create a stunning lattice crust for your next pie masterpiece.
To begin crafting your lattice crust, you’ll need to prepare your pie filling and bottom crust as directed in our previous steps. Once you have your filling ready to go, it’s time to roll out your second pie crust. Roll it out into a circle that is slightly larger than the diameter of your pie dish, then use a sharp knife or pastry wheel to cut the dough into even strips, about 1/2 inch wide.
Now comes the fun part – weaving the lattice! Start by laying half of the strips horizontally across the top of your pie filling, spacing them evenly apart. Then, fold back every other strip halfway and place a strip of dough vertically across the unfolded strips. Unfold the strips back over the vertical strip, then fold back the strips that were not folded back initially. Place another strip of dough vertically, then repeat this process until you have created a woven lattice pattern.
As you weave your lattice, be sure to gently press the edges of the strips into the bottom crust to seal them together. This will help prevent the strips from shifting or falling out of place during baking. Once you have completed weaving the lattice, trim any excess dough hanging over the edges of the pie dish and crimp the edges to seal the crust.
To add an extra touch of magic to your lattice crust, you can brush it with a beaten egg wash before baking. This will give the crust a beautiful golden sheen and help it to bake up crisp and flaky. You can also sprinkle the crust with a bit of sugar for a sweet finishing touch.
Now that your lattice crust is crafted and ready to go, it’s time to pop your pie into the oven and bake it to perfection. Follow the baking instructions for your specific pie Recipes-ideas/’>Recipe, but keep an eye on the crust as it bakes. You’ll know your pie is ready when the filling is bubbling and the crust is a deep golden brown color.
Once your pie has finished baking, remove it from the oven and let it cool slightly before serving. The lattice crust will add a beautiful finishing touch to your pie and impress your friends and family with your baking skills. Whether you’re making a classic apple pie or a decadent cherry pie, mastering the art of crafting a lattice crust is sure to take your pies to the next level.
So go ahead, weave your magic and create a stunning lattice pie crust for your next baking adventure. With a little practice and patience, you’ll be able to craft a perfect lattice crust that will have everyone coming back for seconds. Happy baking!
Crimp & Shine: Finishing Touches
When it comes to making the perfect lattice pie crust, the finishing touches are just as important as the foundation and weaving. One of the key steps in achieving a beautiful and professional-looking lattice pie is crimping the edges. This not only seals the pie and prevents the filling from bubbling over, but it also adds a decorative touch that will impress your friends and family.
To start, gently fold the excess dough from the bottom crust over the edges of the lattice. Use your fingers to create a decorative pattern by pressing the dough together. You can also use a fork to create a simple yet elegant crimped edge. Another option is to use your thumb and index finger to create a wavy pattern around the edge of the pie.
Once you have crimped the edges, it’s time to make your lattice pie shine. Brushing the top crust with an egg wash will not only give it a beautiful golden color, but it will also help to seal the crust and give it a glossy finish. Simply beat an egg with a splash of water and brush it over the lattice before baking.
For an extra special touch, sprinkle a bit of sugar over the top crust before baking. This will add a sweet crunch to the finished pie and make it look even more irresistible. You can also add a sprinkle of cinnamon or nutmeg for a warm and cozy flavor.
As a final finishing touch, don’t forget to cut a few vents in the top crust to allow steam to escape while baking. This will help prevent the filling from becoming too runny and ensure that your lattice pie bakes up perfectly every time.
With these simple yet important finishing touches, your lattice pie will look like it came straight from a professional bakery. So don’t forget to crimp and shine before popping your pie in the oven for a delicious and beautiful dessert that will wow your guests.
And now that your lattice pie is all crimped and shiny, it’s time to bake it to perfection. Let’s move on to the final step in mastering the art of lattice pie crust: baking to savor the flaky goodness!
Bake to Perfection: Savor the Flaky Goodness!
Ah, the sweet aroma of a freshly baked pie wafting through the kitchen – is there anything more comforting? As you master the art of lattice pie crust, the final step is arguably the most important: baking to perfection. After all, it’s the moment when all your hard work pays off, and you get to savor the flaky goodness of your creation.
To ensure your pie bakes to perfection, there are a few key tips and tricks to keep in mind. First and foremost, preheat your oven to the correct temperature as specified in your Recipes-ideas/’>Recipe. This will help ensure even cooking and a beautifully golden crust.
Next, place your pie on the center rack of the oven to ensure it bakes evenly. You may also want to place a baking sheet or a piece of foil underneath the pie to catch any drips and prevent a mess in your oven.
As your pie bakes, keep an eye on it through the oven window. You’ll know it’s done when the crust is a beautiful golden brown and the filling is bubbling. Resist the urge to open the oven too often, as this can cause fluctuations in temperature and affect the final outcome of your pie.
Once your pie is done baking, remove it from the oven and place it on a wire rack to cool. Allowing the pie to cool slightly before serving will help the filling set and make for easier slicing. Plus, there’s nothing quite like a warm slice of pie with a scoop of vanilla ice cream on top!
As you savor the flaky goodness of your lattice pie crust, take a moment to appreciate the artistry and skill that went into creating it. From rolling out the perfect crust to weaving a beautiful lattice pattern, each step was a labor of love that resulted in a delicious masterpiece.
So next time you’re in the mood for a sweet treat, don’t hesitate to whip up a lattice pie crust and bake to perfection. With a bit of practice and a whole lot of love, you’ll be well on your way to becoming a pie-baking pro. Enjoy every bite and savor the flaky goodness – you deserve it!
how to do a lattice pie crust


