
Lattice Pie Crust: Your Key to Baking Brilliance!
When it comes to baking pies, there’s one design element that never fails to impress: the lattice pie crust. This intricate and beautiful crust not only adds a decorative touch to your pie but also allows the delicious filling to peek through, tempting everyone who sees it.
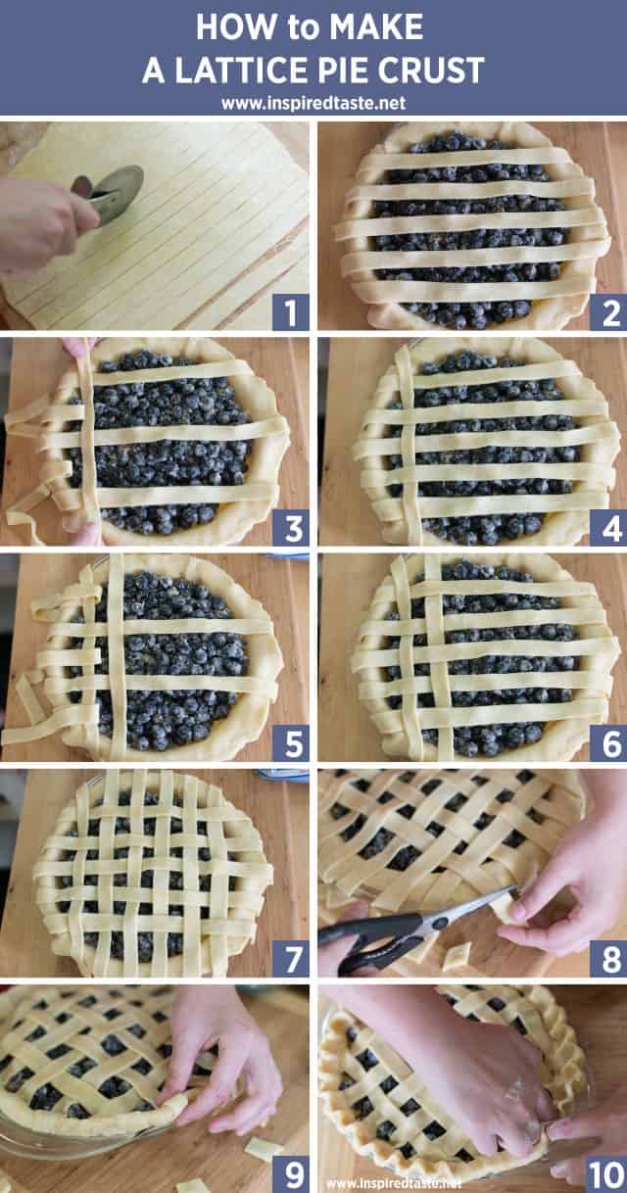
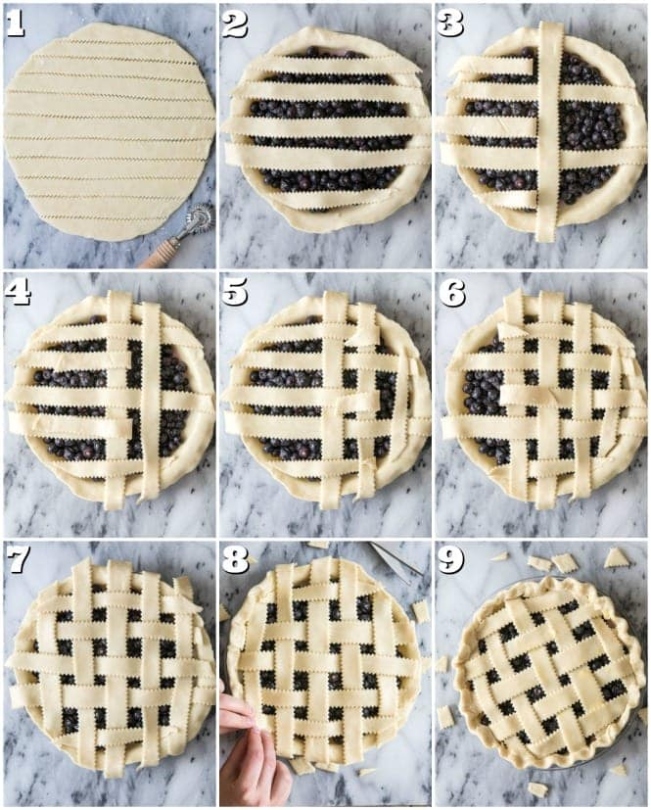
Image Source: inspiredtaste.net
Mastering the art of lattice pie crust may seem daunting at first, but with a little practice and the right technique, you’ll be creating show-stopping pies in no time. In this guide, we’ll take you through the steps to creating a perfect lattice pie crust that will have your friends and family oohing and ahhing over your baking skills.
The first step to mastering the lattice pie crust is to start with a good pie crust Recipes-ideas/’>Recipe. Whether you prefer a traditional butter crust or a flaky shortening crust, make sure to chill your dough thoroughly before rolling it out. This will help prevent the dough from shrinking during baking and will make it easier to work with when creating your lattice design.
Image Source: sugarspunrun.com
Once your dough is chilled and ready to go, roll it out into a circle that is slightly larger than your pie dish. Carefully transfer the dough to the pie dish, pressing it gently into the bottom and sides. Trim any excess dough from the edges and crimp the edges as desired. Now it’s time to create the lattice design!
To create a lattice pie crust, start by cutting strips of dough using a sharp knife or pastry wheel. You can make the strips as thin or as thick as you like, depending on the look you’re going for. Lay half of the strips across the pie in one direction, leaving a small gap between each strip.
Next, fold back every other strip halfway and lay a strip of dough perpendicular to the first set of strips. Unfold the folded strips over the new strip of dough. Now fold back the strips that were not folded the first time, lay another strip of dough next to the first perpendicular strip, and unfold the folded strips over the new strip. Repeat this process until the top of your pie is covered in a beautiful lattice design.
Once your lattice pie crust is complete, trim any excess dough from the edges and crimp the edges as desired. Brush the top of the crust with an egg wash for a golden, shiny finish, and sprinkle with a bit of sugar for an added touch of sweetness.
Bake your pie according to the recipe instructions, keeping an eye on the crust to ensure it doesn’t brown too quickly. The lattice design should become beautifully golden and crisp, creating a stunning contrast to the bubbling filling underneath.
When your pie is finished baking, let it cool slightly before serving. The lattice pie crust will not only impress your guests with its beautiful design but also add a delicious crunch to every bite. Serve slices of pie with a dollop of whipped cream or a scoop of vanilla ice cream for the perfect finishing touch.
With a little practice and patience, you’ll soon be mastering the art of lattice pie crust and wowing everyone with your baking brilliance. So grab your pie dish, roll out that dough, and get ready to create a pie that is as beautiful as it is delicious. Happy baking!
Get Ready to Wow: Learn the Basics of Lattice Design
Ah, the lattice pie crust – a true work of art in the world of baking. There’s something about those perfectly woven strips of dough that instantly elevate any pie from ordinary to extraordinary. If you’ve ever marveled at the intricate lattice work on a pie and thought to yourself, I could never do that, think again! With a little practice and the right technique, you too can master the art of lattice pie crust.
The key to creating a stunning lattice design lies in mastering the basics. While it may seem daunting at first, once you understand the fundamentals, you’ll be well on your way to wowing your friends and family with your baking brilliance. So, let’s dive in and learn the basics of lattice design!
First things first, you’ll need a batch of pie dough ready to go. Whether you prefer a classic butter crust or a flaky shortening crust, make sure it’s chilled and ready to be rolled out. Once you have your dough prepared, it’s time to get rolling – literally! Roll out your dough into a large circle, making sure it’s evenly thick throughout.
Next, it’s time to cut the dough into strips. You can use a sharp knife or a pastry wheel to create long, even strips of dough. Aim for strips that are about half an inch wide, as this will give you the perfect balance between thin and sturdy for weaving. As you cut your strips, keep them chilled in the refrigerator to prevent them from getting too soft.
Now comes the fun part – weaving the lattice! Start by laying half of the strips horizontally across the top of your filled pie, spacing them out evenly. Then, fold back every other strip halfway and lay a strip of dough vertically in the center of the pie. Unfold the strips over the new strip, then fold back the strips that weren’t folded back initially.
Repeat this process, alternating which strips you fold back each time, until you reach the edge of the pie. Trim any excess dough hanging over the edge, then crimp the edges of the lattice strips to seal them to the bottom crust. Voila! You’ve created a beautiful lattice design on your pie.
As you continue to practice your lattice design skills, don’t be afraid to get creative. Experiment with different weaving patterns, such as braids or twists, to add a unique touch to your pies. You can also use cookie cutters to create decorative shapes to lay on top of your lattice for an extra special touch.
Remember, practice makes perfect when it comes to lattice design. Don’t be discouraged if your first few attempts aren’t quite perfect – every pie you make is an opportunity to improve and hone your skills. With time and patience, you’ll be creating stunning lattice designs that will impress even the most discerning pie connoisseurs.
So, get ready to wow your friends and family with your newfound lattice design skills. With a little practice and a lot of creativity, you’ll be well on your way to mastering the art of lattice pie crust. Happy baking!
Step-by-Step Guide: Creating a Perfect Pie Crust
Pie crusts are a fundamental element of any delicious pie, and mastering the art of creating the perfect crust is essential for any aspiring baker. Whether you’re making a classic apple pie or a decadent pecan pie, the crust is what holds everything together and provides the perfect balance of flakiness and flavor. In this step-by-step guide, we will walk you through the process of creating a flawless pie crust that will elevate your baking game to the next level.
Step 1: Gather Your Ingredients
The first step in creating a perfect pie crust is gathering all of your ingredients. You will need flour, salt, sugar, cold butter, and ice water. It’s essential to use cold butter to ensure a flaky crust, as the cold butter creates steam when it bakes, resulting in those coveted layers of flakiness. Make sure to also use ice water to keep the butter cold and prevent it from melting too quickly.
Step 2: Mix the Dry Ingredients
In a large bowl, mix together the flour, salt, and sugar until well combined. Using a pastry cutter or your hands, cut the cold butter into small cubes and work it into the dry ingredients until the mixture resembles coarse crumbs. This step is crucial for creating a flaky crust, as the small pieces of butter will melt during baking and create those beautiful layers.
Step 3: Add Ice Water
Gradually add ice water to the flour and butter mixture, stirring gently with a fork until the dough comes together. Be careful not to overmix, as this can result in a tough crust. The dough should be just moist enough to hold together when pressed between your fingers. Once the dough comes together, shape it into a disk, wrap it in plastic wrap, and refrigerate for at least 30 minutes.
Step 4: Roll Out the Dough
After the dough has chilled, remove it from the refrigerator and let it sit at room temperature for a few minutes to soften slightly. On a lightly floured surface, roll out the dough into a circle that is about 1/8 inch thick. Make sure to roll the dough evenly and turn it occasionally to prevent sticking.
Step 5: Create Your Pie Crust
Once the dough is rolled out, carefully transfer it to a pie dish. Gently press the dough into the bottom and sides of the dish, being careful not to stretch the dough. Trim any excess dough from the edges, leaving about a half-inch overhang. You can then crimp the edges in whatever design you prefer, whether it’s a simple fork pattern or a more elaborate braided edge.
Step 6: Bake Your Pie Crust
At this point, your pie crust is ready to be filled and baked according to your Recipes-ideas/’>Recipe‘s instructions. Whether you’re making a fruit pie, a custard pie, or a savory pie, a perfectly baked crust is key to a successful final product. Make sure to follow the baking time and temperature specified in your recipe to achieve a golden brown crust that is flaky and delicious.
In conclusion, creating a perfect pie crust is a combination of technique, precision, and a little bit of love. By following this step-by-step guide, you can master the art of creating a flawless pie crust that will impress your friends and family. So go ahead, roll up your sleeves, and get baking – the perfect pie crust awaits!
Tips and Tricks for Elevating Your Pie Game!
Are you ready to take your baking skills to the next level and master the art of lattice pie crust? If so, you’ve come to the right place! In this guide, we will share some tips and tricks that will help you elevate your pie game and create show-stopping desserts that will impress your friends and family.
Tip #1: Use Cold Ingredients
One of the most important tips for making a perfect lattice pie crust is to use cold ingredients. This includes cold butter, cold water, and even cold flour. Keeping your ingredients cold will help create a flaky and tender crust that is perfect for holding your delicious pie filling.
Tip #2: Don’t Overwork the Dough
When making your pie crust, it’s important not to overwork the dough. Overworking the dough can result in a tough and dense crust, rather than the light and flaky crust you’re aiming for. Mix the dough until it just comes together, and then stop. You want to see small pieces of butter throughout the dough – this is what will create those beautiful layers in your crust.
Tip #3: Roll Out the Dough Properly
Rolling out the dough for your lattice crust can be a bit tricky, but with the right technique, you can create a perfect crust every time. Start by rolling out the dough into a circle that is slightly larger than your pie dish. Then, use a sharp knife or pastry wheel to cut the dough into strips for your lattice. Make sure the strips are all the same width to create a uniform look.
Tip #4: Weave Your Lattice Carefully
Once you have your strips of dough cut, it’s time to weave your lattice crust. Start by laying half of the strips horizontally across the top of your pie filling, leaving about half an inch of space between each strip. Then, fold back every other strip and lay a new strip of dough vertically across the pie. Continue this process, folding back alternating strips each time, until you have created a beautiful lattice pattern.
Tip #5: Brush with Egg Wash
To give your lattice pie crust that beautiful golden color, be sure to brush it with an egg wash before baking. Simply whisk together an egg with a bit of water or milk, and then brush it lightly over the top of your crust. This will help the crust brown evenly and give it a beautiful shine.
Tip #6: Add Decorative Touches
To really impress your guests, consider adding some decorative touches to your lattice pie crust. Use small cookie cutters to create shapes out of the dough and place them on top of the pie for a fun and festive look. You can also sprinkle some sugar over the top of the crust before baking for a bit of extra sweetness and crunch.
Tip #7: Serve with Style
Once your lattice pie crust is baked to perfection, it’s time to serve it up in style. Consider serving your pie with a dollop of whipped cream or a scoop of vanilla ice cream for a delicious and decadent dessert. You can also drizzle some caramel sauce or chocolate ganache over the top for an extra special touch.
With these tips and tricks in hand, you’ll be well on your way to mastering the art of lattice pie crust and creating stunning desserts that will wow your friends and family. So roll up your sleeves, preheat your oven, and get ready to elevate your pie game to a whole new level!
how to do lattice on pie


