
Lattice Pie Making 101
Master the Art of Lattice Pie Making: A Step-by-Step Guide
Pie Perfection: Lattice Pie Making 101
There’s something truly special about a lattice pie. The intricate weaving of the pastry on top not only looks beautiful, but it also allows the delicious filling to peek through, tempting your taste buds with every slice. If you’ve always wanted to master the art of lattice pie making, you’ve come to the right place! Follow this step-by-step guide to create your own pie perfection.
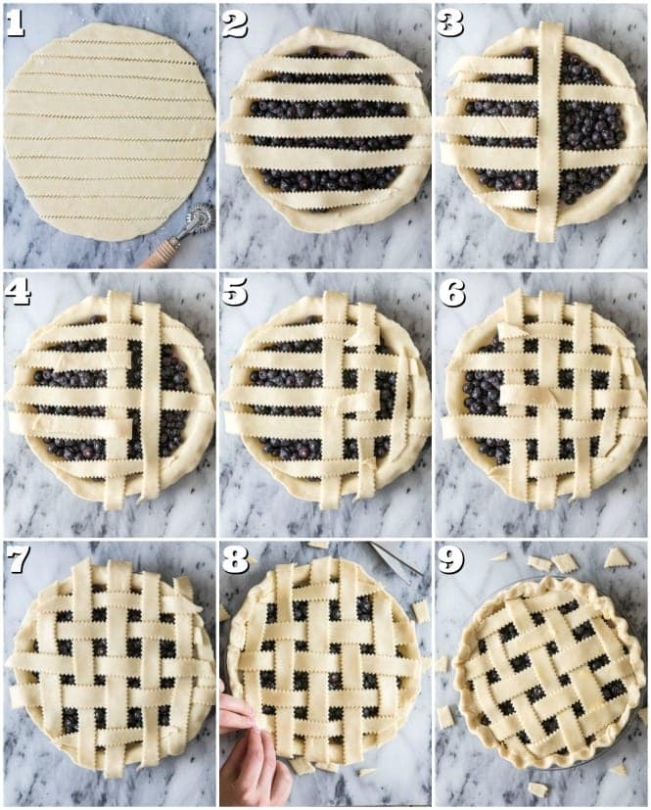
Image Source: inspiredtaste.net
Before we dive into the details of creating the perfect lattice, it’s important to gather all the tools and ingredients you’ll need. From a rolling pin to your favorite pie filling, make sure you have everything on hand before you begin.
Once you have everything ready, it’s time to start weaving your magic. Creating the perfect lattice requires a bit of patience and practice, but with the right technique, you’ll be well on your way to pie perfection.
Image Source: sugarspunrun.com
When it comes to baking your lattice pie, there are a few tips and tricks to keep in mind to ensure a flaky finish. From brushing the top with egg wash to monitoring the oven temperature, these small details can make a big difference in the final result.
Now that you have a basic understanding of what it takes to create a lattice pie, let’s dive into the specifics of Pie Perfection: Lattice Pie Making 101.
First and foremost, you’ll need to have your favorite pie dough ready to go. Whether you prefer a traditional butter crust or a flaky shortening crust, make sure it’s chilled and ready to roll out.
Once your dough is ready, it’s time to roll it out into a circle. Use a floured surface and rolling pin to achieve an even thickness, aiming for a circle that is slightly larger than the size of your pie dish.
Next, carefully transfer the rolled-out dough to your pie dish, gently pressing it into the bottom and sides. Trim any excess dough hanging over the edges, leaving a clean edge all around.
Now, it’s time to prepare the filling for your lattice pie. Whether you’re opting for a classic apple pie or a decadent berry filling, make sure it’s cooked and cooled before adding it to the pie crust.
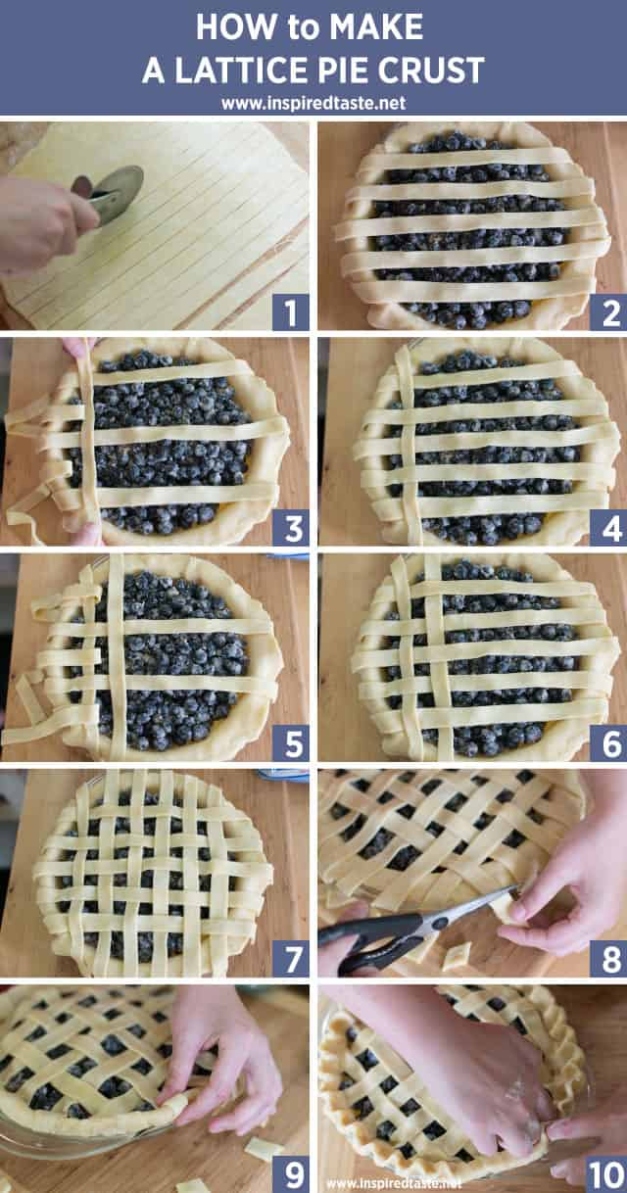
Once your filling is ready, it’s time to create the lattice on top. Roll out another piece of pie dough and use a sharp knife or pastry wheel to cut it into strips. You can make them as thick or as thin as you like, but aim for consistency for a visually appealing lattice.
To create the lattice, lay half of the strips horizontally across the top of the filling, spacing them evenly apart. Then, fold back every other strip and place a new strip vertically across the unfolded strips. Repeat this process, alternating the strips, until the entire pie is covered in a beautiful lattice pattern.
Once your lattice is complete, gently press the edges of the strips into the bottom crust to seal them together. Trim any excess dough hanging over the edges of the pie dish, creating a clean, even edge.
Before baking your lattice pie, it’s important to brush the top with an egg wash. This will help achieve a golden-brown finish and add a bit of shine to the lattice. You can also sprinkle the top with a bit of sugar for an extra touch of sweetness.
When it comes to baking your lattice pie, make sure to preheat your oven to the correct temperature. This will help ensure that the crust bakes evenly and becomes beautifully flaky. Keep a close eye on the pie while it’s in the oven, rotating it if necessary to achieve an evenly browned finish.
Once your lattice pie is baked to perfection, remove it from the oven and allow it to cool slightly before serving. Whether you enjoy it warm with a scoop of vanilla ice cream or at room temperature with a dollop of whipped cream, your lattice pie is sure to be a hit with family and friends.
With a bit of practice and patience, you can master the art of lattice pie making and create beautiful, delicious pies to enjoy all year round. So roll up your sleeves, gather your ingredients, and get ready to weave your magic with Pie Perfection: Lattice Pie Making 101.
Get Ready to Roll: Tools and Ingredients
Welcome to the second installment of our series on mastering the art of lattice pie making! In this article, we will dive into the essential tools and ingredients you need to create a beautiful and delicious lattice pie. So, let’s get ready to roll!
First things first, let’s talk about the tools you will need. To create a perfect lattice pie, you will need a few key items. A rolling pin is essential for rolling out your pie dough to the perfect thickness. Make sure to choose a sturdy, well-made rolling pin that feels comfortable in your hands.
Next, you will need a pastry cutter or a sharp knife for cutting your dough into strips for the lattice. A pastry brush is also handy for brushing on egg wash or water to seal the edges of your pie crust. And of course, don’t forget a pie dish to bake your masterpiece in!
Now, let’s talk about the ingredients. The foundation of any good lattice pie is a flaky, buttery pie crust. To make your pie crust, you will need flour, salt, sugar, butter, and ice water. Make sure to use cold butter and ice water to keep your dough nice and cold, which will result in a flakier crust.
For the filling, the possibilities are endless! You can use fresh or frozen fruit, such as apples, berries, or peaches. You can also get creative and experiment with different flavor combinations, like adding spices or even a splash of liquor.
Once you have gathered all of your tools and ingredients, it’s time to get rolling! Start by preparing your pie crust dough according to your favorite Recipes-ideas/’>Recipe. Roll out half of the dough on a floured surface until it is about 1/8 inch thick. Carefully transfer the dough to your pie dish, making sure to press it into the bottom and sides.
Now, it’s time to create the lattice top. Roll out the remaining dough and use a pastry cutter or knife to cut it into strips. You can make the strips as thick or thin as you like, depending on your preference. Arrange the strips in a lattice pattern on top of the pie, weaving them over and under each other to create a beautiful design.
Once you have finished weaving the lattice, trim any excess dough from the edges of the pie dish and crimp the edges to seal. Brush the top of the pie with egg wash or water to help it brown in the oven.
Now, it’s time to bake your pie to perfection! Preheat your oven to the temperature specified in your recipe and bake the pie until the crust is golden brown and the filling is bubbling. Let the pie cool slightly before slicing and serving.
With the right tools and ingredients, you can create a lattice pie that is not only beautiful to look at but also delicious to eat. So, get ready to roll and start creating your own lattice pie masterpiece today!
Weave Your Magic: Creating the Perfect Lattice
Welcome to the world of lattice pie making, where a simple crisscross pattern can transform your pie into a work of art. Creating the perfect lattice crust may seem daunting at first, but with a little practice and some helpful tips, you’ll be weaving your way to pie perfection in no time.
The key to a beautiful lattice pie crust lies in the technique of weaving the strips of dough together. The process may seem intricate, but with a little patience and attention to detail, you can create a stunning lattice that will impress your friends and family.
To begin, roll out your pie dough into a thin, even sheet. Using a sharp knife or pastry cutter, slice the dough into strips of equal width. Depending on the size of your pie, you’ll need enough strips to cover the entire surface of the pie, with a few extras for weaving.
To create a classic lattice pattern, lay half of the strips horizontally across the top of the pie filling, leaving equal spacing between each strip. Then, fold back every other strip halfway and lay a new strip vertically across the unfolded strips. Unfold the folded strips over the new strip, then fold back the remaining horizontal strips and lay another vertical strip. Continue this weaving pattern until the entire pie is covered.
As you weave the strips together, be sure to gently press the edges of the strips into the bottom crust to seal them together. This will help to prevent the strips from shifting during baking and ensure a cohesive lattice pattern.
For a more intricate lattice design, try experimenting with different weaving patterns. You can create a lattice with a chevron pattern by weaving the strips in a zigzag formation, or a lattice with a diamond pattern by weaving the strips in a crisscross Fashion. The possibilities are endless, so don’t be afraid to get creative with your lattice designs.
Once you’ve finished weaving the lattice, trim any excess dough from the edges of the pie and crimp the edges to seal the crust. For a decorative touch, you can use any extra dough scraps to create small shapes or cutouts to adorn the top of the pie.
Before baking your pie, be sure to brush the lattice crust with an egg wash or milk to help achieve a golden, shiny finish. This will not only enhance the appearance of the pie but also aid in creating a flaky texture on the crust.
When it comes to baking your lattice pie, it’s important to keep a close eye on the oven temperature. A hot oven will help the crust to bake evenly and achieve a beautiful golden color, while a cooler oven may result in a soggy bottom crust.
To prevent the edges of the lattice from burning, you can cover them with strips of aluminum foil halfway through the baking process. This will allow the center of the pie to continue baking while protecting the delicate edges from becoming too brown.
As your lattice pie bakes, the strips of dough will begin to puff up and brown, creating a visually stunning effect. Keep an eye on the pie as it bakes to ensure that the lattice crust is cooking evenly and doesn’t become too dark.
With a little practice and attention to detail, you can master the art of creating the perfect lattice pie crust. Whether you’re making a classic apple pie or a decadent berry pie, a beautifully woven lattice crust will elevate your dessert to a whole new level. So roll up your sleeves, grab your rolling pin, and start weaving your magic today.
Bake to Perfection: Tips for a Flaky Finish
Welcome back to our step-by-step guide on mastering the art of lattice pie making! In this section, we will be focusing on the final step of the process – baking your pie to perfection. The key to a delicious lattice pie lies not only in the filling and the lattice design, but also in achieving a flaky and golden-brown crust. Here are some tips to help you achieve that flaky finish every time:
1. Use Cold Ingredients: One of the most important tips for achieving a flaky crust is to use cold ingredients. This includes cold butter, cold water, and even cold flour. Keeping your ingredients cold helps to create steam when the pie is baking, which in turn creates those beautiful, flaky layers that we all love.
2. Don’t Overwork the Dough: When making your pie crust, be sure not to overwork the dough. Overworking the dough can lead to a tough crust rather than a flaky one. Mix the ingredients until just combined, and then stop. It’s okay if there are some lumps of butter in the dough – this is actually what helps create those flaky layers.
3. Chill the Dough: After making your pie dough, be sure to chill it in the refrigerator for at least 30 minutes before rolling it out. This helps to relax the gluten in the dough and firm up the butter, making it easier to roll out and shape. It also helps to prevent the butter from melting too quickly in the oven, which can result in a soggy crust.
4. Roll Out the Dough Properly: When rolling out your dough, be sure to do so on a floured surface to prevent sticking. Roll the dough out in a circular shape, rotating it frequently to ensure an even thickness. If the dough starts to become too warm and soft, place it back in the refrigerator for a few minutes to firm up again.
5. Use a Pie Shield: To prevent the edges of your pie crust from burning before the rest of the pie is fully baked, consider using a pie shield. This can be a purchased pie shield or simply a piece of foil wrapped around the edges of the pie. This will help to protect the edges from becoming too dark while the rest of the pie bakes to perfection.
6. Brush with Egg Wash: For a beautiful golden-brown finish, consider brushing your lattice pie with an egg wash before baking. Simply whisk together an egg with a splash of water or milk, and brush it over the top of the pie crust before baking. This will give your pie a shiny, golden finish that is sure to impress.
7. Bake at the Right Temperature: It’s important to bake your pie at the right temperature to ensure that the crust bakes evenly and becomes golden-brown. Most lattice pies are baked at a temperature of around 375-400 degrees Fahrenheit. Be sure to preheat your oven before baking to ensure that the crust bakes properly from the start.
8. Let it Cool: Once your lattice pie is finished baking, be sure to let it cool on a wire rack before serving. Allowing the pie to cool slightly will help the filling set and make it easier to slice. Cutting into a pie that is too hot can cause the filling to run, resulting in a messy presentation.
By following these tips for achieving a flaky finish, you’ll be well on your way to creating beautiful lattice pies that are sure to impress your friends and family. So go ahead, roll out that dough, weave your lattice, and bake to perfection – you’ve got this!
how to do lattice pie


