

Elevate Your Pie Game with a Stunning Lattice Crust!
Are you ready to take your pie-making skills to the next level? Look no further than the beautiful lattice crust! This classic pie design is not only visually stunning but also surprisingly easy to create with just a few simple steps. Whether you’re a seasoned baker or a novice in the kitchen, mastering the art of the lattice crust will surely impress your friends and family at your next gathering.
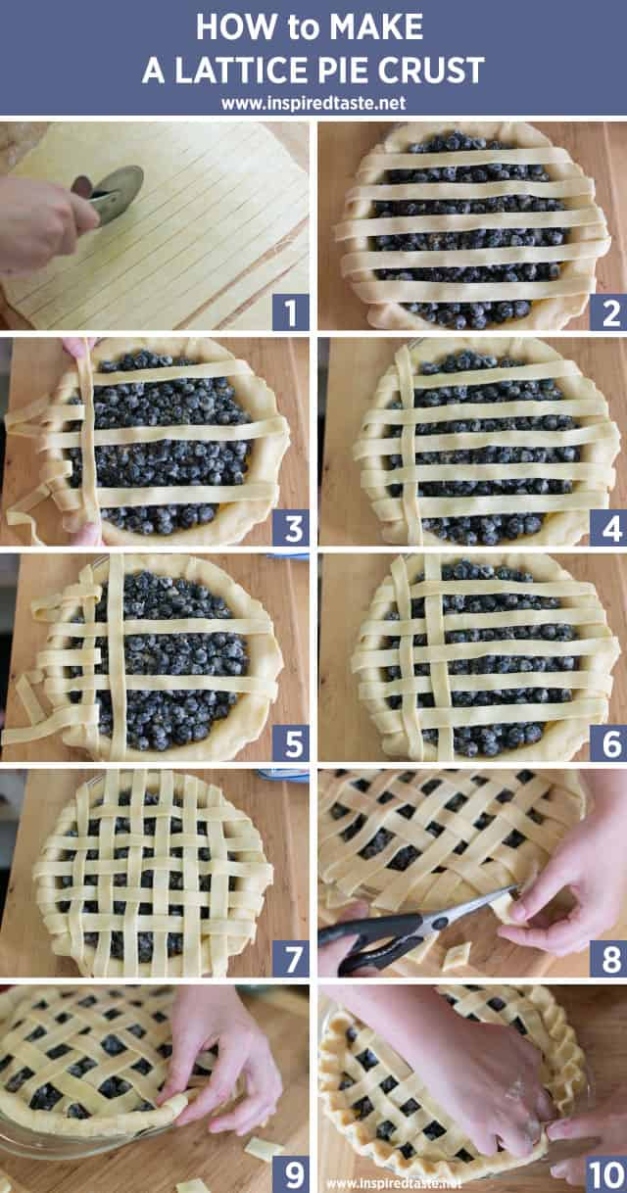
Image Source: inspiredtaste.net
The key to creating a gorgeous lattice pie crust is all in the technique. Start by rolling out your pie dough and cutting it into thin strips using a sharp knife or a pastry cutter. These strips will be woven together to create the lattice pattern on top of your pie. Don’t worry if your strips aren’t perfectly even – a little bit of imperfection only adds to the charm of a Homemade pie.
Once you have your strips ready, it’s time to start weaving your lattice crust. Begin by laying half of the strips vertically across the top of your filled pie, leaving a bit of space between each strip. Then, fold back every other strip and lay another strip horizontally across the top. Fold the vertical strips back over the horizontal strip and continue this weaving pattern until you’ve covered the entire pie. It may seem intimidating at first, but with a little practice, you’ll be weaving like a pro in no time.
Image Source: sugarspunrun.com
As you weave your lattice crust, remember to gently press the edges of the strips onto the bottom crust to seal them together. This will help prevent any filling from leaking out during baking and will give your pie a beautiful finished look. If you’re feeling extra creative, you can even use small cookie cutters to create decorative shapes out of the leftover dough and place them on top of your lattice for an added touch of whimsy.
Once your lattice crust is complete, brush it with an egg wash or a bit of milk to help it achieve that golden-brown color when baked. This final step will give your pie a professional finish and make it look as good as it tastes. Pop your pie in the oven and watch as the lattice crust bakes up into a beautiful geometric pattern that will have everyone reaching for a slice.
The best part about mastering the lattice crust is that it can be used on any type of pie – from classic apple to decadent cherry or savory chicken pot pie. The lattice design adds a touch of elegance to any dessert and showcases your pie-making skills in a way that is sure to impress your friends and family. So go ahead, give it a try and elevate your pie game with a stunning lattice crust today!
In conclusion, creating a lattice crust is a fun and creative way to take your pies to the next level. With just a few simple steps, you can transform an ordinary pie into a show-stopping dessert that will have everyone talking. So why wait? Master the art of the lattice crust and wow your friends with your pie-making skills at your next gathering.
Step-by-Step Guide to Perfecting Your Pie Decor!
Pie making is an art form that can elevate any dessert to a whole new level. And one of the most visually stunning ways to craft a pie is by creating a lattice crust. This intricate design not only looks impressive but also adds a delicious crunch to every bite. If you’ve always wanted to master the art of creating a gorgeous lattice pie crust, then you’re in the right place! Follow these easy steps to perfect your pie decor and impress your friends and family with your baking skills.
Step 1: Choose the Right Dough
The first step in creating a perfect lattice pie crust is to choose the right dough. You want a dough that is easy to work with and won’t shrink too much during baking. A good rule of thumb is to use a pie crust Recipes-ideas/’>Recipe that has a higher fat content, like a traditional butter crust. This will give you a flaky and tender crust that is perfect for creating intricate designs.
Step 2: Roll Out the Dough
to the correct thickness
Once you have your dough ready, it’s time to roll it out to the correct thickness. You want your dough to be thin enough to create a delicate lattice design but not too thin that it will fall apart when you try to transfer it onto your pie. Roll out your dough on a lightly floured surface, rotating it occasionally to ensure an even thickness.
Step 3: Cut Strips of Dough
Once your dough is rolled out, it’s time to cut it into strips. You can use a sharp knife or a pastry wheel to cut even strips of dough. The width of the strips is up to you, but a good rule of thumb is to make them about 1/2 inch wide. Make sure to cut an even number of strips so that you have enough to create a lattice design on your pie.
Step 4: Weave the Lattice
Now comes the fun part – weaving the lattice! Start by laying half of the strips across the top of your pie filling, evenly spaced apart. Then, fold back every other strip halfway. Place a new strip of dough perpendicular to the folded strips. Unfold the folded strips over the new strip., then fold back the strips that weren’t folded back the first time. Lay another strip of dough perpendicular to the folded strips. Continue this pattern until the lattice is complete. Trim any excess dough from the edges and crimp them to seal.
Step 5: Egg Wash and Bake
Once your lattice crust is complete, it’s time to give it a beautiful golden finish. Brush the top of your pie crust with an egg wash, which is simply a beaten egg mixed with a little water. This will give your crust a shiny and golden appearance when baked.
Now, bake your pie according to the recipe instructions. Keep an eye on it as it bakes to ensure that the crust doesn’t burn. Once your pie is done baking, let it cool before slicing and serving to your eager guests.
With these easy steps, you can master the art of creating a gorgeous lattice pie crust that will impress everyone who sees and tastes it. So, roll up your sleeves, put on your apron, and get ready to elevate your pie-making game with this stunning decorative technique!
Transform Your Desserts with a Beautiful Lattice Design!
Are you ready to take your dessert game to the next level? If you’re looking to impress your friends and family with your pie-making skills, then mastering the art of creating a gorgeous lattice pie crust is a must! A lattice crust not only adds a decorative touch to your pie but also allows the fruit filling to peek through, creating a beautiful and mouthwatering presentation.
Creating a lattice pie crust may seem intimidating at first, but with a few easy steps and some practice, you’ll be able to transform your desserts into works of art. In this article, we’ll guide you through the process of creating a stunning lattice design that will elevate your pies to new heights.
The first step in creating a lattice pie crust is to prepare your pie dough. Whether you’re using store-bought or Homemade dough, make sure it’s chilled and firm before rolling it out. Once your dough is ready, roll it out into a circle on a floured surface, about 1/8 inch thick.
Next, it’s time to cut the dough into strips for the lattice. Using a sharp knife or a pastry wheel, cut the dough into even strips, about 1/2 inch wide. You can make the strips as thick or thin as you’d like, depending on the look you’re going for. For a more intricate lattice design, try cutting some of the strips into different widths.
After cutting the strips, it’s time to create the lattice pattern on top of your pie. Start by laying half of the strips across the pie filling in one direction, leaving about 1/2 inch of space between each strip. Then, fold back every other strip halfway and lay a new strip perpendicular to them. Unfold the folded strips over the new one and repeat with the remaining strips until the lattice is complete.
As you’re weaving the lattice, make sure to gently press the edges of the strips into the bottom crust to seal them together. This will help prevent the strips from sliding around during baking and ensure a cohesive lattice design. Once the lattice is complete, trim any excess dough hanging over the edges of the pie pan.
Before baking your pie, you can brush the lattice with an egg wash for a golden finish. This will give your lattice a shiny and crisp appearance once it’s baked. You can also sprinkle the lattice with sugar for an extra touch of sweetness and sparkle.
When your pie is ready to bake, make sure to place it on a baking sheet to catch any drips that may bubble over during baking. This will help prevent a mess in your oven and keep your pie looking picture-perfect.
Once your pie is out of the oven and cooled, it’s time to slice into the beautiful lattice crust and reveal the delicious fruit filling inside. Your friends and family will be amazed at your pie-making skills and won’t be able to resist a slice of your stunning creation.
So, don’t be afraid to experiment with different lattice designs and techniques to create a pie that’s as beautiful as it is delicious. With a little practice and a lot of creativity, you’ll be able to transform your desserts into works of art that will impress everyone who has the pleasure of enjoying them. Mastering the art of creating a gorgeous lattice pie crust is a fun and rewarding skill that will take your dessert game to new heights.
Impress Your Friends with Your Pie-Making Skills!
Are you looking to up your baking game and impress your friends with your pie-making skills? One surefire way to do so is by mastering the art of creating a gorgeous lattice pie crust. Not only does a lattice crust add a beautiful decorative touch to your pies, but it also allows the filling to peek through, creating a visually stunning dessert that is sure to wow your guests.
Creating a lattice pie crust may seem like a daunting task, but with a few simple steps and some practice, you can easily achieve a professional-looking result. Whether you’re a seasoned baker looking to take your skills to the next level or a beginner looking to impress your friends, mastering the art of creating a lattice pie crust is a fun and rewarding challenge.
The key to creating a perfect lattice pie crust is in the preparation. Start by making your favorite pie dough Recipes-ideas/’>Recipe and chilling it in the refrigerator. While the dough is chilling, prepare your pie filling and set it aside. Once your dough is chilled, roll it out on a lightly floured surface into a large circle, about 1/8 inch thick.
Next, cut the rolled-out dough into even strips using a sharp knife or a pastry wheel. You can make the strips as thick or as thin as you like, depending on the look you’re going for. Once you have your strips cut, it’s time to assemble the lattice crust on top of your filled pie.
To create a lattice crust, start by laying half of the strips across the pie filling in one direction, leaving about 1/2 inch of space between each strip. Then, fold back every other strip halfway and lay a new strip perpendicular to them. Unfold the folded strips over the new strip and fold back the strips that were not folded back in the first step. Continue this process, alternating which strips are folded back, until the entire pie is covered with a lattice pattern.
Once you have completed your lattice crust, trim any excess dough from the edges of the pie and crimp them together to seal. If desired, you can brush the crust with an egg wash for a shiny finish or sprinkle it with sugar for a sweet crunch.
Bake your pie according to your recipe’s instructions, keeping an eye on the crust to ensure it doesn’t burn. Once the pie is golden brown and bubbling, remove it from the oven and let it cool before serving.
By following these easy steps and practicing your lattice pie crust skills, you’ll be able to impress your friends with your pie-making abilities in no time. Whether you’re serving up a classic apple pie or a decadent cherry pie, a lattice crust is sure to take your dessert to the next level and leave your guests begging for more.
So why not give it a try and see for yourself how mastering the art of creating a gorgeous lattice pie crust can elevate your baking game and impress your friends? Happy baking!
how to do lattice pie crust


