
Let’s Get Latticed: The Ultimate Pie Crust Tutorial!
Pie making is an art form that has been passed down through generations. There’s something truly magical about the process of creating a delicious pie from scratch, especially when it comes to the intricate weaving of a lattice crust. In this tutorial, we will guide you through the steps to mastering the art of pie lattice, ensuring that your crusts come out perfectly woven every time.
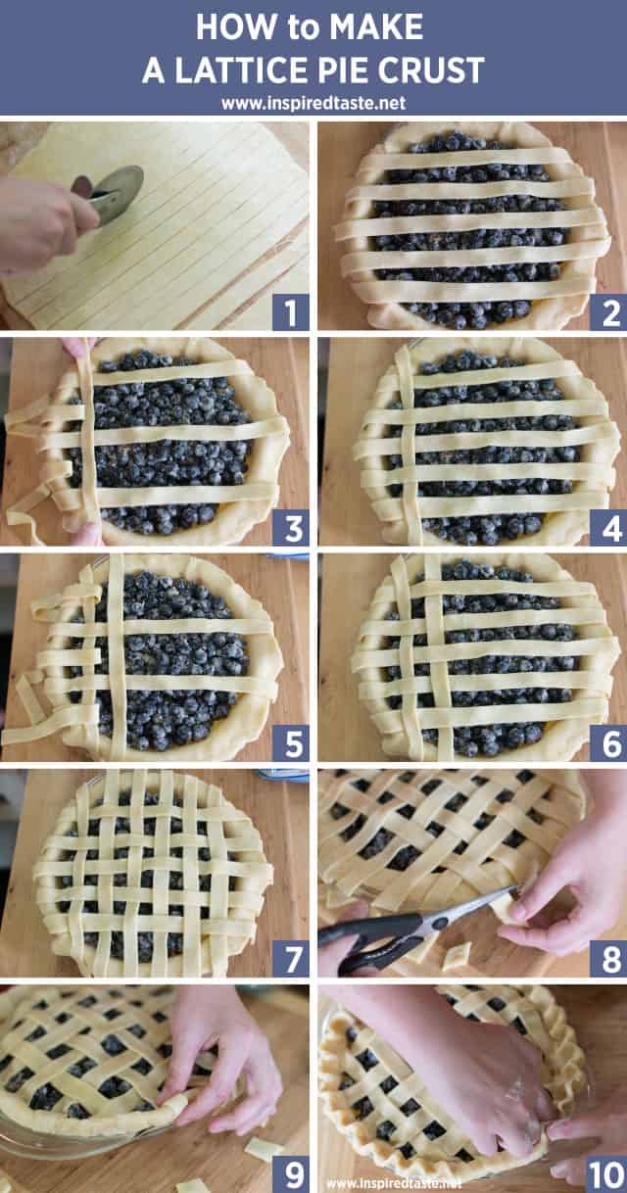

Image Source: houseofnasheats.com
To begin, it’s important to start with a good pie crust Recipes-ideas/’>Recipe. Whether you prefer a traditional butter crust or a flaky shortening crust, make sure to follow the recipe carefully and give the dough plenty of time to chill. A cold dough is essential for easy rolling and shaping.
Once your dough is ready, divide it into two equal portions. Roll out one portion into a circle to fit your pie dish, and carefully transfer it to the dish, making sure to press it into the edges. This will serve as the base of your pie, so take your time to make sure it’s smooth and even.
Image Source: inspiredtaste.net
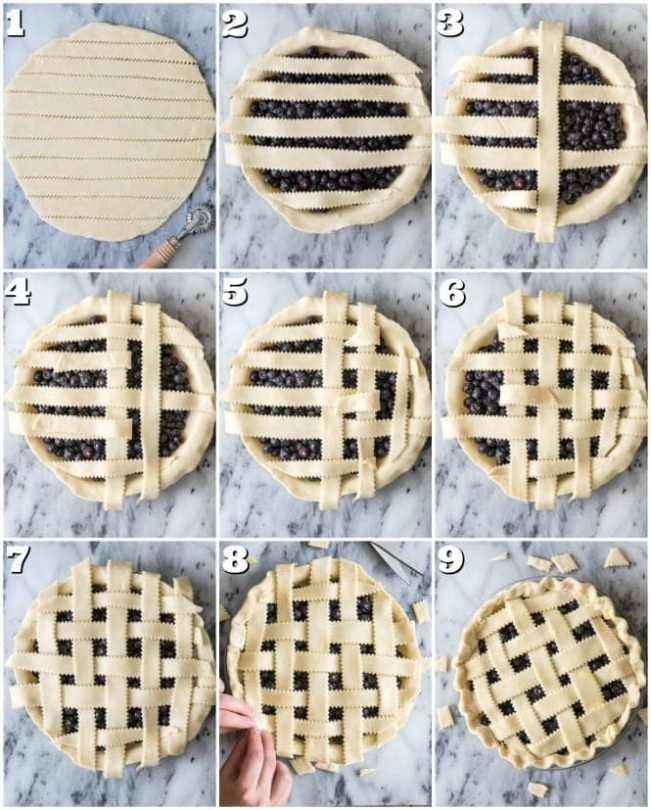
Next, it’s time to prepare the lattice strips. Roll out the second portion of dough into a rectangle, and use a sharp knife or pastry cutter to slice it into even strips. Depending on the size of your pie dish, you may need anywhere from 8 to 12 strips.
Now comes the fun part – weaving the lattice! Start by laying half of the strips horizontally across the pie, leaving equal spacing between each strip. Then, fold back every other strip halfway, and place a new strip vertically across the unfolded strips. Unfold the folded strips over the new strip, and repeat this process until you have created a woven lattice pattern.
Image Source: sugarspunrun.com
As you weave the lattice, it’s important to work quickly to prevent the dough from becoming too warm and difficult to handle. If at any point the dough becomes too soft, simply pop it back in the fridge for a few minutes to firm up before continuing.
Once your lattice is complete, trim any excess dough hanging over the edges of the pie dish, and crimp the edges to seal the lattice to the base crust. This will ensure that your pie holds together beautifully as it bakes.
Before baking, you can brush the lattice crust with an egg wash for a beautiful golden finish, or sprinkle it with sugar for a touch of sweetness. Then, pop the pie in the oven and bake according to your recipe’s instructions.
And there you have it – a perfectly woven lattice crust that will impress all of your friends and family. With a little practice and patience, you’ll soon be able to create stunning lattice designs that will take your pies to the next level. So grab your rolling pin and get latticed – the ultimate pie crust tutorial awaits!
Weave Your Magic: Tips for Flawless Pie Lattice
When it comes to baking a pie, the crust is just as important as the filling. And one of the most beautiful and impressive ways to top off a pie crust is with a lattice design. The crisscross pattern not only adds visual appeal but also allows the filling to peek through, creating a tantalizing teaser for what’s inside.
But weaving a perfect lattice crust can be a daunting task for some bakers. The good news is that with a few simple tips and tricks, you can master the art of pie lattice and create flawless, picture-perfect crusts every time. So, grab your rolling pin and get ready to weave your magic with these helpful hints.
First and foremost, make sure your pie dough is well-chilled before you attempt to create a lattice design. Cold dough is easier to work with and less likely to tear or stretch. If your dough becomes too warm while you’re working with it, simply pop it back in the refrigerator for a few minutes to firm up.
When rolling out your dough, be sure to roll it evenly to the desired thickness. Uneven dough can result in a lopsided lattice pattern. Use a ruler or pastry mat to guide you if needed. And don’t forget to flour your work surface and rolling pin to prevent sticking.
Once you have your dough rolled out, it’s time to cut strips for your lattice. You can use a sharp knife or a pastry wheel to create uniform strips. Aim for strips that are about 1/2 inch wide for a classic lattice design. If you want a more intricate pattern, you can make thinner strips or even mix and match different widths.
To create a traditional lattice pattern, lay half of the strips across the filled pie in one direction, leaving about 1/2 inch of space between each strip. Then, fold back every other strip halfway and lay a new strip perpendicular to them. Continue folding back alternating strips and laying new ones until you have woven a complete lattice pattern.
If you’re feeling adventurous, you can experiment with different lattice designs, such as a braided lattice or a diamond pattern. The key is to have fun and let your creativity shine through. Remember, there’s no right or wrong way to weave a lattice crust – as long as it looks beautiful and tastes delicious.
Once you have finished weaving your lattice crust, trim any excess dough hanging over the edge of the pie plate. You can crimp the edges with a fork or your fingers for a decorative finish. Brush the top of the crust with an egg wash or milk for a golden, shiny finish.
Finally, bake your pie according to the Recipes-ideas/’>Recipe instructions, keeping an eye on the crust to ensure it doesn’t burn. The lattice should turn golden brown and crispy, providing the perfect contrast to the juicy filling underneath. Let the pie cool slightly before slicing and serving – and be prepared for oohs and ahhs from your impressed guests.
With these tips for flawless pie lattice, you’ll be well on your way to mastering the art of pie design. So, roll up your sleeves, dust off your apron, and get ready to weave your magic with a perfectly woven crust that’s as beautiful as it is delicious. Happy baking!
Crisscross Craze: Mastering the Art of Pie Design
When it comes to creating a beautiful and delicious pie, the design of the crust is just as important as the filling. One of the most popular and visually stunning designs is the crisscross lattice pattern. This intricate design adds a touch of elegance to any pie, making it a showstopper at any gathering or event.
Mastering the art of pie design, specifically the crisscross lattice pattern, takes practice and patience. But with the right guidance and a bit of creativity, you can create perfectly woven crusts that will impress your friends and family. In this step-by-step guide, we will walk you through the process of creating a stunning crisscross lattice pie crust.
The first step in creating a crisscross lattice pie crust is to prepare your pie dough. Whether you are using a store-bought crust or making your own from scratch, it is important to roll out the dough to the proper thickness. The dough should be thin enough to be pliable, but not so thin that it tears easily.
Once you have rolled out your dough, it is time to cut it into strips. Using a sharp knife or a pizza cutter, cut the dough into long strips of equal width. These strips will be used to create the lattice pattern on top of the pie.
Next, it is time to fill your pie. Whether you are making a fruit pie, a savory pie, or a custard pie, be sure to fill it with your desired ingredients before moving on to the lattice design. Once the pie is filled, it is time to start weaving the lattice pattern.
To create the crisscross lattice pattern, lay half of the dough strips horizontally across the filled pie, leaving even spaces between each strip. Then, fold back every other strip halfway. Lay a new strip vertically across the unfolded strips, then unfold the folded strips over the new strip. Repeat this process, folding back alternating strips and adding new strips, until the entire pie is covered in a beautiful crisscross pattern.
As you weave the lattice pattern, be sure to gently press the ends of the strips into the edge of the crust to seal them in place. This will prevent the strips from shifting or coming loose during baking. Once the lattice pattern is complete, trim any excess dough from the edges of the pie and crimp them with a fork or your fingers for a polished finish.
Before baking your pie, be sure to brush the lattice crust with an egg wash or milk to give it a golden, shiny finish. This will also help the crust to bake evenly and develop a crisp texture. Once the pie is brushed, it is ready to go into the oven and bake according to your Recipes-ideas/’>Recipe‘s instructions.
When the pie is finished baking, remove it from the oven and let it cool before slicing and serving. The crisscross lattice pattern will be beautifully displayed on top of the pie, showcasing your skill and creativity in pie design. Whether you are making a classic apple pie, a decadent chocolate pie, or a savory quiche, the crisscross lattice pattern is sure to impress your guests and elevate your baking game.
Mastering the art of pie design, specifically the crisscross lattice pattern, takes practice and patience. But with the right guidance and a bit of creativity, you can create perfectly woven crusts that will impress your friends and family. So, get ready to wow your loved ones with a beautifully designed pie that not only tastes delicious but looks like a work of art.
Master the Art of Pie Lattice: Step-by-Step Guide for Perfectly Woven Crusts!
The Ultimate Guide to Perfectly Woven Pie Lattice
Slice of Perfection: Step-by-Step Guide to Lattice Pies
When it comes to baking a pie, one of the most visually appealing and impressive techniques you can master is creating a lattice crust. The intricate weaving of dough not only adds a beautiful touch to your pie but also allows for the filling to bubble and caramelize perfectly. If you’ve always wanted to try your hand at making a lattice pie but have been intimidated by the process, fear not! With this step-by-step guide, you’ll be weaving like a pro in no time.
Before you dive into the world of lattice pies, it’s important to have a solid pie crust Recipes-ideas/’>Recipe that you can rely on. Whether you prefer a traditional butter crust or a flaky shortening-based crust, make sure you have your dough prepared and chilled before you begin the lattice process.
Once your dough is ready to go, it’s time to roll it out into a circle that’s slightly larger than the size of your pie plate. Carefully transfer the dough to the pie plate, gently pressing it into the corners and allowing any excess dough to hang over the edges. This excess dough will be used for creating the lattice top, so don’t trim it off just yet.
Next, it’s time to prepare your filling. Whether you’re making a classic apple pie, a tart cherry pie, or a decadent pecan pie, make sure your filling is ready to go before you start weaving your lattice crust. Once your filling is prepared, pour it into the pie crust, spreading it out evenly with a spatula.
Now comes the fun part – creating the lattice top! Using a sharp knife or a pastry wheel, cut the excess dough into strips of equal width. You can make your lattice as simple or as intricate as you’d like, so feel free to get creative with your weaving pattern.
To create a basic lattice pattern, lay half of the strips horizontally across the pie filling, leaving a small gap between each strip. Then, fold back every other strip halfway and lay a strip of dough vertically across the unfolded strips. Fold the horizontal strips back over the vertical strip, then repeat the process with the remaining strips, weaving them over and under the horizontal strips to create a woven lattice pattern.
Once you’ve finished weaving your lattice top, trim any excess dough from the edges of the pie plate and crimp the edges to seal in the filling. If desired, you can brush the lattice crust with an egg wash or sprinkle it with sugar for a beautifully golden and crisp finish.
Before baking your pie, be sure to preheat your oven to the specified temperature in your recipe. Place the pie on a baking sheet to catch any drips, then bake it until the crust is golden brown and the filling is bubbling and thickened. Allow the pie to cool slightly before serving, and enjoy the fruits of your labor!
With this step-by-step guide, you can confidently tackle the art of creating a perfectly woven lattice crust for your next pie baking adventure. Whether you’re a seasoned baker looking to up your pie game or a novice looking to impress your friends and family, mastering the art of pie lattice is sure to take your baking skills to the next level. So roll up your sleeves, get weaving, and enjoy the sweet rewards of a beautifully crafted lattice pie!
how to do pie lattice


