
Pie Chart Perfection: A Beginner’s Guide!
Are you ready to master the art of creating a stunning pie chart? Whether you’re a data enthusiast or a beginner just dipping your toes into the world of data visualization, this beginner’s guide to pie chart perfection is here to help you shine!


Image Source: artprojectsforkids.org
Pie charts are a powerful tool for presenting data in a visually appealing way. They can help you quickly and easily understand the distribution of a whole data set, making it easy to spot trends and patterns. With a few simple tips and tricks, you can create eye-catching pie charts with ease.
One key aspect of creating a stunning pie chart is choosing the right data to represent. Make sure your data set is clear and well-organized before you start creating your chart. This will ensure that your pie chart is accurate and easy to interpret.
Image Source: howtodrawforkids.com
Another important factor in pie chart perfection is choosing the right colors. Colors can help draw attention to different data points and make your chart visually appealing. Make sure to choose colors that are easy to distinguish and complement each other well.
Once you have your data set and colors sorted, it’s time to start creating your pie chart. Most data visualization tools have built-in pie chart templates that make it easy to create a professional-looking chart. Simply input your data, choose your colors, and watch as your pie chart comes to life!
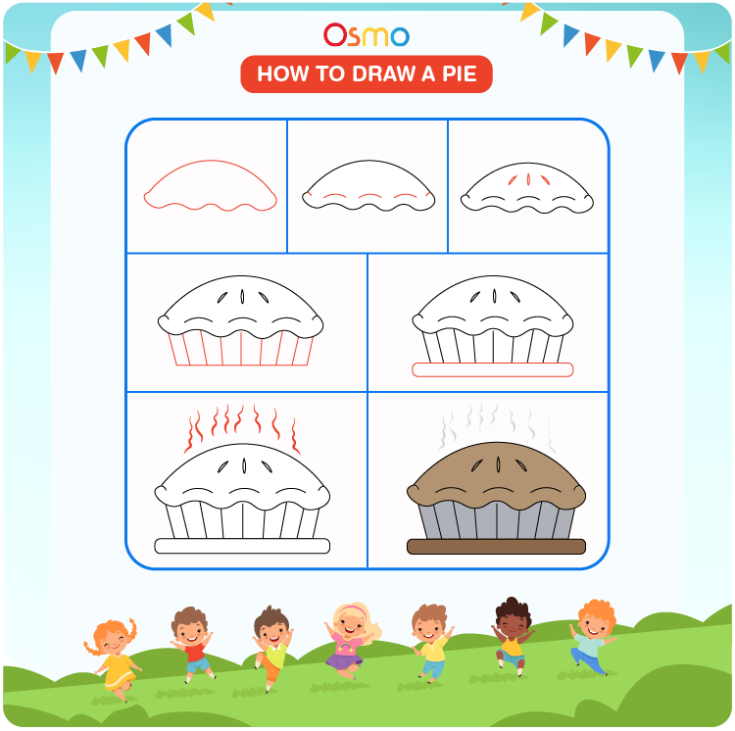
Image Source: playosmo.com
When creating your pie chart, it’s important to keep things simple. Avoid cluttering your chart with unnecessary elements or labels. A clean and minimalist design will make your pie chart easier to read and understand.
Don’t forget to label your chart with a clear and concise title. This will help viewers understand what the chart is representing and why it’s important. You can also add labels to each segment of the pie chart to provide additional context and information.
Pie charts are a versatile tool that can be used in a variety of situations. Whether you’re presenting sales data, survey results, or even just showing the breakdown of your monthly expenses, pie charts can help you tell a compelling story with your data.
In conclusion, mastering the art of creating a stunning pie chart is easier than you think. With a little practice and some creativity, you can create eye-catching pie charts that will impress your audience and help you visualize your data in a whole new way. So go ahead, unleash your inner data artist and start creating pie chart perfection today!
Let Your Data Shine with a Stunning Pie!
Pie charts are not just colorful circles with slices that represent data. They are powerful tools that can help you visualize and understand your data in a creative and engaging way. By mastering the art of creating a stunning pie chart, you can effectively communicate your data to your audience and make a lasting impression.
To create a stunning pie chart, you first need to gather and organize your data. Whether you are working with sales figures, survey results, or any other type of data, make sure it is clear and concise. Remember, the key to a successful pie chart is simplicity and clarity.
Once you have your data ready, it’s time to choose the right type of pie chart for your information. There are many different types of pie charts, including 2D, 3D, exploded, doughnut, and more. Each type has its own unique style and purpose, so choose the one that best suits your data and the message you want to convey.
Next, it’s time to design your pie chart. Choose a color scheme that is visually appealing and easy to read. Avoid using too many colors or intricate patterns that can distract from the data. Keep it simple and let your data shine through.
When it comes to labeling your pie chart, make sure your labels are clear and informative. Include the category names and percentages for each slice of the pie. You can also add a title and a legend to help your audience understand the data at a glance.
Now that your pie chart is designed and labeled, it’s time to add some finishing touches. Consider adding annotations, such as arrows or lines, to highlight specific data points. You can also add shadows or gradients to give your pie chart a more polished and professional look.
Once your pie chart is complete, take a step back and admire your work. Your stunning pie chart is not just a visualization of data—it’s a work of art that communicates a story. Share your pie chart with your audience and watch as they are captivated by the beauty and simplicity of your creation.
In conclusion, mastering the art of creating a stunning pie chart is not just about visualizing data—it’s about telling a compelling story. By choosing the right type of pie chart, designing it with care, and adding the finishing touches, you can create a masterpiece that will captivate and engage your audience. So go ahead, let your data shine with a stunning pie!
Mastering the Art of Pie Chart Creation
Pie charts are a powerful tool for visualizing data in a clear and concise manner. They allow us to easily see the relationship between different parts of a whole, making complex information more digestible and engaging. In this article, we will explore the art of creating stunning pie charts that effectively communicate your data.
To master the art of pie chart creation, it is important to first understand the key elements that make up a successful chart. One of the most important factors to consider is the distribution of data. A pie chart works best when you have distinct categories that make up the whole, such as sales by region or market share by company.
Another crucial aspect of pie chart creation is color selection. Choosing the right colors can make your chart more visually appealing and help differentiate between different categories. It is important to use a color scheme that is easy on the eyes and conveys the message you want to communicate.
In addition to color, the size of each slice in a pie chart is also important. The size of each slice should accurately represent the proportion of data it represents. This can be achieved by adjusting the angle of each slice or by using labels to provide additional context.
When creating a pie chart, it is also important to consider the overall design and layout of the chart. Make sure that the chart is easy to read and understand, with clear labels and a concise title. Avoid cluttering the chart with unnecessary information, as this can distract from the main message you want to convey.
One of the most effective ways to create a stunning pie chart is to use a charting tool or software. There are many online tools available that make it easy to create professional-looking charts with just a few clicks. These tools often provide customizable options for colors, labels, and layout, allowing you to create a chart that suits your specific needs.
In addition to using charting tools, there are also some best practices to keep in mind when creating a pie chart. One important tip is to avoid using 3D effects or shadows, as these can make the chart harder to read and understand. Keep the design clean and simple to ensure that the data is the focus.
Another important consideration when creating a pie chart is labeling. Make sure that each slice is clearly labeled with the corresponding category or value. This will help viewers quickly identify the data and understand the chart at a glance.
Overall, mastering the art of pie chart creation is a combination of understanding the key principles of data visualization, using the right tools and techniques, and following best practices for design and layout. By following these tips and guidelines, you can create stunning pie charts that effectively communicate your data and engage your audience.
Create Eye-Catching Pie Charts with Ease
Are you ready to take your data visualization skills to the next level? Do you want to create stunning pie charts that will captivate your audience and make your data truly shine? Look no further, because in this article, we will show you how to create eye-catching pie charts with ease.
Pie charts are a popular way to represent data because they are visually appealing and easy to understand. With just a few simple steps, you can create a pie chart that will impress your colleagues and clients. So let’s dive in and master the art of creating a stunning pie chart in English.
The first step in creating an eye-catching pie chart is to choose the right data. Make sure your data is clear, concise, and relevant to the message you want to convey. Whether you are presenting sales figures, market share, or survey results, your data should be accurate and up-to-date.
Next, decide on the layout and design of your pie chart. You can choose from a variety of styles, colors, and labels to customize your chart and make it visually appealing. Experiment with different options until you find the perfect combination that suits your data and your audience.
Once you have selected your data and designed your pie chart, it’s time to create the chart itself. There are many tools and software programs available that can help you create professional-looking pie charts with ease. Whether you prefer to use Excel, Google Sheets, or a specialized data visualization tool, the key is to choose a tool that is user-friendly and easy to navigate.
As you begin to create your pie chart, pay close attention to the details. Make sure your labels are clear and concise, your colors are vibrant and easy to distinguish, and your chart is easy to read and understand. Remember, the goal is to communicate your data effectively, so take the time to make sure every element of your chart is polished and professional.
In addition to choosing the right data and designing your chart, there are a few tips and tricks you can use to make your pie chart even more eye-catching. For example, you can add a title or caption to your chart to provide context and help your audience understand the data. You can also use annotations or callouts to highlight key points or trends in your data.
Another way to create an eye-catching pie chart is to add visual elements such as icons, images, or logos. These elements can help to reinforce your message and make your chart more engaging and memorable. Just be sure to use visual elements sparingly and strategically, so they enhance your chart without overwhelming it.
Finally, once you have created your eye-catching pie chart, don’t forget to practice presenting it to your audience. Whether you are giving a presentation, sharing a report, or posting your chart online, make sure you are comfortable explaining the data and answering any questions that may arise. The more confident and knowledgeable you are about your chart, the more impact it will have on your audience.
In conclusion, creating eye-catching pie charts with ease is a skill that anyone can master with a little practice and creativity. By choosing the right data, designing your chart with care, and adding visual elements to enhance your message, you can create stunning pie charts that will impress and inspire your audience. So go ahead, unleash your creativity, and start creating pie charts that will truly shine!
Create Eye-Catching Pie Charts with Ease
Pie charts are a powerful tool for visually representing data in a way that is both easy to understand and aesthetically pleasing. Whether you are a data analyst, a business owner, or just someone who loves to play with numbers, mastering the art of creating stunning pie charts can take your presentations to the next level. In this article, we will explore some tips and tricks for creating eye-catching pie charts with ease.
One of the key elements of a successful pie chart is choosing the right colors. Colors can make or break a pie chart, so it’s important to choose a color scheme that is visually appealing and easy to read. When selecting colors for your pie chart, consider using a mix of bold, contrasting colors to make different sections of the chart stand out. Avoid using too many colors, as this can make the chart look cluttered and confusing.
In addition to choosing the right colors, it’s also important to pay attention to the labeling of your pie chart. Make sure that each section of the chart is clearly labeled, so that viewers can easily understand what each slice represents. You can add labels directly to the chart itself, or create a legend that explains the data in more detail. Whichever method you choose, make sure that the labels are easy to read and understand.
Another important aspect of creating eye-catching pie charts is choosing the right layout. Pie charts can be displayed in a variety of ways, including 2D and 3D formats. While 3D pie charts can look impressive, they can also be more difficult to read and understand. For most purposes, a simple 2D pie chart is usually the best option. When creating your pie chart, make sure that the layout is clean and easy to follow, with each section clearly defined.
Once you have chosen the right colors, labels, and layout for your pie chart, it’s time to add some finishing touches to make it truly stand out. One way to enhance your pie chart is to add shadows or gradients to the slices, giving them a more three-dimensional appearance. You can also add textures or patterns to the chart, to make it more visually interesting. Be careful not to go overboard with these effects, as they can distract from the data itself.
In addition to adding visual elements to your pie chart, you can also experiment with different chart styles to create a unique look. For example, you can create a donut chart by removing the center of the pie chart, or a exploded pie chart by separating one or more slices from the rest of the chart. These variations can add visual interest to your chart, making it more engaging and memorable.
With these tips and tricks in mind, creating eye-catching pie charts with ease is well within your reach. By choosing the right colors, labels, layout, and finishing touches, you can create stunning pie charts that grab the attention of your audience and make your data shine. So go ahead, unleash your creativity, and master the art of creating stunning pie charts in English!
Create Eye-Catching Pie Charts with Ease
Are you ready to take your data visualization skills to the next level? Look no further than the humble pie chart! Pie charts are a simple yet powerful way to showcase data in a visually appealing way. In this article, we will delve into the art of creating stunning pie charts that will captivate your audience and make your data shine.
The key to creating eye-catching pie charts is to start with clean and organized data. Before you even think about designing your chart, make sure your data is accurate and properly formatted. This will save you a lot of time and headaches down the road. Once you have your data in order, it’s time to choose the right type of pie chart for your needs.
There are many different types of pie charts to choose from, each with its own unique features. The most common type is the standard pie chart, which displays data as slices of a circle. This type of chart is great for showing proportions and percentages. If you want to compare multiple sets of data, a stacked pie chart might be more suitable. This type of chart stacks the slices on top of each other, making it easy to see how the different data sets relate to each other.
Now that you have chosen the right type of pie chart for your data, it’s time to design your chart. One of the most important things to consider when designing a pie chart is color. Choose a color scheme that is visually appealing and easy to read. Avoid using too many colors, as this can make your chart look cluttered and confusing. Stick to a few key colors that complement each other and make your data stand out.
In addition to color, it’s important to pay attention to the layout of your pie chart. Make sure that the slices are evenly spaced and clearly labeled. Adding labels to your slices will help your audience understand the data at a glance. You can also add a title to your chart to provide context and make it easier to understand.
Another key aspect of creating an eye-catching pie chart is to use the right tools. There are many software programs and online tools available that can help you create beautiful pie charts with ease. Some popular options include Microsoft Excel, Google Sheets, and Canva. These tools offer a wide range of customization options, making it easy to create a chart that fits your unique style and needs.
Once you have designed your pie chart, it’s time to share it with the world. Whether you are presenting your data in a meeting, a report, or on social media, make sure to keep your audience in mind. Use simple language and clear visuals to communicate your message effectively. Remember, the goal of a pie chart is to make your data easy to understand and visually appealing.
In conclusion, creating eye-catching pie charts doesn’t have to be difficult. With the right tools and a little creativity, you can design stunning charts that will impress your audience and make your data shine. So what are you waiting for? Start mastering the art of creating stunning pie charts today!
Let’s Get Rolling: Preparing the Perfect Pie Crust!
When it comes to making a delicious pie, one of the most important steps is preparing the perfect pie crust. The crust is the foundation of the pie, and getting it just right can make all the difference in the final product. Mastering the art of making a pie crust from scratch may seem daunting, but with a few simple tips and tricks, you’ll be well on your way to creating a pie that is sure to impress.
First and foremost, it’s important to start with the right ingredients. For a classic pie crust, you’ll need flour, salt, sugar, cold butter, and ice water. Using cold butter is key to achieving a flaky crust, as it will melt as the pie bakes, creating pockets of air that result in a light and tender texture. It’s also important to handle the dough as little as possible to prevent the butter from melting too quickly.
Once you have your ingredients gathered, it’s time to start making the dough. In a large mixing bowl, combine the flour, salt, and sugar. Cut the cold butter into small cubes and add it to the dry ingredients. Using a pastry cutter or your fingers, work the butter into the flour mixture until it resembles coarse crumbs. Gradually add the ice water, a few tablespoons at a time, mixing until the dough comes together. Be careful not to overmix, as this can result in a tough crust.
Next, turn the dough out onto a floured surface and gently knead it a few times to bring it together. Divide the dough in half and shape each half into a disk. Wrap the dough in plastic wrap and refrigerate for at least 30 minutes, or up to overnight. Chilling the dough allows the gluten to relax and the butter to firm up, making it easier to roll out.
When you’re ready to roll out the dough, lightly flour your work surface and rolling pin. Place one disk of dough on the floured surface and roll it out into a circle, about 1/8 inch thick. As you roll, be sure to turn the dough occasionally and add more flour to prevent sticking. Carefully transfer the rolled-out dough to a pie dish, pressing it gently into the bottom and sides.
Now comes the fun part – decorating the edges of the crust! There are many ways to create a decorative edge, from crimping with a fork to using a fluted pastry wheel. Experiment with different techniques to find the one that suits your style. Once the crust is shaped and decorated, it’s time to fill it with your favorite pie filling and bake according to the Recipes-ideas/’>Recipe instructions.
With a little practice and patience, you’ll soon be able to whip up a perfect pie crust every time. So roll up your sleeves, dust off your rolling pin, and get ready to impress your friends and family with your newfound pie-making skills. Happy baking!
Master the Art of Drawing a Perfect Pie: Step-by-Step Guide!
Master the Art of Drawing a Perfect Pie: Step-by-Step Guide!
Filling Fun: Choosing the Best Pie Ingredients!
When it comes to making a delicious pie, the filling is arguably the most important part. It’s what gives the pie its flavor and character, so it’s essential to choose the best ingredients possible. In this step-by-step guide, we’ll explore the art of selecting the perfect pie ingredients to create a mouthwatering masterpiece.
First and foremost, you’ll need to decide on the type of pie you want to make. Whether you’re in the mood for a classic apple pie, a rich chocolate cream pie, or a tangy lemon meringue pie, the filling will dictate the overall taste of your creation.
When it comes to fruits, opt for fresh, in-season produce whenever possible. This will ensure that your pie is bursting with flavor and sweetness. If fresh fruits are not available, frozen fruits can be a good alternative, as they are picked at their peak ripeness and can be just as tasty.
For cream or custard-based pies, using high-quality dairy products is key. Opt for whole milk, heavy cream, and real butter to achieve a rich and decadent filling. When it comes to chocolate pies, choose a good quality chocolate with a high cocoa content for a smooth and velvety texture.
When it comes to sweeteners, there are a variety of options to choose from. White sugar is a classic choice that works well in most pie fillings. Brown sugar adds a deeper flavor and caramel notes, while honey and maple syrup can lend a natural sweetness to your pies. Experiment with different sweeteners to find the perfect balance for your taste buds.
Don’t forget about spices and flavorings! Cinnamon, nutmeg, vanilla extract, and citrus zest can elevate the flavor profile of your pie filling and add an extra layer of complexity. Just remember to taste as you go and adjust seasonings accordingly.
Lastly, don’t be afraid to get creative with your pie fillings. Mix and match different fruits, nuts, and flavor combinations to create a unique and delicious pie that reflects your personal taste and style. The possibilities are endless, so have fun experimenting and see where your imagination takes you!
By choosing the best pie ingredients and combining them thoughtfully, you’ll be well on your way to creating a pie that is not only visually stunning but also incredibly tasty. So go ahead, let your creativity run wild and enjoy the process of filling fun!
Top It Off: Creating Beautiful Pie Designs!
When it comes to baking a perfect pie, it’s not just about the taste – it’s also about the presentation. A beautifully designed pie can elevate your dessert from simple to stunning, impressing your friends and family with your artistic skills. In this step-by-step guide, we will show you how to create beautiful pie designs that will make your pie the star of the show.
The first step in creating a beautiful pie design is to choose the right tools. You will need a sharp knife, a pastry brush, and a variety of cookie cutters or pie stamps to create different shapes and patterns. You can also use a piping bag fitted with a decorative tip for more intricate designs. Make sure to have these tools ready before you start decorating your pie.
Once you have your tools ready, it’s time to start designing your pie. The possibilities are endless when it comes to pie designs – you can create lattice patterns, cut-out shapes, or even freehand designs. For a classic look, you can create a lattice pattern by weaving strips of dough over the top of the pie. Simply lay strips of dough horizontally across the pie, then weave strips of dough vertically through the horizontal strips. Trim off any excess dough and press the edges to seal.
If you prefer a more whimsical design, you can use cookie cutters to create shapes out of the dough and arrange them on top of the pie. You can create flowers, leaves, hearts, or any other shape you desire. Simply cut out the shapes using the cookie cutters, then gently press them onto the top of the pie. You can also use a pie stamp to create intricate patterns on the top of the pie. Simply press the stamp into the dough to create a design, then carefully lift it off to reveal the pattern.
For a more elegant look, you can use a piping bag fitted with a decorative tip to create intricate designs on top of the pie. You can pipe swirls, rosettes, or even write messages on the pie using the piping bag. To do this, fill the piping bag with a mixture of softened butter and powdered sugar, then pipe the design onto the top of the pie. Be sure to practice your piping skills before decorating the pie to ensure a clean and precise design.
Once you have finished decorating your pie, it’s time to bake it to perfection. Preheat your oven to the temperature specified in your pie Recipes-ideas/’>Recipe, then carefully place the pie into the oven. Keep an eye on the pie as it bakes, making sure it doesn’t burn. You can cover the edges of the pie with aluminum foil if they start to brown too quickly. Once the pie is golden brown and bubbling, remove it from the oven and let it cool before serving.
Creating beautiful pie designs is a fun and creative way to take your baking skills to the next level. With the right tools and techniques, you can transform a simple pie into a work of art that will impress everyone who sees it. So next time you bake a pie, don’t forget to top it off with a beautiful design that will make it truly unforgettable.
Bake to Perfection: Tips for a Perfect Pie Every Time!
Ah, the moment of truth has arrived – it’s time to bake your pie to perfection! Whether you’re a seasoned pie maker or a newbie in the kitchen, these tips will ensure that your pie comes out golden, flaky, and delicious every single time. So preheat your oven, put on your apron, and let’s get baking!
1. Temperature is Key:
One of the most important factors in baking a perfect pie is getting the temperature right. Make sure your oven is preheated to the correct temperature specified in your Recipes-ideas/’>Recipe. This will ensure that your pie bakes evenly and the crust becomes crispy and golden brown.
2. Use a Pie Shield:
To prevent the edges of your pie crust from burning, consider using a pie shield or aluminum foil to cover the edges during baking. This will help the edges cook more slowly and evenly, while allowing the center of the pie to bake to perfection.
3. Ventilation is Vital:
To avoid a soggy bottom crust, make sure to vent your pie properly. This can be done by cutting small slits or creating decorative cutouts in the top crust. This will allow steam to escape while the pie bakes, preventing the crust from becoming mushy.
4. Egg Wash for Shine:
For a beautiful golden finish on your pie crust, consider brushing it with an egg wash before baking. Simply whisk together an egg with a bit of water or milk, and brush it over the crust before placing the pie in the oven. This will give your pie a shiny, professional-looking finish.
5. Rotate for Even Baking:
To ensure that your pie bakes evenly, consider rotating it halfway through the baking time. This will help the pie cook more evenly on all sides, resulting in a perfectly baked pie with no hot spots or undercooked areas.
6. Check for Doneness:
The best way to know if your pie is ready is to check for doneness. This can be done by inserting a toothpick or a knife into the center of the pie. If it comes out clean, your pie is ready to come out of the oven. If there is still wet filling sticking to the toothpick, give it a few more minutes to bake.
7. Let it Cool:
Once your pie is out of the oven, resist the temptation to dig in right away. Let the pie cool on a wire rack for at least an hour before slicing into it. This will allow the filling to set and the flavors to meld together, resulting in a more cohesive and delicious pie.
8. Serve with Style:
Finally, when it’s time to serve your perfect pie, consider adding a dollop of whipped cream or a scoop of ice cream on top. This will not only enhance the flavors of the pie but also add a touch of elegance to your dessert. So grab a fork, dig in, and savor every bite of your perfectly baked pie!
In conclusion, baking the perfect pie is an art form that requires patience, attention to detail, and a little bit of practice. By following these tips and techniques, you can master the art of baking a perfect pie every time. So roll up your sleeves, turn on the oven, and get ready to impress your friends and family with your delicious Homemade pies. Happy baking!
how to draw a pie


