
Let’s Get Sketching: Pumpkin Pie Edition!
Are you ready to embark on a creative journey filled with delicious desserts and artistic expression? If so, then grab your sketchbook and pencils because we are going to learn how to sketch a mouth-watering pumpkin pie with easy step-by-step instructions.
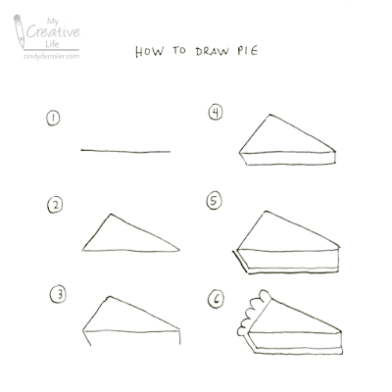
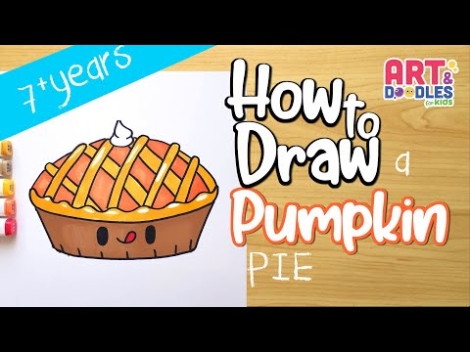
Image Source: googleusercontent.com
Drawing food can be a fun and challenging task, but with the right techniques and a little bit of practice, you can bring your dessert to life on paper. So, let’s dive right in and discover the art of sketching a delectable pumpkin pie.
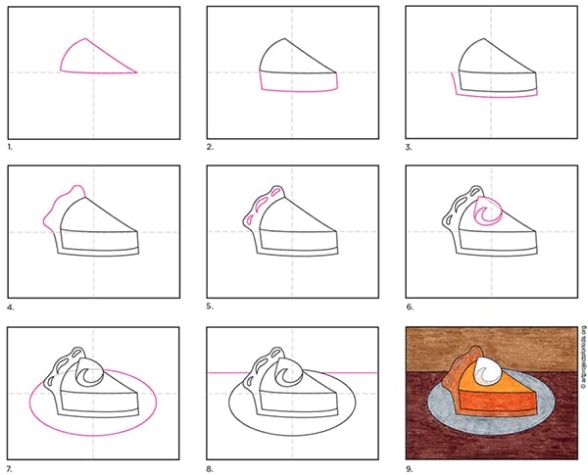
To begin, start by sketching the basic shape of your pie. Draw a circle to represent the crust of the pie, and then add a smaller circle in the center to create the filling. Don’t worry about making it perfect – the beauty of sketching is in the imperfections.
Image Source: ytimg.com
Next, add some detail to your pie by drawing in the crust. You can make it look more realistic by adding small lines or dots to represent the flakiness of the pastry. Feel free to get creative with your crust design – maybe you want to add some decorative edges or even a lattice pattern.
Now, it’s time to focus on the delicious pumpkin filling. Add some texture to the filling by sketching in some lines to represent the creamy consistency. You can also add some small lines or dots to represent the spices and flavors that make pumpkin pie so delicious.
Image Source: artprojectsforkids.org
To make your pumpkin pie look even more appetizing, add some shadows and highlights. This will give your drawing depth and dimension, making it look more realistic. Focus on where the light would hit the pie and where the shadows would fall to create a more lifelike appearance.
Once you are happy with the overall look of your pumpkin pie, you can add some final touches to make it stand out. Maybe you want to add a dollop of whipped cream on top or a sprinkle of cinnamon. Get creative and make your pie truly unique.
Drawing a delicious pumpkin pie is not only a fun and engaging activity, but it also helps you improve your sketching skills. By focusing on the details and textures of the pie, you can enhance your ability to capture the essence of different foods and objects in your drawings.
So, grab your sketchbook and pencils, and let’s get sketching! With easy step-by-step instructions and a sprinkle of creativity, you can bring your dessert to life on paper and impress your friends and family with your artistic talents. Happy sketching!
Step-By-Step Guide to Drawing a Yummy Pie
Are you ready to learn how to sketch a delicious pumpkin pie with easy step-by-step instructions? Grab your sketchbook and pencil, because we’re about to bring this delectable dessert to life on paper!
Step 1: Start with the Crust
To begin your sketch of a yummy pie, start by drawing the crust. Use light, gentle strokes to outline the shape of the pie crust, making sure to add in the fluted edges for that classic pie look. Remember, the crust doesn’t have to be perfect – a little imperfection adds character!
Step 2: Add the Filling
Once you’ve got the crust outlined, it’s time to add the filling. Draw a round shape in the center of the crust to represent the pumpkin filling. Use curved lines to give the filling a smooth, creamy texture. Don’t forget to add in some spices like cinnamon and nutmeg for that extra delicious touch!
Step 3: Detail the Crust
Next, it’s time to add some detail to the crust. Use short, curved lines to add texture and depth to the crust. You can also add in some shading to give the crust a more realistic look. Remember, the crust is just as important as the filling when it comes to making a yummy pie sketch!
Step 4: Add Some Whipped Cream
No pumpkin pie is complete without a dollop of whipped cream on top! Use gentle, swirling motions to sketch in the whipped cream on top of the pie filling. You can add some texture with small, circular motions to give the whipped cream a fluffy, light appearance.
Step 5: Shade and Add Final Details
To bring your yummy pie sketch to life, add in some shading to give it depth and dimension. Use a slightly darker pencil or shading tool to add shadows and highlights to the crust, filling, and whipped cream. Don’t forget to add in some final details like a decorative swirl of whipped cream or a sprinkle of cinnamon on top!
There you have it – a delicious pumpkin pie sketched on paper with easy step-by-step instructions! Now that you’ve mastered the art of pie sketching, you can try your hand at sketching other delicious desserts like apple pie, cherry pie, or even a decadent chocolate cake. Happy sketching!
Bring Your Dessert to Life on Paper
Are you ready to take your sketching skills to the next level? In this article, we will explore how to bring your delicious pumpkin pie to life on paper with easy step-by-step instructions. Sketching can be a fun and creative way to express yourself, and what better way to do so than with a mouth-watering dessert like pumpkin pie?
To begin, gather your sketching materials. You will need a pencil, eraser, paper, and some colored pencils if you want to add a pop of color to your drawing. Once you have everything ready, it’s time to get started!
Start by sketching the outline of your pumpkin pie. Begin with a simple oval shape to represent the crust of the pie. Then, add another oval shape on top to create the filling of the pie. Don’t worry about making it perfect at this stage – the beauty of sketching is that you can always make adjustments as you go along.
Next, add some details to your pie. Sketch in the crimped edges of the crust, and add some lines to represent the texture of the filling. You can also add some whipped cream on top for an extra touch of sweetness. Feel free to get creative with your details – after all, this is your pie masterpiece!
Once you are happy with the overall shape and details of your pumpkin pie, it’s time to add some color. Use your colored pencils to carefully shade in the crust, filling, and any additional Decorations you have added. Remember to blend the colors smoothly for a more realistic look.
Don’t forget to add some shadows to give your pumpkin pie some depth. Shade in areas where the light would naturally hit the pie, and add some darker shading to create a sense of dimension. This will help make your pie look more realistic and mouth-watering.
As you add the finishing touches to your pumpkin pie sketch, take a step back and admire your work. You have successfully brought your dessert to life on paper with just a pencil and some colored pencils. Sketching can be a relaxing and rewarding hobby, and with practice, you can continue to improve your skills and create even more delicious drawings.
So the next time you are craving a slice of pumpkin pie, why not try sketching one instead? It’s a fun and creative way to satisfy your sweet tooth, and who knows – you may even discover a new passion for dessert art. Happy sketching!
Easy Tips and Tricks for Delicious Pie Art
Are you ready to take your dessert sketches to the next level? In this article, we will explore some easy tips and tricks for creating mouth-watering pie art, specifically focusing on the classic pumpkin pie. With just a few simple techniques, you can learn how to bring your delicious pie drawings to life on paper.
To begin, start by gathering your materials. You will need a sketchbook, pencils, eraser, and colored pencils or markers. Make sure to choose colors that closely resemble the shades of a pumpkin pie – oranges, browns, and yellows will be essential for capturing the warm and inviting look of this classic dessert.
Next, it’s time to sketch out the basic shape of your pumpkin pie. Start by drawing a circle to represent the crust of the pie. Then, add a slightly smaller circle inside to indicate the filling. Remember, pumpkin pie is typically round and flat, so aim for a symmetrical shape that is pleasing to the eye.
Once you have the basic outline of your pie, it’s time to add some detail. Start by adding texture to the crust. You can do this by drawing small lines or dots along the edge of the crust to mimic the look of a flaky, golden pastry. Don’t forget to add a crimped edge to give your pie a more realistic appearance.
Next, focus on the filling of the pie. Pumpkin pie is known for its smooth and creamy texture, so make sure to add some shading to indicate the richness of the filling. Use a light orange or yellow color to fill in the center of the pie, leaving some white space for highlights and reflections.
To add even more realism to your pie art, consider adding some toppings. Whipped cream, cinnamon, and nutmeg are all popular choices for garnishing a slice of pumpkin pie. Use your colored pencils or markers to add these details to your drawing, being mindful of shading and placement to create a three-dimensional effect.
As you continue to work on your pie drawing, remember to pay attention to the details. Add shadows and highlights to give your pie depth and dimension. Consider adding a plate or fork next to the pie to complete the scene and add context to your dessert drawing.
Once you are satisfied with the overall look of your pumpkin pie sketch, take a step back and admire your handiwork. You have successfully brought this delicious dessert to life on paper, capturing the warmth and comfort of a Homemade pumpkin pie with just a few simple tools and techniques.
In conclusion, creating delicious pie art is a fun and rewarding way to express your creativity and love for desserts. By following these easy tips and tricks, you can learn how to sketch a mouth-watering pumpkin pie with confidence and skill. So grab your sketchbook and pencils, and get ready to bring your dessert drawings to life!
how to draw a pumpkin pie


