
Let’s Bake Some Happiness: A Pie-Drawing Adventure!
Who doesn’t love a delicious pie? Whether it’s a classic apple pie, a decadent chocolate cream pie, or a tangy lemon meringue pie, there’s something truly special about this beloved dessert. But have you ever thought about capturing the beauty of a pie on paper? In this pie-drawing adventure, we will explore the art of drawing the perfect pie and create a masterpiece that is sure to make your mouth water.
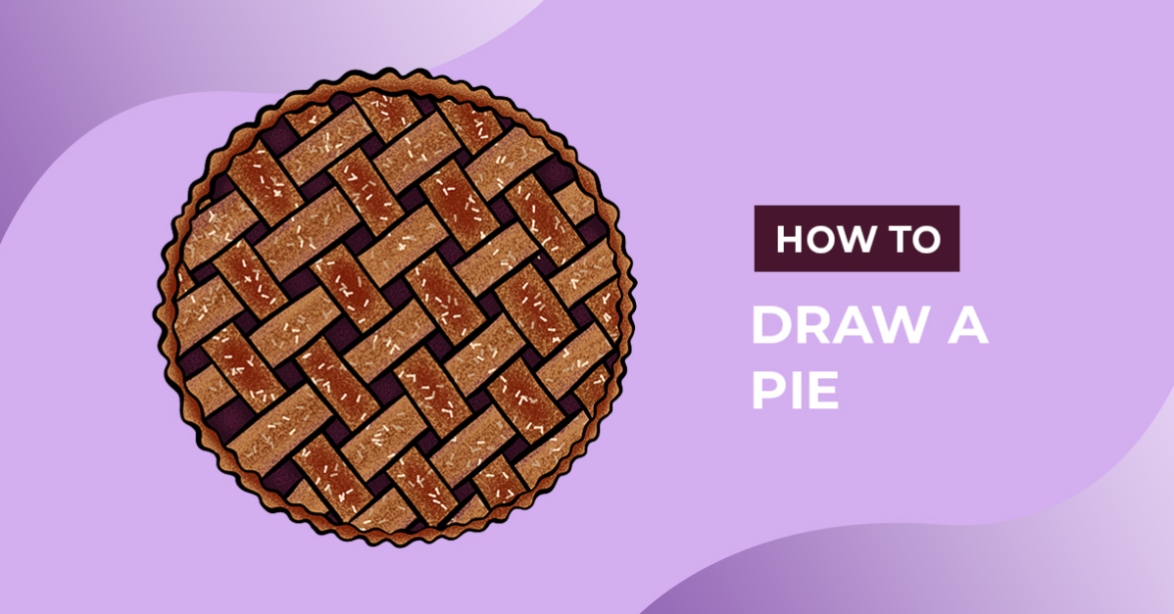

Image Source: howtodrawforkids.com
Drawing a pie may seem like a daunting task, but with the right techniques and a bit of creativity, you can create a work of art that looks good enough to eat. So grab your pencils, paper, and imagination, and let’s get started on this delicious journey!
The first step in drawing the perfect pie is to envision the type of pie you want to create. Will it be a classic lattice-topped apple pie, a colorful berry pie, or a rich and creamy cheesecake? Once you have chosen your pie, it’s time to gather your materials and get started.
Image Source: cloudfront.net
To begin, sketch the outline of your pie using a pencil. Start with the basic shape of the pie, whether it’s round, rectangular, or square. Next, add in the details such as the crust, filling, and any decorative elements like whipped cream or sprinkles. Don’t worry about making it perfect – the beauty of pie is its imperfections, so embrace any quirks or uneven edges in your drawing.
Once you have the basic outline of your pie, it’s time to add in some color. Use colored pencils or markers to bring your pie to life, selecting shades that match the flavors and ingredients of your chosen dessert. If you’re drawing a cherry pie, for example, use deep reds and browns for the cherries and a golden yellow for the crust. For a key lime pie, opt for bright greens and yellows to capture the zesty citrus flavors.
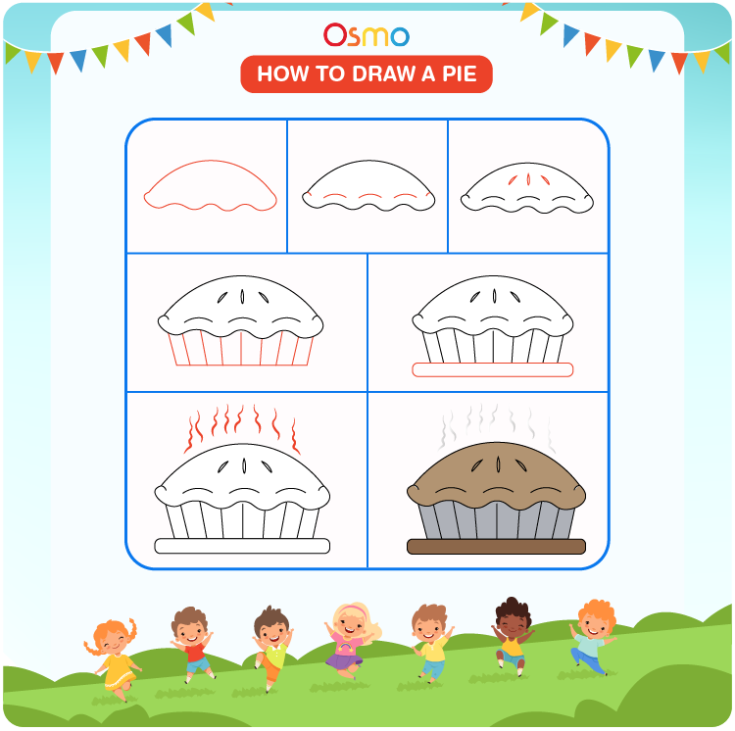
Image Source: playosmo.com
As you add color to your pie, consider adding shading and highlights to create depth and dimension. Shade the areas of the pie that would be in shadow, such as the underside of the crust or the edges of the filling. Add highlights to the areas that would catch the light, like the glossy surface of a fruit pie or the creamy swirls of a cheesecake.
Once you have added color and shading to your pie, it’s time to add the finishing touches. Consider adding texture to the crust with delicate lines or cross-hatching, or adding a sprinkle of glitter to make your pie sparkle. You can also add a background to your drawing, such as a checkered tablecloth or a rustic wooden table, to set the scene and add extra visual interest.
And there you have it – a delicious pie drawing that is sure to make your mouth water! Whether you’re a seasoned artist or a beginner, drawing a pie can be a fun and rewarding experience. So next time you’re craving a slice of pie, why not try drawing one instead? It’s a creative way to indulge in your love of dessert and hone your artistic skills at the same time.
So grab your pencils and paper, and let’s bake some happiness with a pie-drawing adventure that is sure to satisfy your sweet tooth and ignite your creativity. Happy drawing!
Ingredients for Success: Tools and Tips for Pie Perfection
Welcome to the second part of our pie-drawing adventure! In this article, we will explore the essential tools and helpful tips that will set you on the path to creating a picture-perfect pie drawing. Just like baking a delicious pie, drawing a beautiful pie requires the right ingredients and techniques. So, let’s gather our supplies and get started on mastering the art of drawing the perfect pie!
First and foremost, you will need the right tools to bring your pie drawing to life. Here are some essential items that every aspiring pie artist should have in their toolbox:
1. Pencils: A good set of pencils is essential for creating depth and shading in your pie drawing. Make sure to have a range of lead hardness, from 2H for light sketching to 6B for darker shading.
2. Erasers: Mistakes happen, so having a quality eraser on hand is crucial for fixing any errors in your drawing. A kneaded eraser is great for lifting graphite without damaging the paper.
3. Paper: Choose a smooth, heavy-weight paper that can withstand multiple layers of pencil and erasing. A high-quality drawing paper will ensure that your pie drawing looks professional and polished.
4. Blending tools: Blending stumps or tortillons are essential for creating smooth transitions between light and dark areas in your drawing. They help to blend the graphite and create a seamless finish.
5. Reference images: Whether you are using a photo of a real pie or drawing from memory, having a reference image will help you capture the details and textures of your pie accurately.
Now that you have gathered your tools, it’s time to dive into some tips and techniques for drawing the perfect pie. Here are some helpful pointers to keep in mind as you work on your pie masterpiece:
1. Start with a sketch: Begin by lightly sketching the shape of your pie on the paper. Pay attention to proportions and placement to ensure that your pie looks realistic.
2. Focus on details: Pies are all about the details, from the flaky crust to the juicy filling. Take your time to add texture and shading to capture the essence of a delicious pie.
3. Use a light touch: When shading your pie, remember to start light and gradually build up to darker tones. This will give your drawing depth and dimension.
4. Experiment with different techniques: Don’t be afraid to try out different shading techniques, such as cross-hatching or stippling, to add interest to your pie drawing.
5. Have fun with it: Drawing should be a fun and creative process, so don’t be afraid to experiment and make mistakes. Embrace the imperfections and enjoy the journey of creating your perfect pie drawing.
By following these tools and tips, you will be well on your way to mastering the art of drawing the perfect pie. Remember to practice regularly and don’t be afraid to push yourself out of your comfort zone. With dedication and a sprinkle of creativity, you will be creating mouth-watering pie drawings in no time. Happy drawing!
Sketching Your Sweet Treat: Step-by-Step Pie Drawing
Welcome to the next step in our pie-drawing adventure! Now that you have gathered all your tools and ingredients, it’s time to put pencil to paper and sketch out your sweet treat. Drawing a pie may seem daunting at first, but with a little guidance and practice, you’ll be able to create a picture-perfect masterpiece in no time.
To start, let’s break down the process into simple steps to help you master the art of drawing the perfect pie.
Step 1: Choose Your Pie
Before you begin sketching, decide on the type of pie you want to draw. Whether it’s a classic apple pie, a decadent chocolate cream pie, or a fruity peach pie, pick your favorite and envision how you want it to look on paper.
Step 2: Outline the Shape
Using a light pencil, start by outlining the overall shape of your pie. Remember that pies come in various sizes and shapes, so feel free to get creative with the proportions. You can draw a round pie, a square pie, or even a heart-shaped pie – the choice is yours!
Step 3: Add Crust Details
Next, focus on adding details to the crust of your pie. Whether it’s a lattice crust, a crimped edge, or a simple fluted design, carefully sketch out the intricate patterns to give your pie a realistic appearance. Don’t forget to add in any decorative elements like leaves, braids, or cutouts to make your crust truly stand out.
Step 4: Fillings and Toppings
Now it’s time to add in the delicious fillings and toppings of your pie. Whether you’re drawing a slice with a dollop of whipped cream, a scoop of ice cream, or a drizzle of caramel sauce, make sure to capture all the mouth-watering details. Pay attention to textures, colors, and shapes to create a visually appealing dessert that looks good enough to eat.
Step 5: Shadows and Highlights
To make your pie drawing really pop, add in shadows and highlights to create depth and dimension. Think about where the light source is coming from and shade accordingly to give your pie a three-dimensional look. Use a blending tool or your finger to soften harsh lines and create a smooth transition between light and dark areas.
Step 6: Finishing Touches
Once you have added in all the details, take a step back and admire your masterpiece. If there are any areas that need touching up or refining, now is the time to make those adjustments. Add in any final details, like sprinkles, crumbs, or garnishes, to complete your pie drawing and make it truly picture-perfect.
Drawing a pie may take some practice, but with patience and creativity, you can master the art of creating a delectable dessert on paper. So grab your pencil, unleash your imagination, and get ready to sketch your way to pie perfection. Happy drawing!
From Pencil to Plate: Finishing Touches for a Picture-Perfect Pie
Welcome to the final step in mastering the art of drawing the perfect pie! After sketching out the basic shape and details of your pie, it’s time to add those finishing touches that will bring your drawing to life and make it look good enough to eat. In this step-by-step guide, we’ll explore some techniques and tips for adding depth, texture, and color to your pie drawing.
1. Add Shadows and Highlights:
One of the key elements in making your pie drawing look realistic is adding shadows and highlights to give it dimension. Start by identifying where the light source is coming from in your drawing, and then use a darker shade of pencil to add shadows on the opposite side of the pie. This will create the illusion of depth and make your pie look more three-dimensional. Similarly, use a lighter shade of pencil to add highlights on the side of the pie facing the light source, emphasizing the areas that would catch the most light.
2. Texture, Texture, Texture:
To make your pie drawing look even more realistic, it’s important to add texture to the different components of the pie. For the crust, use short, quick strokes with your pencil to create a crumbly, flaky texture. For the filling, experiment with different shading techniques to give it a smooth, creamy texture. You can also use a blending tool or your finger to smudge the pencil marks slightly, creating a softer, more realistic texture.
3. Color Me Delicious:
While black and white pie drawings can look beautiful, adding color can take your drawing to the next level. Use colored pencils or markers to add realistic hues to your pie, from golden-brown crust to vibrant red berries. Remember to layer your colors and blend them together to create a smooth, seamless transition between shades. Don’t be afraid to mix different colors to achieve the perfect hue for each part of the pie.
4. Details, Details, Details:
The devil is in the details when it comes to drawing a picture-perfect pie. Add small details like fluting on the crust, individual berries or slices of fruit, and even a dollop of whipped cream on top. These little touches may seem insignificant, but they can make a big difference in the overall look of your drawing. Pay attention to the small details and take your time to refine them until you’re happy with how they look.
5. Frame It Up:
Once you’ve added all the finishing touches to your pie drawing, consider framing it with a border or background to enhance the presentation. You can draw a simple table setting, a decorative plate, or even a whimsical scene to set the stage for your delicious pie. Adding a frame can help draw the viewer’s eye to the focal point of your drawing and give it a polished, professional look.
And there you have it – a step-by-step guide to adding those finishing touches that will transform your pie drawing into a picture-perfect masterpiece. Remember to have fun, experiment with different techniques, and most importantly, enjoy the process of creating your own edible work of art. Happy drawing!
how to draw pie


