
Savor the Taste: Preserving Apples for Pie
When it comes to making the perfect apple pie, one of the key ingredients is, of course, the apples. But what if you have an abundance of apples and want to save some for later use? Freezing apples is a great way to preserve their flavor and texture, allowing you to enjoy that delicious apple pie taste all year round. In this article, we will explore the art of preserving apples for pie, so you can savor the taste of your favorite dessert anytime you please.

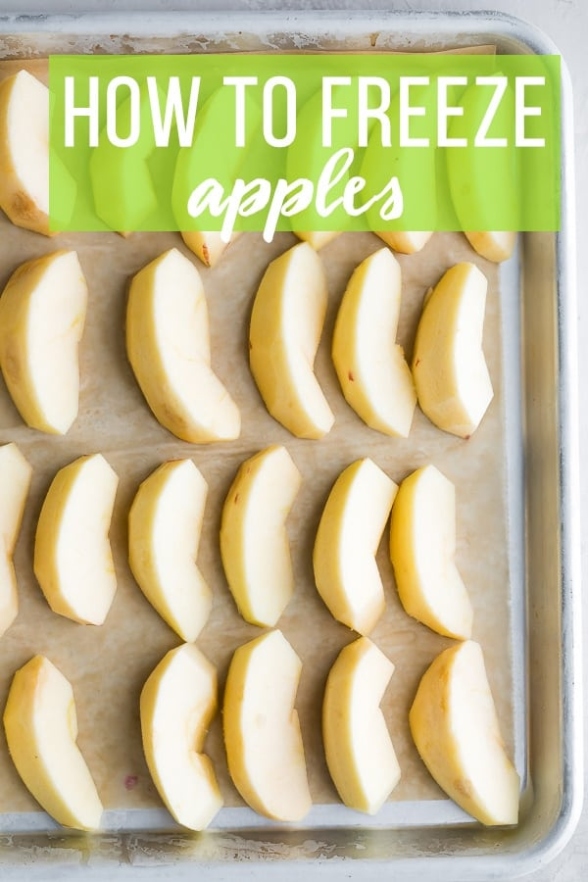
Image Source: thefoodieaffair.com
Freezing apples is a simple process that can be done in just a few easy steps. The first step is to choose the right apples for freezing. Look for apples that are firm and ripe, as these will hold up better in the freezing process. You can use a variety of apple types, such as Granny Smith, Honeycrisp, or Gala, depending on your personal preference.
Once you have selected your apples, the next step is to wash and peel them. If you prefer to leave the peel on, that’s perfectly fine as well. Cut the apples into slices or cubes, removing the core and seeds. You can also sprinkle some lemon juice over the apples to prevent browning, although this is not necessary if you plan to use the apples for pie filling.
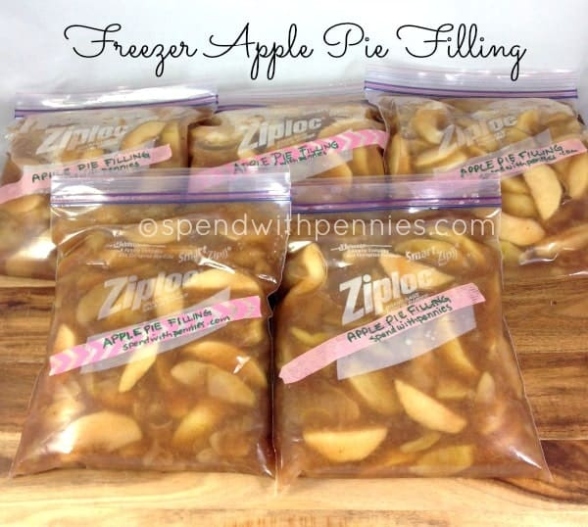
Image Source: spendwithpennies.com
After you have prepared the apples, you can choose to sweeten them with sugar or cinnamon if desired. This will add an extra layer of flavor to your pie filling. Once the apples are ready, you can pack them into airtight containers or freezer bags. Make sure to leave some space at the top of the container for expansion during freezing.
Label the containers with the date and type of apple, so you can easily identify them later on. Place the containers in the freezer and let them freeze for at least 24 hours. Once the apples are fully frozen, they can be stored in the freezer for up to six months.
Image Source: sweetpeasandsaffron.com
When you are ready to use the frozen apples for pie, simply remove them from the freezer and allow them to thaw at room temperature. You can then use them in your favorite pie Recipes-ideas/’>Recipe, whether it’s a classic apple pie or a more creative variation. The frozen apples will retain their flavor and texture, making for a delicious and convenient dessert option.
In addition to apple pie, frozen apples can also be used in other baked goods, such as cobblers, crisps, and muffins. The possibilities are endless when it comes to using frozen apples in your baking. Experiment with different recipes and see how you can incorporate this versatile ingredient into your culinary creations.
So, next time you find yourself with an abundance of apples, don’t let them go to waste. Freeze them for later use and enjoy the taste of fresh apple pie whenever the craving strikes. With just a little bit of preparation and some freezer space, you can savor the taste of apple pie perfection all year round.
Freeze & Please: Tips for Apple Pie Lovers
As the leaves turn fiery shades of red and orange and the air becomes crisp and cool, there’s nothing quite like the aroma of a freshly baked apple pie wafting through the kitchen. Apple pie is a classic dessert that evokes feelings of warmth and comfort, making it a favorite treat for many during the fall and winter months. If you’re a die-hard apple pie lover, then you know that having a stash of frozen apples on hand is essential for whipping up a pie at a moment’s notice. Here are some tips for freezing apples like a pro and ensuring that your apple pies turn out perfectly every time.
First and foremost, it’s important to choose the right kind of apples for freezing. While there are many varieties of apples to choose from, not all of them are suitable for freezing. For the best results, opt for firm, tart apples such as Granny Smith or Jonathan. These varieties hold their shape well when frozen and thawed, making them ideal for pies.
Before freezing your apples, it’s crucial to properly prepare them. Start by washing the apples thoroughly to remove any dirt or residue. Peel the apples and core them, then slice them into uniform pieces. This will ensure that your apples freeze evenly and cook evenly when it comes time to bake your pie.
To prevent browning, it’s a good idea to soak the apple slices in a mixture of water and lemon juice before freezing. The acid in the lemon juice will help to keep the apples looking fresh and vibrant, even after they’ve been frozen. Once the apple slices have been soaked, drain them well and pat them dry with a paper towel.
When it comes to freezing apples, there are a few different methods you can use. One popular method is to freeze the apple slices on a baking sheet before transferring them to a resealable plastic bag. This prevents the apple slices from sticking together and makes it easy to grab just the amount you need for a pie. Alternatively, you can pack the apple slices directly into a freezer-safe container, making sure to leave some room at the top for expansion.
If you’re short on time, you can also freeze whole apples. Simply wash and dry the apples, then wrap them individually in plastic wrap before placing them in a resealable plastic bag. When you’re ready to use them, just thaw the apples in the refrigerator overnight before peeling and slicing them.
When it comes time to bake your apple pie, there’s no need to thaw the apple slices beforehand. Simply toss them with sugar, spices, and a thickening agent such as cornstarch or flour before placing them in the pie crust. This will help to absorb any excess moisture released by the apples as they thaw, ensuring that your pie has a perfectly flaky crust.
In conclusion, freezing apples is a great way to ensure that you always have the key ingredient on hand for baking delicious apple pies. By following these tips and tricks, you can freeze apples like a pro and enjoy the sweet taste of apple pie perfection whenever the craving strikes. So go ahead, stock up on apples, freeze them with care, and get ready to delight your taste buds with the ultimate apple pie experience.
Perfect Pie Prep: Freezing Apples Made Easy
When it comes to making the perfect apple pie, having the right ingredients on hand is essential. One key ingredient that often gets overlooked is the apples themselves. While fresh apples are delicious, using frozen apples can actually result in a more flavorful and evenly cooked pie. In this article, we’ll explore the process of freezing apples for pie making and how it can elevate your baking game to new heights.
Freezing apples is a simple and convenient way to preserve the flavor and texture of fresh apples for use in pies and other baked goods. By following a few easy steps, you can have a stash of frozen apples ready to go whenever the baking mood strikes.
The first step in freezing apples for pie making is to select the right apples. Look for firm, slightly tart apples such as Granny Smith or Honeycrisp. These varieties hold up well to freezing and have a nice balance of sweetness and acidity that will complement the other flavors in your pie.
Once you have your apples selected, the next step is to peel, core, and slice them. You can choose to leave the slices whole or cut them into smaller pieces, depending on your preference. Some bakers like to sprinkle the apple slices with a bit of lemon juice to help prevent browning, but this step is optional.
After your apples are prepped, it’s time to pack them for freezing. Spread the apple slices out in a single layer on a baking sheet lined with parchment paper. This will prevent the slices from sticking together during the freezing process. Place the baking sheet in the freezer and allow the apples to freeze solid, usually for about 2-3 hours.
Once the apple slices are frozen, transfer them to airtight containers or freezer bags for long-term storage. Be sure to label the containers with the date and type of apple for easy identification later on. Frozen apples can be stored in the freezer for up to 6 months, so you can enjoy delicious apple pies all year round.
When you’re ready to bake a pie, there’s no need to thaw the frozen apples before using them. Simply incorporate them into your pie filling as directed in your favorite Recipes-ideas/’>Recipe. The frozen apples will release some extra moisture as they bake, which can help prevent a soggy bottom crust and result in a beautifully thick and flavorful filling.
Using frozen apples for pie making is a game-changer for Home bakers. Not only does it save time and effort, but it also ensures that you’ll have a consistent supply of high-quality apples on hand for all your baking needs. Whether you’re a seasoned pie pro or just starting out, freezing apples is a technique that can take your apple pie game to the next level.
So the next time you find yourself with an abundance of fresh apples, don’t let them go to waste. Take a few extra minutes to freeze them for later use in pies, crisps, and other desserts. Your taste buds will thank you for the extra effort when you bite into a delicious slice of apple pie made with perfectly frozen apples.
From Orchard to Oven: How to Freeze Apples
There’s nothing quite like biting into a warm, flaky slice of apple pie. The combination of sweet apples, warm cinnamon, and buttery crust is simply unbeatable. But what do you do when you have an abundance of apples from the orchard and want to save them for later use? Freezing apples is a great way to preserve their freshness and flavor for making the ultimate apple pie whenever the craving strikes.
When it comes to freezing apples, there are a few key steps to follow to ensure that they maintain their quality and taste. From choosing the right apples to preparing them for the freezer, here’s everything you need to know to go from orchard to oven with ease.
The first step in freezing apples is selecting the right variety. While any type of apple can be frozen, some varieties are better suited for baking than others. Look for firm, crisp apples like Granny Smith, Honeycrisp, or Braeburn that will hold their shape and texture well when thawed. These varieties are also known for their sweet and tart flavor profiles, making them perfect for apple pie.
Once you’ve chosen your apples, it’s time to prepare them for the freezer. Start by washing the apples thoroughly to remove any dirt or residue. If desired, you can peel the apples before freezing, although leaving the skins on can add extra flavor and nutrients to your pie. Core and slice the apples into uniform pieces, removing any seeds or tough spots as you go.
To prevent the apples from browning during freezing, you can treat them with a solution of lemon juice and water. Simply toss the sliced apples in a mixture of one part lemon juice to three parts water before placing them in a freezer-safe container or bag. This will help preserve the apples’ color and flavor until you’re ready to use them.
When packaging the apples for freezing, be sure to remove as much air as possible from the container or bag to prevent freezer burn. Label the package with the date and type of apples inside so you can easily identify them later on. For added convenience, you can portion the apples into smaller bags or containers for quick and easy access when making pies.
Once your apples are prepared and packaged, it’s time to freeze them. Place the containers or bags in the freezer and allow them to freeze solid before moving them to a more permanent storage location. Frozen apples can be stored for up to six months in the freezer, ensuring that you’ll have plenty of pie-making ingredients on hand whenever the mood strikes.
When you’re ready to use your frozen apples, simply thaw them in the refrigerator overnight or at room temperature for a few hours. Use them as you would fresh apples in your favorite pie Recipes-ideas/’>Recipe, adjusting the sweetness and spices to taste. The frozen apples will retain their shape and texture when baked, giving you a delicious pie every time.
From orchard to oven, freezing apples is a simple and effective way to preserve the taste of fresh-picked fruit for making the ultimate apple pie. With a little preparation and some freezer space, you can enjoy the flavors of fall all year round. So go ahead, stock up on apples from the orchard and freeze them for pie perfection whenever the craving strikes. Your taste buds will thank you!
how to freeze apples for apple pie


