
Say Goodbye to Soggy Pie Crusts!
Are you tired of biting into a delicious pie, only to be met with a soggy, unappetizing crust? Fear not, for I have the perfect solution for you! With these foolproof tips, you can say goodbye to soggy pie crusts forever and enjoy perfectly crunchy crusts every time.

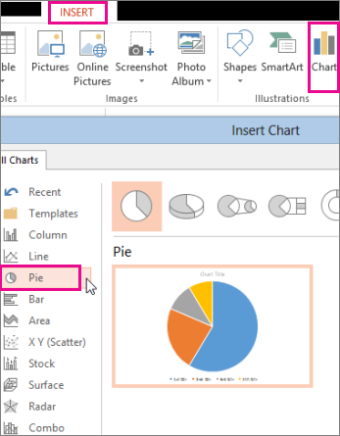
Image Source: wondershare.com
1. Pre-bake your crust: One of the best ways to prevent a soggy pie crust is to pre-bake it before adding any filling. This will help to set the crust and create a barrier that will prevent it from becoming too moist when the filling is added.
2. Brush with egg wash: Before baking your pie, brush the crust with an egg wash. This will create a seal that will help to keep the moisture from the filling from seeping into the crust and making it soggy.
Image Source: office.net
3. Use a high-fat crust Recipes-ideas/’>Recipe: A higher fat content in your pie crust will help to create a flakier, more tender crust that is less likely to become soggy when baked. Try using a recipe that calls for butter or lard for the best results.
4. Blind bake your crust: If you are making a pie with a particularly wet filling, such as a custard or fruit pie, consider blind baking your crust. This involves baking the crust without any filling until it is partially cooked, which will help to prevent it from becoming soggy when the filling is added.
Image Source: wondershare.com
5. Avoid overfilling: When adding your filling to the pie crust, be sure not to overfill it. Too much filling can cause the crust to become soggy as it bakes, so be sure to leave some room at the top of the pie for the filling to expand without spilling over.
6. Ventilate your pie: To prevent steam from building up inside the pie and making the crust soggy, be sure to ventilate it properly. You can do this by cutting small slits in the top crust or using a lattice crust that allows steam to escape.
7. Use a pie shield: To prevent the edges of your crust from becoming too dark or burnt before the filling is fully cooked, consider using a pie shield. This handy tool can be placed over the edges of the crust to protect them from over-browning while the pie bakes.
8. Cool your pie properly: Once your pie is finished baking, be sure to cool it properly before serving. Allowing the pie to cool on a wire rack will help to prevent the crust from becoming soggy as it sits in its own steam.
9. Store your pie correctly: If you have leftover pie that you want to save for later, be sure to store it properly to prevent the crust from becoming soggy. Avoid covering the pie with plastic wrap, as this can trap moisture and make the crust soggy. Instead, store the pie in a paper bag or loosely cover it with foil.
10. Enjoy your crunchy crust: With these foolproof tips, you can enjoy perfectly crunchy pie crusts every time. Say goodbye to soggy crusts and impress your friends and family with your delicious, flaky pies. Happy baking!
Master the Art of Crunchy Crusts
When it comes to making the perfect pie, one of the most important elements is the crust. A soggy crust can ruin an otherwise delicious dessert, so mastering the art of creating a crunchy crust is essential. With these tips and tricks, you’ll be able to impress your friends and family with perfectly crispy pie crusts every time.
1. Use Cold Butter: One of the keys to a flaky and crunchy crust is using cold butter. When you mix cold butter into your flour mixture, it creates pockets of steam when baked, which helps to create a flaky texture. Be sure to cut your butter into small cubes and chill it in the refrigerator before incorporating it into your dough.
2. Don’t Overwork the Dough: When mixing your dough, be careful not to overwork it. Overworking the dough can lead to a tough crust rather than a flaky one. Mix the ingredients just until they come together, and then stop. It’s better to have a few lumps of butter in the dough than to overmix it.
3. Chill the Dough: After you’ve mixed your dough, be sure to chill it in the refrigerator for at least 30 minutes before rolling it out. Chilling the dough allows the butter to firm up again, which will help create a flaky and crunchy crust when baked.
4. Roll it Out Thin: When rolling out your pie crust, aim for a thin, even thickness. A thicker crust will take longer to bake and may not crisp up as nicely as a thinner one. Plus, a thin crust allows the filling to be the star of the show, rather than the crust itself.
5. Use a Pie Weight: If you’re pre-baking your crust for a pie that requires a pre-baked shell, be sure to use a pie weight. This will help prevent the crust from puffing up or shrinking during baking, resulting in a flatter and crispier crust.
6. Brush with Egg Wash: For an extra crunchy crust, consider brushing the top of your pie crust with an egg wash before baking. The egg wash will help the crust to brown and crisp up beautifully in the oven.
7. Bake on a Hot Baking Sheet: To ensure a crispy bottom crust, consider baking your pie on a hot baking sheet. Preheat a baking sheet in the oven while your pie is chilling in the refrigerator, then place the pie on the hot sheet to bake. This will help the bottom crust to bake quickly and become nice and crispy.
8. Ventilation is Key: Remember to vent your pie crust by cutting slits or creating a decorative pattern on the top crust. Venting allows steam to escape during baking, which helps to prevent a soggy crust. Plus, a vented crust looks beautiful and adds to the overall presentation of your pie.
9. Sprinkle with Sugar: For an extra crunchy and sweet crust, consider sprinkling the top of your pie with a bit of sugar before baking. The sugar will caramelize in the oven and create a deliciously crispy topping that adds both texture and flavor to your pie.
10. Let it Cool Completely: Once your pie is finished baking, be sure to let it cool completely before slicing into it. Cutting into a hot pie can cause the filling to run and the crust to become soggy. Allowing the pie to cool completely will ensure that the crust stays nice and crunchy.
With these tips and tricks, you’ll be well on your way to mastering the art of creating crunchy pie crusts. Whether you’re making a fruit pie, a savory pie, or a custard pie, following these guidelines will help you achieve the perfect crunchy crust every time. So go ahead, get baking, and impress your friends and family with your newfound pie-making skills!
Top 10 Tips for Perfect Pie Crusts
Crunchy Crusts: 10 Foolproof Tips to Prevent Soggy Pie Crusts!
Tip #1: Use Cold Ingredients
When making pie crusts, it’s important to use cold ingredients. This includes cold butter, cold water, and even cold flour. Keeping everything cold helps to create a flaky and crispy crust that won’t get soggy during baking.
Tip #2: Don’t Overwork the Dough
One common mistake people make when making pie crusts is overworking the dough. This can lead to a tough crust that doesn’t bake up properly. To prevent this, handle the dough as little as possible and avoid kneading it too much.
Tip #3: Chill the Dough Before Rolling
After making the pie dough, be sure to chill it in the refrigerator for at least 30 minutes before rolling it out. This helps to relax the gluten in the dough, making it easier to roll out and preventing shrinkage during baking.
Tip #4: Roll Out the Dough Evenly
When rolling out the dough, be sure to do so evenly. This helps to create a consistent thickness throughout the crust, which will ensure even baking. Avoid rolling the dough too thin, as this can lead to a soggy bottom crust.
Tip #5: Use Pie Weights
To prevent the crust from puffing up during baking, use pie weights or dried beans to weigh down the crust. This helps to keep the crust flat and ensures an even bake.
Tip #6: Brush with Egg Wash
For an extra crispy and shiny crust, brush the top of the pie crust with an egg wash before baking. This helps to create a beautiful golden brown color and adds an extra layer of flavor to the crust.
Tip #7: Vent the Crust
To prevent steam from building up inside the pie and creating a soggy crust, be sure to vent the crust. This can be done by cutting slits in the top of the crust or using a decorative pie vent.
Tip #8: Bake on a Preheated Baking Sheet
For a perfectly crisp bottom crust, bake the pie on a preheated baking sheet. This helps to ensure that the bottom crust gets enough heat and crisps up nicely.
Tip #9: Let the Pie Cool Completely
After baking the pie, be sure to let it cool completely before slicing into it. Cutting into a hot pie can cause the filling to be too runny and lead to a soggy crust. Allow the pie to set and firm up before serving.
Tip #10: Store Leftover Pie Properly
If you have leftover pie, be sure to store it properly to maintain the crispy crust. Place a paper towel in the container with the pie to absorb any excess moisture and keep the crust from getting soggy.
By following these 10 tips for perfect pie crusts, you can ensure that your pies will have a deliciously crunchy crust every time. Say goodbye to soggy pie crusts and hello to perfectly crispy, flaky pies!
Keep Your Crusts Crunchy Every Time!
Are you tired of soggy pie crusts ruining your delicious dessert creations? Do you long for that perfect crunchy crust that holds up to any filling? Well, fear not! With these top tips, you can ensure that your pie crusts stay crunchy every time.
1. Pre-bake your crusts: One of the best ways to prevent a soggy pie crust is to pre-bake it before adding any filling. This will create a barrier between the crust and the wet filling, ensuring that it stays crispy and flaky.
2. Use the right fat: Choosing the right fat for your pie crust can make all the difference. Butter, shortening, or a combination of both can create a flaky and crunchy crust. Make sure your fat is cold and well incorporated into the flour for the best results.
3. Chill your dough: After mixing your pie dough, be sure to chill it in the refrigerator for at least 30 minutes. This will relax the gluten in the flour and solidify the fat, resulting in a tender and crunchy crust.
4. Brush with egg wash: Before baking your pie, brush the crust with an egg wash. This will create a shiny and crispy outer layer that will hold up to any filling.
5. Use a pie shield: To prevent the edges of your crust from burning before the filling is fully cooked, use a pie shield or foil to cover the edges. This will ensure that your crust stays golden and crunchy.
6. Bake at a high temperature: For a crisp and crunchy crust, bake your pie at a high temperature (around 400°F). This will help the crust brown evenly and develop a crunchy texture.
7. Ventilate your pie: To prevent steam from building up inside your pie and making the crust soggy, be sure to create vents in the top crust. This will allow steam to escape and help your crust stay crisp.
8. Cool completely: Once your pie is done baking, be sure to let it cool completely before slicing into it. This will allow the filling to set and the crust to firm up, ensuring a crunchy bite every time.
9. Store properly: To keep your pie crust crunchy for longer, store any leftovers at room temperature in a loosely covered container. Avoid storing in the refrigerator, as this can cause the crust to become soggy.
10. Reheat properly: If you need to reheat your pie, avoid using the microwave, as this can make the crust soggy. Instead, reheat in a 350°F oven for a few minutes to crisp up the crust.
With these foolproof tips, you can say goodbye to soggy pie crusts and hello to perfectly crunchy creations every time. So go ahead, whip up that pie you’ve been dreaming of, and enjoy a deliciously crispy crust with every bite.
Keep Your Crusts Crunchy Every Time!
Are you tired of biting into a pie only to be met with a soggy, disappointing crust? Say goodbye to soggy pie crusts and master the art of crunchy crusts with these top 10 foolproof tips!
1. Blind Bake Your Crust
One of the best ways to ensure a crunchy crust is to blind bake it before adding your filling. This involves pre-baking the crust without any filling, which helps to set the crust and prevent it from becoming soggy when the filling is added.
2. Use the Right Flour
The type of flour you use can make a big difference in the texture of your crust. Opt for a flour with a higher protein content, such as bread flour, which will help to create a crisp and crunchy crust.
3. Chill Your Ingredients
Cold ingredients are key to a flaky and crunchy crust. Make sure your butter, water, and any other ingredients are well chilled before mixing them together. This will help the fat in the butter to create layers in the dough, resulting in a flaky crust.
4. Brush with Egg Wash
For an extra crispy crust, brush the top of your pie with an egg wash before baking. This will give your crust a beautiful golden color and a crispy texture that is sure to impress.
5. Vent Your Pie
To prevent steam from getting trapped inside your pie and causing a soggy crust, make sure to vent your pie before baking. You can do this by cutting slits in the top crust or using a pie bird to release steam.
6. Use a Pie Shield
If you find that the edges of your crust are browning too quickly, a pie shield can help to prevent them from burning. Simply place a pie shield or strips of aluminum foil around the edges of your pie before baking.
7. Bake on a Hot Surface
For a crispy bottom crust, try baking your pie on a preheated baking sheet or pizza stone. This will help to ensure that the bottom of the crust cooks evenly and stays crunchy.
8. Avoid Overfilling
Adding too much filling to your pie can cause the crust to become soggy. Make sure to follow the Recipes-ideas/’>Recipe‘s instructions for filling the pie and avoid overfilling to keep your crust crispy.
9. Let Your Pie Cool Properly
Allowing your pie to cool properly before slicing into it is essential for maintaining a crunchy crust. Let your pie cool on a wire rack for at least an hour before serving to ensure that the crust stays crispy.
10. Store Your Pie Correctly
To keep your pie crust crunchy for as long as possible, store your pie at room temperature in a loosely covered container. Avoid storing your pie in the refrigerator, as this can cause the crust to become soft and lose its crunch.
With these top 10 tips, you can say goodbye to soggy pie crusts and keep your crusts crunchy every time! Master the art of crunchy crusts and impress your friends and family with your perfectly crispy pies.
Keep Your Crusts Crunchy Every Time!
Are you tired of serving up soggy pie crusts to your family and friends? Don’t worry, we’ve got you covered with these foolproof tips to ensure that your crusts stay crunchy every time! There’s nothing worse than spending hours in the kitchen preparing a delicious pie, only to have the crust turn out disappointingly soggy. But fear not, with these tips and tricks, you’ll be serving up perfectly crispy and crunchy pie crusts in no time!
1. Blind Bake Your Crust: One of the best ways to prevent a soggy bottom crust is to blind bake it before adding your filling. Simply line your pie crust with parchment paper, fill it with pie weights or dried beans, and bake it in the oven for about 15 minutes. This will help to set the crust and prevent it from becoming soggy when you add your filling.
2. Brush the Crust with Egg Wash: Before adding your filling, brush the bottom and sides of your pie crust with an egg wash. This will create a barrier between the crust and the filling, helping to keep it crispy and crunchy.
3. Use a Pie Shield: If you find that the edges of your pie crust are browning too quickly, use a pie shield to protect them. Simply place the shield over the edges of the pie crust before baking to prevent them from burning.
4. Avoid Overfilling: One of the main causes of a soggy pie crust is overfilling. Make sure to only fill your pie crust with the amount of filling specified in the Recipes-ideas/’>Recipe, and avoid adding too much liquid or juicy ingredients that can seep into the crust.
5. Ventilate Your Pie: To prevent steam from getting trapped in your pie and making the crust soggy, make sure to cut vents in the top crust before baking. This will allow steam to escape and help to keep the crust crispy.
6. Preheat Your Baking Sheet: For extra crispy crusts, preheat a baking sheet in the oven before placing your pie on top of it to bake. This will help to crisp up the bottom crust and prevent it from getting soggy.
7. Use Cold Ingredients: When making your pie crust, make sure to use cold ingredients, such as chilled butter and ice water. This will help to create a flaky and crispy crust that stays crunchy even after baking.
8. Avoid Underbaking: To ensure that your crust stays crunchy, make sure to bake your pie for the full amount of time specified in the recipe. Underbaking can result in a soggy crust, so be sure to keep an eye on your pie and bake it until it’s golden brown and crispy.
9. Let Your Pie Cool Completely: Once your pie is done baking, resist the urge to dig in right away. Let your pie cool completely on a wire rack before serving. This will help the crust to set and become even crispier.
10. Store Properly: If you have leftovers, make sure to store your pie properly to keep the crust crunchy. Store it at room temperature in a loosely covered container to prevent the crust from getting soggy.
With these 10 foolproof tips, you’ll never have to worry about serving up a soggy pie crust again. Say goodbye to disappointment and hello to perfectly crispy and crunchy pie crusts every time! So go ahead, get baking, and impress your family and friends with your newfound crust perfection.
Let’s Get Baking: Creating a Delicious Pie Chart!
As we all know, pie charts are a great way to visualize data and make presentations more engaging. But why settle for a plain old pie chart when you can create a delicious one that will leave your audience craving more? In this step-by-step guide, we will show you how to create a mouth-watering pie chart that will make your presentation stand out.
To start off, gather all the ingredients you will need for your pie chart. This includes your data, which should be sliced and diced to perfection. Just like baking a pie, you want to make sure your data is fresh and accurate. Take the time to organize and analyze your data so that it is ready to be transformed into a delectable pie chart.
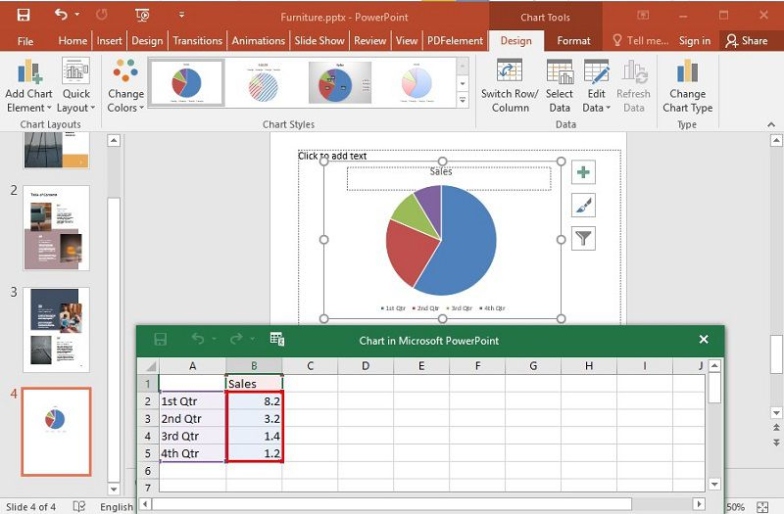
Next, open up PowerPoint and select the slide where you want to insert your pie chart. Just like preheating an oven, you want to make sure your audience is warmed up and ready for the delicious treat you are about to present. Choose the Insert tab and then select Chart from the menu. This will open up a variety of chart options for you to choose from.
Now comes the fun part – choosing the right type of pie chart for your data. Just like selecting the perfect filling for your pie, you want to pick a chart that will showcase your data in the most appealing way. Whether you choose a traditional pie chart, a doughnut chart, or a 3D pie chart, make sure it suits the style and message of your presentation.
Once you have selected your pie chart type, it’s time to add your data. Think of this step as mixing together the ingredients for your pie filling. Click on the Select Data button and then enter your data into the spreadsheet that appears. Make sure to label your data accurately so that your audience can easily understand the information you are presenting.
After you have added your data, it’s time to customize your pie chart to make it even more delicious. Just like adding a sprinkle of cinnamon or a dollop of whipped cream to your pie, you can customize the colors, labels, and design of your chart to make it visually appealing. Experiment with different color schemes and fonts until you create a chart that looks as good as it tastes.
Now that your pie chart is looking scrumptious, it’s time to add the finishing touches. Just like adding a lattice crust or a decorative edge to your pie, you can add titles, legends, and other elements to make your chart more informative and engaging. Make sure to include a title that clearly summarizes the data you are presenting and a legend that explains the different slices of the pie.
Finally, once your pie chart is complete, it’s time to present it to your audience. Just like serving up a freshly baked pie, you want to make sure your audience can fully enjoy and appreciate your chart. Use animations and transitions to reveal your chart in a visually appealing way, and be prepared to explain the data and insights behind it.
And there you have it – a delicious pie chart that will leave your audience craving more. By following these steps and adding your own creative flair, you can create a visually stunning chart that will make your presentation memorable and engaging. So why settle for a plain old pie chart when you can create a mouth-watering masterpiece that will impress your audience and make your data more digestible? Happy baking!
Slicing and Dicing Data for Visual Impact
Ah, the art of slicing and dicing data to create a visually stunning pie chart in PowerPoint. It may seem like a daunting task at first, but fear not! With a few simple steps, you can transform your data into a mouth-watering visual masterpiece that will captivate your audience.
To begin, gather all the data you wish to represent in your pie chart. Whether it’s sales figures, survey results, or any other type of data, make sure it is organized and ready to be sliced and diced. Remember, the key to a successful pie chart is clear and concise data representation.
Next, open up PowerPoint and select the slide where you want to insert your pie chart. Click on the Insert tab at the top of the screen and then choose Chart from the dropdown menu. A variety of chart options will appear, but for our purposes, we will select the Pie chart.
Now comes the fun part – slicing and dicing your data! Click on the chart to select it, and then click on the Edit Data button that appears. A datasheet will pop up, allowing you to input your data directly into the chart. Be sure to label each data point clearly so that your audience can easily understand the information being presented.
Once your data is entered, you can further customize your pie chart to enhance its visual impact. Click on the chart to select it, and then click on the Design tab at the top of the screen. From here, you can choose different chart styles, colors, and layouts to make your pie chart truly stand out.
But wait, there’s more! To truly make your pie chart pop, consider adding labels, legends, and other visual elements to provide additional context to your data. You can do this by clicking on the chart and then selecting the Chart Elements button that appears. From here, you can add or remove elements as needed to make your pie chart as informative as possible.
As you put the finishing touches on your pie chart, take a step back and admire your handiwork. You’ve successfully sliced and diced your data to create a visually stunning representation that will undoubtedly impress your audience. So go ahead, insert that pie chart into your PowerPoint presentation and watch as it takes center stage, stealing the show with its visual impact.
In the world of presentations, data visualization is key. And what better way to present your data than with a delicious pie chart that not only informs but also entertains? So the next time you find yourself needing to convey complex data in a simple and engaging way, remember the art of slicing and dicing for visual impact. Your audience will thank you for it!
Slice and Dice: A Step-by-Step Guide to Inserting a Pie Chart in PowerPoint
A Piece of Cake: Inserting Your Pie Chart in PowerPoint
Have you ever found yourself staring at a spreadsheet full of data, wondering How to Make it visually appealing for a presentation? Look no further, because inserting a pie chart in PowerPoint is easier than you think! With just a few simple steps, you can turn those boring numbers into a colorful and informative visual aid that will impress your audience.
To begin, open up your PowerPoint presentation and navigate to the slide where you want to insert your pie chart. Click on the Insert tab at the top of the screen, and then select Chart from the drop-down menu. A new window will pop up, giving you the option to choose the type of chart you want to insert. Select Pie Chart from the list of options, and then click OK.
Next, a blank pie chart will appear on your slide, ready for you to input your data. Click on the chart to select it, and then click on the small spreadsheet icon in the top right corner of the chart. This will open up an Excel spreadsheet where you can enter your data. Simply type your labels and values into the cells provided, and watch as your pie chart automatically updates to reflect your input.
Once you have entered your data, you can customize your pie chart to make it more visually appealing. Click on the chart to select it, and then click on the Design tab at the top of the screen. Here, you can choose from a variety of different styles and color schemes to make your chart stand out. You can also adjust the size of the chart and add labels or a legend to make it easier for your audience to understand.
In addition to customizing the appearance of your pie chart, you can also add animations to make your presentation more engaging. Click on the chart to select it, and then click on the Animations tab at the top of the screen. Here, you can choose from a variety of different animation effects to make your chart come to life. You can also adjust the speed and direction of the animation to fit the flow of your presentation.
Finally, once you are happy with the appearance and animations of your pie chart, you can add any final touches to your slide to complete your presentation. You can add titles, captions, or additional text to provide context for your chart, and you can also add transitions between slides to keep your audience engaged. With just a few simple steps, you can create a professional and visually appealing presentation that will impress your audience.
So the next time you find yourself faced with a sea of data, don’t panic. With the simple steps outlined above, you can easily insert a pie chart in PowerPoint and turn that daunting spreadsheet into a colorful and informative visual aid. Impress your audience with your creativity and professionalism, and make your presentation a piece of cake!
Putting the Cherry on Top: Tips for Perfecting Your Presentation
Are you ready to take your PowerPoint presentation to the next level? If so, it’s time to put the cherry on top by perfecting your pie chart. A well-designed pie chart can add visual impact and clarity to your data, helping your audience better understand the information you’re presenting. In this article, we’ll share some tips to help you create a stunning pie chart that will impress your audience.
One of the first things to consider when perfecting your presentation is choosing the right colors for your pie chart. It’s important to select colors that are visually appealing and easy to differentiate. Avoid using colors that are too similar, as this can make it difficult for your audience to distinguish between different data points. Instead, opt for a color scheme that is both eye-catching and easy to read.
In addition to choosing the right colors, it’s also important to pay attention to the design elements of your pie chart. Make sure that the slices are clearly labeled and that any legends or key information is easy to read. You can also add a title to your pie chart to give your audience a clear understanding of what the data represents.
Another tip for perfecting your pie chart is to make sure that the data you’re presenting is accurate and up-to-date. Double-check your numbers and ensure that your chart reflects the most recent information available. This will help you build credibility with your audience and ensure that your presentation is as informative as possible.
Once you’ve created your pie chart, it’s important to practice presenting it before the big day. Make sure that you’re familiar with the data and can speak confidently about what the chart represents. By rehearsing your presentation, you’ll feel more comfortable and be better prepared to answer any questions that may arise.
Finally, don’t forget to consider the overall aesthetics of your presentation. Make sure that your pie chart fits in with the rest of your slides and that the design is cohesive. You can use PowerPoint’s design tools to adjust the size, shape, and placement of your chart to ensure that it looks polished and professional.
By following these tips, you can put the cherry on top of your presentation and create a stunning pie chart that will impress your audience. With the right colors, design elements, and attention to detail, you can take your PowerPoint presentation to the next level and ensure that your data is presented in a visually appealing and informative way. So go ahead and slice, dice, and insert that pie chart with confidence – your audience will thank you for it!
how to insert pie chart in ppt


