
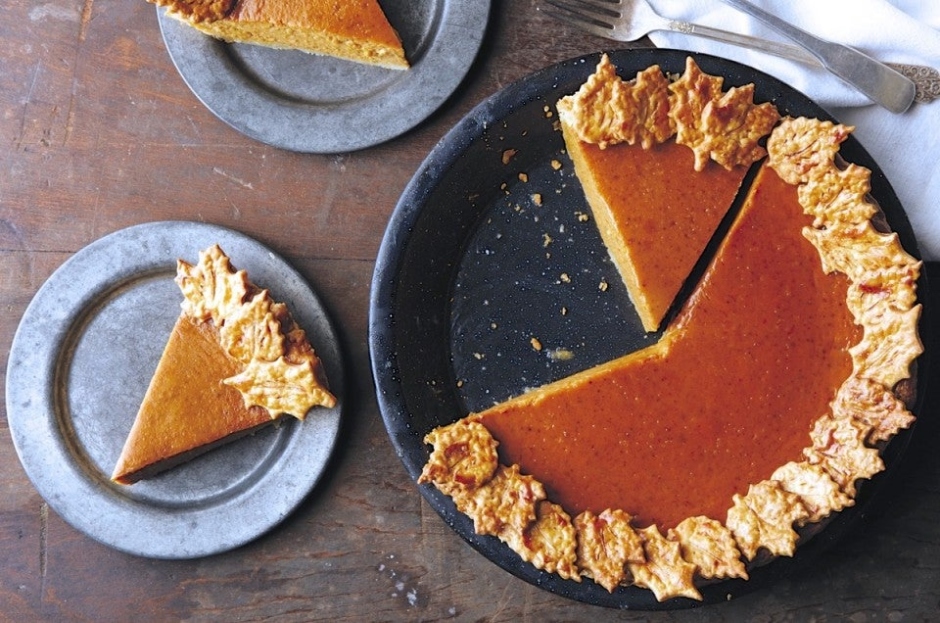
Say Goodbye to Cracked Pumpkin Pies!
Ah, pumpkin pie – a beloved classic that graces our tables during the fall season. But nothing can put a damper on your dessert quite like a cracked pumpkin pie. Fear not, dear reader, for I am here to share with you the ultimate guide to preventing those unsightly cracks in your pumpkin pie!
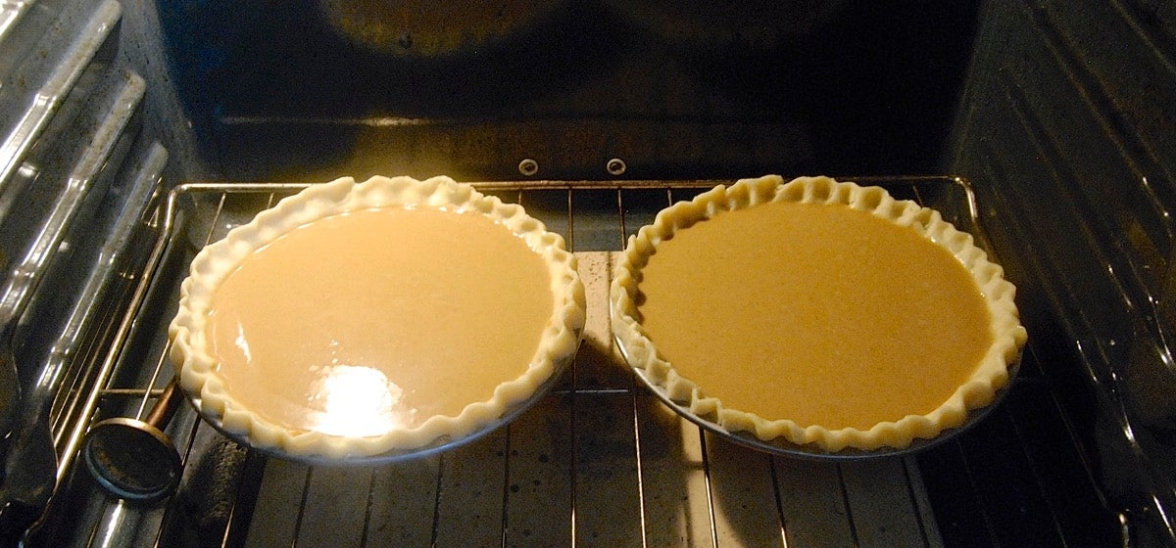
Image Source: kingarthurbaking.com
The key to crack-proof pumpkin pie lies in understanding the science behind the dessert. Pumpkin pie filling is essentially a custard, made with eggs, sugar, spices, and of course, pumpkin puree. When baking a custard-based pie like pumpkin pie, it’s important to remember that the filling will continue to cook and set after it’s been removed from the oven. This residual heat can cause the filling to overcook, leading to cracks.
To prevent cracks in your pumpkin pie, there are a few simple tips and tricks you can follow. First and foremost, be sure to bake your pie at the right temperature. A hot oven can cause the filling to set too quickly, resulting in cracks. To avoid this, bake your pie at a lower temperature for a longer period of time. This will allow the filling to cook evenly and prevent cracks from forming.
Image Source: kingarthurbaking.com
Another important factor in preventing cracks is to avoid overmixing your pie filling. Overmixing can incorporate too much air into the filling, which can cause it to puff up and crack during baking. Be sure to mix your ingredients just until they are combined, and avoid using a mixer on high speed.
In addition to proper baking techniques, the type of pie dish you use can also affect the likelihood of cracks in your pumpkin pie. A glass or ceramic pie dish is ideal for baking pumpkin pie, as these materials distribute heat more evenly than metal pans. This helps the filling to cook more evenly and reduces the risk of cracks.
If you still find yourself facing cracks in your pumpkin pie, fear not – there are ways to salvage your dessert. One trick is to cover the cracks with a dollop of whipped cream or a sprinkle of powdered sugar. Not only will this disguise any imperfections, but it will also add a delicious finishing touch to your pie.
In conclusion, with a little knowledge and care, you can say goodbye to cracked pumpkin pies for good. By following these tips and tricks, you’ll be well on your way to baking the perfect, crack-proof pumpkin pie every time. So go ahead, whip up a delicious pumpkin pie and impress your friends and family with your newfound baking skills. Happy baking!
Master the Art of Crust Perfection
Ah, the beloved pumpkin pie – a classic dessert that symbolizes the cozy comfort of fall. But nothing can ruin that warm, fuzzy feeling quite like a cracked crust on your pumpkin pie. Fear not, dear bakers, for I am here to guide you through the art of crust perfection.
The key to a crack-proof crust lies in the right balance of ingredients and techniques. Let’s start with the basics – flour, butter, and water. When making your pie crust, make sure to use cold butter and ice water. Cold ingredients help prevent the butter from melting too quickly, resulting in a flaky crust.
For the flour, opt for all-purpose flour for a versatile and sturdy crust. To achieve that perfect flakiness, don’t overwork the dough. Mix the ingredients just until they come together, then chill the dough before rolling it out. This allows the gluten in the flour to relax, making the crust tender and flaky.
When rolling out the dough, do so on a lightly floured surface. Roll from the center outwards, rotating the dough as needed to achieve an even thickness. Avoid stretching the dough as this can lead to shrinkage during baking. For a decorative finish, crimp the edges of the crust with a fork or your fingers.
Now, let’s talk about blind baking. To prevent a soggy bottom crust, blind bake your pie crust before filling it with the pumpkin mixture. To do this, line the chilled crust with parchment paper and fill it with pie weights or dried beans. Bake the crust until it’s set and lightly golden brown. This step ensures a crisp and flaky crust that can withstand the moisture from the filling.
Another tip for a crack-proof crust is to brush the bottom of the crust with an egg wash before blind baking. This creates a barrier between the crust and the filling, helping to prevent sogginess and cracks. For an extra layer of protection, you can also sprinkle a thin layer of ground nuts or graham cracker crumbs on the bottom of the crust before adding the filling.
When it comes to filling your pie crust, make sure the pumpkin mixture is smooth and evenly mixed. Air bubbles in the filling can cause cracks during baking. To avoid this, gently tap the filled pie on the counter to release any trapped air bubbles. You can also cover the surface of the filling with a thin layer of cream or foil to prevent over-browning.
Finally, to ensure a beautifully golden and crack-free crust, bake your pumpkin pie at the right temperature. Start baking the pie at a high temperature (around 425°F) for the first 15 minutes to set the crust, then reduce the temperature to 350°F for the remaining baking time. This gradual temperature change helps prevent cracks and ensures an evenly baked pie.
With these tips and tricks in your baking arsenal, you’ll be able to master the art of crust perfection and say goodbye to cracked pumpkin pies for good. So roll up your sleeves, preheat your oven, and get ready to impress your friends and family with a flawless pumpkin pie that’s as delicious as it is beautiful. Happy baking!
Expert Tips for a Flawless Finish
When it comes to making the perfect pumpkin pie, there are a few key factors that can make or break your dessert. One of the most common issues that Home bakers face is the dreaded cracked pumpkin pie. But fear not, with the right techniques and tips, you can achieve a flawless finish every time.
First and foremost, it’s important to properly prepare your filling. Overmixing can introduce too much air into the mixture, which can cause the pie to crack as it bakes. To prevent this, gently mix the ingredients together until just combined. Additionally, make sure to use room temperature ingredients to ensure a smooth and creamy texture.
Another tip for preventing cracks in your pumpkin pie is to avoid overbaking. An overcooked pie is more likely to crack as it cools. To ensure that your pie is perfectly baked, start checking for doneness about 10-15 minutes before the suggested baking time. The pie is done when the edges are set and the center jiggles slightly.
In addition to proper mixing and baking techniques, there are a few tricks you can use to give your pumpkin pie a flawless finish. One of the most effective methods is to bake the pie in a water bath. This involves placing the pie tin in a larger pan filled with hot water while it bakes. The steam created from the water helps to prevent the surface of the pie from drying out and cracking.
Another tip for a flawless finish is to use a pie crust shield or aluminum foil to protect the edges of the pie from overbrowning. Simply cover the edges of the crust with the shield or foil during the first half of the baking time, then remove it for the remaining time to ensure a perfectly golden crust.
To really elevate the appearance of your pumpkin pie, consider adding decorative elements to the top. You can use cookie cutters to create fun shapes out of extra pie dough and arrange them on top of the filling before baking. Or, try piping whipped cream around the edges of the pie for a professional touch.
Lastly, let your pumpkin pie cool completely before slicing into it. Cutting into a warm pie can cause it to crack, so be patient and allow it to set before serving. Once it’s cooled, slice with a sharp knife to ensure clean cuts and a beautiful presentation.
By following these expert tips for a flawless finish, you can say goodbye to cracked pumpkin pies and impress your friends and family with a dessert that looks as good as it tastes. So go ahead, bake up a delicious pumpkin pie and enjoy a slice of fall perfection!
The Secrets to Silky Smooth Pumpkin Pies
When it comes to baking the perfect pumpkin pie, one of the biggest challenges that many Home bakers face is preventing those pesky cracks from forming on the surface. A cracked pumpkin pie can be a real disappointment, especially after putting in all the time and effort to create a delicious dessert. But fear not, with a few simple tips and tricks, you can ensure that your pumpkin pie comes out silky smooth every time.
One of the secrets to achieving a silky smooth pumpkin pie is to start with a perfectly blended filling. This means making sure that your pumpkin puree, eggs, sugar, spices, and cream are all fully incorporated. Overmixing can introduce air bubbles into the filling, which can lead to cracking during baking. To avoid this, mix your ingredients together gently and just until everything is combined.
Another key factor in preventing cracks in your pumpkin pie is to avoid overbaking. Overbaking can cause the filling to dry out and shrink, which can result in unsightly cracks. To determine when your pie is done, you can use the jiggle test. Gently shake the pan, and if the center of the pie jiggles slightly but the edges are set, then it’s ready to come out of the oven. Remember that the pie will continue to cook and set as it cools, so it’s better to slightly underbake than to overbake.
In addition to proper mixing and baking techniques, the type of pie dish you use can also make a difference in the appearance of your pumpkin pie. A glass or ceramic pie dish is ideal for baking pumpkin pie, as it conducts heat evenly and helps to prevent hot spots that can result in cracking. It’s also important to allow your pie to cool slowly after baking. Rapid temperature changes can cause the filling to contract and crack, so be patient and let your pie cool on a wire rack for at least an hour before serving.
To add an extra layer of protection against cracks, you can also try using a water bath when baking your pumpkin pie. Simply place your pie dish inside a larger roasting pan and fill the pan with hot water before baking. The steam created by the water bath helps to keep the filling moist and prevents it from drying out and cracking. Just be sure to wrap the bottom of your pie dish in foil to prevent any water from seeping in.
Another trick for achieving a silky smooth pumpkin pie is to brush the top of the pie with a thin layer of cream or egg wash before baking. This helps to seal the surface of the pie and creates a beautiful, glossy finish. You can also sprinkle a little bit of sugar on top for a hint of sweetness and a slightly crisp texture.
Incorporating these tips and techniques into your pumpkin pie baking routine will help you create a dessert that is not only delicious but also visually appealing. With a silky smooth filling and a flawless finish, your pumpkin pie is sure to be a showstopper at any gathering. So say goodbye to cracked pumpkin pies and hello to the ultimate guide to preventing cracks – your taste buds will thank you!
how to keep pumpkin pie from cracking


