
Luscious Lattice: A Guide to Perfect Pie Crusts!
Are you ready to take your pie baking skills to the next level? Look no further than mastering the art of lattice pie crusts! There’s something truly special about a perfectly woven lattice topping on a pie – it adds a touch of elegance and whimsy that can’t be beat. But creating a picture-perfect lattice crust isn’t always easy. That’s why we’re here to provide you with all the tips and tricks you need to achieve pie perfection!

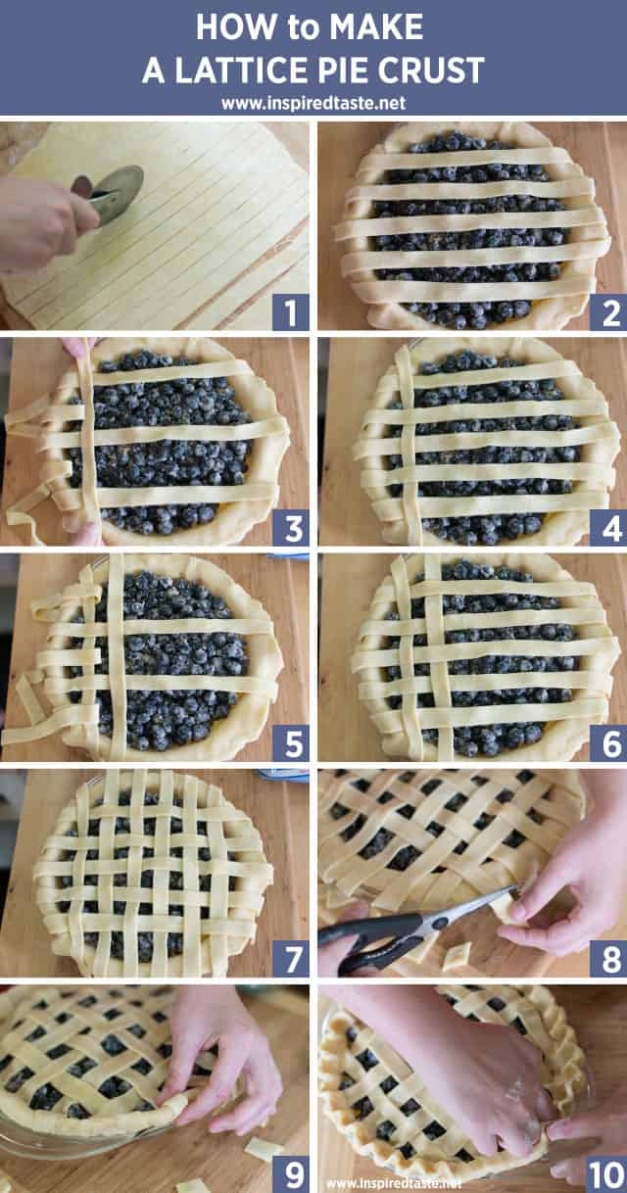
Image Source: inspiredtaste.net
First things first, let’s talk about the dough. For a lattice crust that is both flaky and sturdy enough to hold its shape, you’ll want to make sure your dough is properly chilled before rolling it out. This will help prevent the butter from melting too quickly and ensure that your lattice stays intact during baking.
Once your dough is chilled, it’s time to roll it out. Be sure to roll your dough into a uniform thickness – about 1/8 of an inch is ideal. This will make it easier to create even strips for weaving your lattice. If you find that your dough is sticking, don’t be afraid to dust your work surface with a little flour to prevent any mishaps.
Image Source: sugarspunrun.com
Now, onto the weaving! To create a classic lattice crust, start by cutting your rolled out dough into even strips using a sharp knife or pastry wheel. You can make your lattice as wide or narrow as you like, but we recommend keeping the strips between 1/2 to 1 inch wide for a visually appealing look.
To weave your lattice, start by laying half of the strips horizontally across the pie filling. Then, fold back every other strip halfway and lay a strip vertically across the unfolded strips. Unfold the strips over the top of the vertical strip, then fold back the alternate strips and repeat the process until you’ve created a woven lattice pattern. It may sound complicated, but with a little practice, you’ll be weaving like a pro in no time!
As you weave your lattice, be sure to gently press the edges of the strips onto the bottom crust to seal them together. This will help prevent any gaps from forming during baking and ensure that your lattice stays in place. Once your lattice is woven, trim any excess dough from the edges of the pie and crimp them together for a polished finish.
Before baking your pie, we recommend giving your lattice a little extra love with an egg wash. This will help give your crust a beautiful golden sheen and add a touch of flavor. Simply brush the top of your lattice with a beaten egg before popping it in the oven – trust us, it’s worth the extra step!
When it comes to baking your lattice pie, remember that patience is key. To prevent your crust from burning or becoming too dark, you may want to cover the edges with a pie crust shield or aluminum foil halfway through baking. This will help protect the delicate lattice strips while allowing the filling to cook to perfection.
And there you have it – a guide to creating a perfect lattice pie crust! With a little practice and a lot of love, you’ll be weaving picture-perfect lattice crusts in no time. So grab your rolling pin and get ready to impress your friends and family with your newfound pie baking skills. Happy baking!
Weave Your Way to Pie Perfection with Lattice
When it comes to baking a pie, the crust is often the star of the show. And if you want to take your pie game to the next level, mastering the art of lattice pie crust is a must. Not only does a lattice crust add a beautiful decorative touch to your pie, but it also allows the filling to peek through, creating a visually stunning dessert that is sure to impress your friends and family.
But creating a perfect lattice crust can be a daunting task for some bakers. Don’t worry, though – with a few tips and tricks, you’ll be weaving your way to pie perfection in no time.
First and foremost, start with a good pie crust Recipes-ideas/’>Recipe. Whether you prefer a traditional butter crust or a flaky shortening crust, make sure to chill your dough before rolling it out. This will make it easier to work with and will help prevent shrinkage during baking.
Once your dough is chilled and rolled out, it’s time to cut strips for your lattice. You can use a sharp knife or a pastry wheel to create even strips, making sure they are all about the same width. For a traditional lattice design, you’ll want to cut an even number of strips – typically around 8 to 10, depending on the size of your pie.
Now comes the fun part – weaving the lattice! Start by laying half of the strips across the top of your filled pie, spacing them evenly apart. Then, fold back every other strip halfway and lay a new strip perpendicular to them. Unfold the folded strips over the new one, then fold back the other strips and repeat the process. Continue weaving until the top of your pie is covered in a beautiful lattice pattern.
To help your lattice crust bake up golden and crispy, brush it with an egg wash before popping it in the oven. This will give your crust a shiny finish and help it brown evenly. You can also sprinkle a little sugar on top for some added sweetness and crunch.
Another tip for a picture-perfect lattice crust is to make sure your filling is thick enough to support the lattice design. If your filling is too runny, it can cause the lattice to sink or collapse during baking. To prevent this, consider adding a thickening agent like cornstarch or tapioca to your filling.
And finally, don’t forget to bake your pie on a preheated baking sheet. This will help ensure that the bottom crust bakes up nice and crispy, while also preventing any drips from making a mess in your oven. Plus, a hot baking sheet will help your pie cook evenly and thoroughly, giving you a perfectly baked lattice crust every time.
So there you have it – with a little practice and these helpful tips, you’ll be weaving your way to pie perfection with a stunning lattice crust that is sure to impress. Whether you’re baking a classic apple pie, a decadent cherry pie, or a savory pot pie, mastering the art of lattice crust will take your baking skills to the next level. Get creative, have fun, and enjoy the delicious results of your hard work. Happy baking!
Baking Beauty: Tips for a Stunning Lattice Crust
When it comes to baking a pie, the crust is often the star of the show. And when it comes to creating a stunning lattice crust, there are a few tips and tricks that can help you achieve a picture-perfect result every time. From choosing the right ingredients to mastering the weaving technique, here are some key tips for creating a lattice crust that will impress your friends and family.
One of the most important factors in creating a beautiful lattice crust is choosing the right ingredients. Start with a high-quality flour and butter for the crust, as these will give you a flaky and flavorful base for your pie. Make sure your ingredients are cold when you start, as this will help create a tender crust that holds its shape during baking.
Once you have your dough ready, it’s time to roll it out and create the lattice strips. Roll out your dough on a floured surface, making sure it’s even in thickness. Use a sharp knife or pastry cutter to cut the dough into even strips, about half an inch wide. You can use a ruler or a straight edge to help guide your cuts and ensure your strips are uniform in size.
As you start weaving your lattice crust, keep in mind that the key is to alternate the strips over and under each other to create a woven pattern. Start by laying out half of the strips in one direction, spacing them evenly apart. Then, fold back every other strip and lay a new strip perpendicular to the first set. Continue folding back strips and adding new ones until you have created a woven lattice pattern.
To make your lattice crust even more beautiful, consider adding decorative touches like braids or twists to the edges of the crust. You can also use small cookie cutters to create shapes that you can place on top of the lattice for a whimsical look. Just make sure to brush the edges of the crust with an egg wash before adding any Decorations to help them stick in place.
When it comes to baking your lattice pie, make sure to preheat your oven and place a baking sheet on the bottom rack to catch any drips. This will help prevent the bottom of your pie from getting soggy during baking. You can also sprinkle a little sugar on top of the lattice before baking to give it a nice golden color and added sweetness.
Once your pie is baking, keep an eye on it to make sure the crust doesn’t get too dark. If it starts to brown too quickly, you can cover the edges with foil to protect them while the rest of the pie finishes baking. And don’t forget to let your pie cool completely before serving to ensure that the filling sets and the crust firms up.
With these tips and tricks in mind, you’ll be well on your way to creating a stunning lattice crust that will impress everyone who sees and tastes it. So roll up your sleeves, grab your rolling pin, and get ready to master the art of lattice pie baking. Your friends and family will thank you for it!
Mastering the Art of Lattice Pie: Tips & Tricks
When it comes to baking a perfect lattice pie crust, there are a few key tips and tricks that can help you achieve a picture-perfect result every time. Whether you’re a seasoned baker or a novice in the kitchen, mastering the art of lattice pie can be a rewarding experience that will impress your friends and family. Here are some valuable insights to help you become a pro at creating beautiful lattice pie crusts.
Embrace the Dough: The key to a successful lattice pie crust is to start with a good dough. Make sure your dough is well-chilled before rolling it out, as this will make it easier to work with and prevent it from becoming too sticky. You can also add a touch of sugar or spice to your dough for added flavor and texture.
Precision is Key: When it comes to creating a lattice pie crust, precision is key. Take your time when cutting the strips of dough and weaving them together, ensuring that each strip is evenly spaced and aligned. This will help create a beautiful lattice pattern that will impress your guests.
Use the Right Tools: Having the right tools on hand can make all the difference when it comes to creating a perfect lattice pie crust. Invest in a good pastry cutter or knife to help you cut the strips of dough with precision, and use a pastry brush to apply an egg wash or sugar glaze for a shiny, golden finish.
Play with Flavors: Don’t be afraid to get creative with your lattice pie crusts! Experiment with different flavors and textures by adding spices, herbs, or even citrus zest to your dough. You can also mix and match different types of fruits for a unique and delicious filling that will take your lattice pie to the next level.
Practice Patience: Creating a beautiful lattice pie crust takes time and patience, so don’t rush the process. Take your time to carefully weave the strips of dough together, making sure to secure the edges and crimp them neatly. The extra effort will pay off in the end when you unveil a stunning lattice pie that looks as good as it tastes.
Let it Shine: Before baking your lattice pie crust, be sure to give it a final touch of shine. Brush the crust with an egg wash or sprinkle it with sugar for a glossy finish that will make your pie look irresistible. You can also add a sprinkle of coarse sugar or cinnamon for a bit of extra crunch and flavor.
Mastering the art of lattice pie crusts is a fun and rewarding experience that will impress your friends and family. By following these tips and tricks, you can create picture-perfect lattice pie crusts that are as beautiful as they are delicious. So roll up your sleeves, preheat your oven, and get ready to weave your way to pie perfection!
how to lattice pie


