
Let’s Get Rolling: Lattice Pie Crust Basics
When it comes to creating a beautiful lattice pie crust, mastering the art of rolling out your dough is key. The perfect lattice crust is not only visually stunning but also adds a delicious flaky texture to your pie. In this step-by-step guide, we’ll cover everything you need to know about rolling out your dough to create a perfect lattice crust.
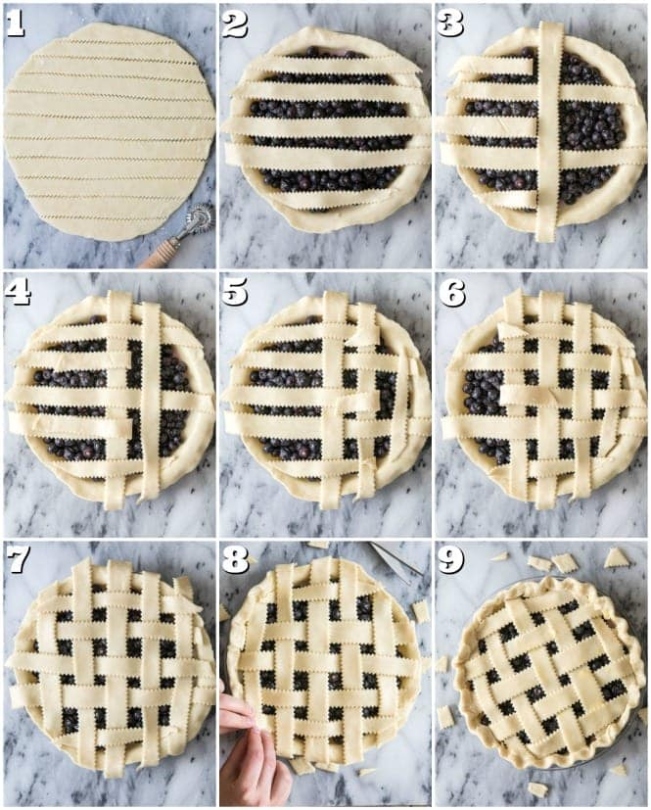
Image Source: sugarspunrun.com
First and foremost, it’s important to start with a well-chilled pie dough. This will make it easier to roll out and weave into a lattice pattern. Once your dough has chilled, lightly flour your work surface and rolling pin to prevent sticking.
When rolling out your dough, it’s best to work quickly and efficiently to prevent the butter in the dough from melting. Start by gently pressing the dough with your rolling pin to flatten it slightly. Then, begin rolling the dough out from the center, rotating it occasionally to ensure an even thickness.
As you roll out the dough, try to maintain a circular shape to fit your pie dish. If the dough starts to stick, add more flour underneath and on top of the dough. You want to avoid adding too much flour, as this can make the dough tough.
Once your dough is rolled out to the desired thickness, carefully transfer it to your pie dish. Gently press the dough into the corners of the dish, being careful not to stretch it too much. Trim any excess dough from the edges, leaving a slight overhang to seal the lattice crust.
Now, it’s time to create the lattice pattern. Using a sharp knife or pastry wheel, cut the rolled-out dough into strips of equal width. You can make as many or as few strips as you like, depending on the design you want to create.
To weave the lattice, start by laying half of the strips vertically across the filled pie. Fold back every other strip halfway, then lay a strip horizontally across the unfolded strips. Unfold the folded strips over the horizontal strip, then fold back the strips that were left in place before. Lay another strip horizontally across the unfolded strips, and continue weaving until your lattice is complete.
Once your lattice is woven, trim any excess dough from the edges of the pie dish and crimp the edges to seal the crust. You can also brush the lattice with an egg wash for a golden finish.
With these basics of rolling out your dough mastered, you’ll be well on your way to creating a stunning lattice pie crust. Practice makes perfect, so don’t be afraid to experiment with different designs and techniques. Before you know it, you’ll be weaving magic with your lattice crusts and impressing your friends and family with your baking skills. So grab your rolling pin and get rolling – the world of lattice pie crusts awaits!
Weaving Magic: Creating a Stunning Lattice Design
When it comes to mastering the art of lattice pie crust, creating a stunning lattice design is essential. Not only does a beautifully woven lattice add visual appeal to your pie, but it also allows for the perfect balance of flaky crust and delicious filling. With a few simple tips and tricks, you can weave magic into your lattice design and impress your friends and family with your pie-making skills.
First and foremost, it’s important to start with a well-chilled pie dough. This will make it easier to work with and prevent the dough from becoming too soft and sticky. Once your dough is ready, roll it out into a large circle and carefully transfer it to your pie dish.
Next, it’s time to create the lattice design. Begin by cutting the rolled-out dough into strips using a sharp knife or a pastry wheel. Aim for strips that are around half an inch wide, as this will give you the perfect balance of crust and filling in your pie.
Now comes the fun part – weaving the lattice! Start by laying out half of the strips vertically across the pie, leaving an equal amount of space between each strip. Then, fold back every other strip halfway and lay a strip horizontally across the unfolded strips. Unfold the folded strips over the horizontal strip, then fold back the strips that were left out before. Lay another strip horizontally across the unfolded strips, and continue this process until the lattice is complete.
To really make your lattice design pop, consider creating a braided lattice. Simply braid three strips of dough together before laying them across the pie in a diagonal pattern. This will add a touch of elegance to your pie and impress your guests with your attention to detail.
Another way to elevate your lattice design is to create a twisted lattice. Twist two strips of dough together before laying them across the pie in a crisscross pattern. This will give your pie a unique look and add a bit of flair to your baking repertoire.
Once your lattice design is complete, it’s time to finish off your pie with a final touch. Consider brushing the lattice with an egg wash or sprinkling it with a bit of sugar to give it a golden, crispy finish. You can also add decorative cutouts or shapes to the top of your pie for an extra special touch.
In conclusion, creating a stunning lattice design is all about having fun and getting creative with your pie-making skills. With a well-chilled dough, a bit of patience, and a touch of imagination, you can weave magic into your lattice design and create a pie that is both visually appealing and delicious. So go ahead, get weaving, and impress your friends and family with your lattice pie crust skills!
Butter and Flour: Perfecting Your Pie Dough
When it comes to mastering the art of lattice pie crust, one of the most important elements is the dough itself. A perfect lattice pie crust starts with a buttery, flaky dough that serves as the foundation for the entire dessert. In this step-by-step guide, we will dive into the details of creating the perfect pie dough that will elevate your lattice pie to a whole new level.
To start off, let’s talk about the key ingredients for a successful pie dough: butter and flour. These two ingredients are the building blocks of any pie crust, and getting them right is crucial for a delicious end result. When it comes to choosing the right butter, opt for unsalted butter for better control over the salt content in your dough. Make sure your butter is cold before incorporating it into the flour mixture, as this will help create a flaky texture in the crust.
The flour you use is equally important in creating the perfect pie dough. All-purpose flour is the most commonly used type of flour for pie crusts, as it strikes a good balance between tenderness and structure. When measuring your flour, make sure to spoon it into the measuring cup and level it off with a knife, rather than packing it down. This will ensure that you don’t end up with too much flour in your dough, which can lead to a tough crust.
Once you have your butter and flour ready, it’s time to bring them together to create the perfect pie dough. Start by combining the flour and salt in a large mixing bowl, then add the cold butter that has been cut into small cubes. Using a pastry cutter or your fingertips, work the butter into the flour until it resembles coarse crumbs with pea-sized pieces of butter scattered throughout. This step is crucial for creating a flaky texture in the crust, as the butter will melt during baking and create steam pockets that result in a light and airy crust.
After you’ve achieved the right texture with the butter and flour mixture, it’s time to add the liquid component to bring the dough together. Ice water is the most common liquid used in pie dough, as it helps keep the butter cold and prevents it from melting too quickly. Start by adding a few tablespoons of ice water to the dough mixture, then gently knead it together until it forms a cohesive dough. Be careful not to overwork the dough, as this can lead to a tough crust.
Once your pie dough is ready, it’s time to shape it into a round disc and chill it in the refrigerator for at least 30 minutes. This rest period allows the gluten in the flour to relax and the butter to firm up, which will make the dough easier to roll out and shape into a lattice. When you’re ready to assemble your lattice pie crust, take the chilled dough out of the refrigerator and roll it out on a floured surface to the desired thickness.
With your perfect pie dough ready to go, you’re well on your way to mastering the art of lattice pie crust. The butter and flour are the foundation of a delicious and flaky crust, and getting them right is key to creating a show-stopping dessert. So next time you’re in the mood for a Homemade pie, be sure to pay attention to the details of your pie dough – your taste buds will thank you!
Bake to Perfection: Tips for a Golden, Flaky Crust
When it comes to mastering the art of lattice pie crust, one of the most important elements to perfect is the crust itself. A golden, flaky crust is the ultimate goal for any pie baker, and here are some tips to help you achieve just that.
1. Use Cold Ingredients: One of the key secrets to a flaky crust is keeping your ingredients cold. This means using cold butter, cold water, and even chilling your flour before mixing it all together. When the cold butter hits the hot oven, it creates steam which helps to create those beautiful flaky layers in your crust.
2. Don’t Overwork the Dough: It can be tempting to keep kneading and rolling your dough until it’s perfectly smooth, but this can actually lead to a tough crust. Be gentle with your dough and stop as soon as it comes together. Overworking the dough can also lead to gluten development, which can make your crust chewy instead of flaky.
3. Chill the Dough: After you’ve made your dough, be sure to chill it in the refrigerator for at least 30 minutes before rolling it out. This helps to relax the gluten in the dough and makes it easier to roll out. Chilled dough also helps to keep the butter cold, which is crucial for a flaky crust.
4. Use the Right Flour: Not all flours are created equal when it comes to pie crust. Look for a flour with a higher protein content, like all-purpose flour, which will help to create a sturdy crust that holds up to the weight of the filling. Avoid using cake or pastry flour, as these are too delicate for a pie crust.
5. Roll Out Your Dough: When rolling out your dough, be sure to do so on a floured surface to prevent sticking. Roll the dough in one direction, turning it occasionally to ensure an even thickness. Aim for a thickness of about 1/8 of an inch for the perfect balance of flakiness and structure.
6. Preheat Your Oven: A hot oven is key to achieving a golden, flaky crust. Preheat your oven to the temperature specified in your pie Recipes-ideas/’>Recipe and be sure to let it come to temperature before putting your pie in. This ensures that the crust will bake evenly and develop that beautiful golden color.
7. Use an Egg Wash: For an extra shiny, golden crust, consider brushing your pie with an egg wash before baking. Simply whisk together an egg yolk with a little water and brush it over the top of your crust before putting it in the oven. This will give your pie that professional-looking finish.
8. Vent Your Pie: To prevent your pie from becoming soggy, be sure to vent it properly before baking. You can do this by cutting slits in the top crust, or by using a lattice design which allows steam to escape as the pie bakes. This helps to prevent a soggy bottom crust and ensures that your pie bakes evenly.
By following these tips and techniques, you’ll be well on your way to baking the perfect golden, flaky crust for your lattice pie. Remember to have fun with the process and don’t be afraid to experiment with different techniques to find what works best for you. Happy baking!
how to lattice pie crust


